How do you “torture” your children without even meaning to?? You let them pick their fabrics and patterns for their first Mom made swim suits. Then you sew them, but only half of each set, because you have to change the thread color in your machines, for the second half. And they see their amazing first half, waiting, every time they walk by. 🤣
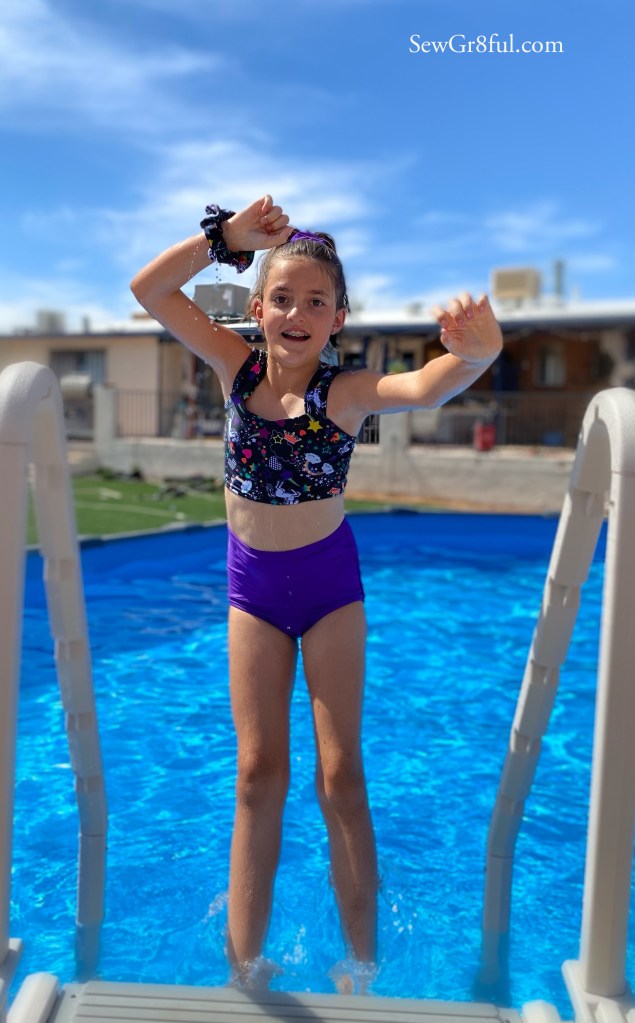
“Torture” aside, my kids both love their new suits and have been wearing them almost daily to swim, since they were done. I shared earlier this week about my Son’s suit, you can read about it here.
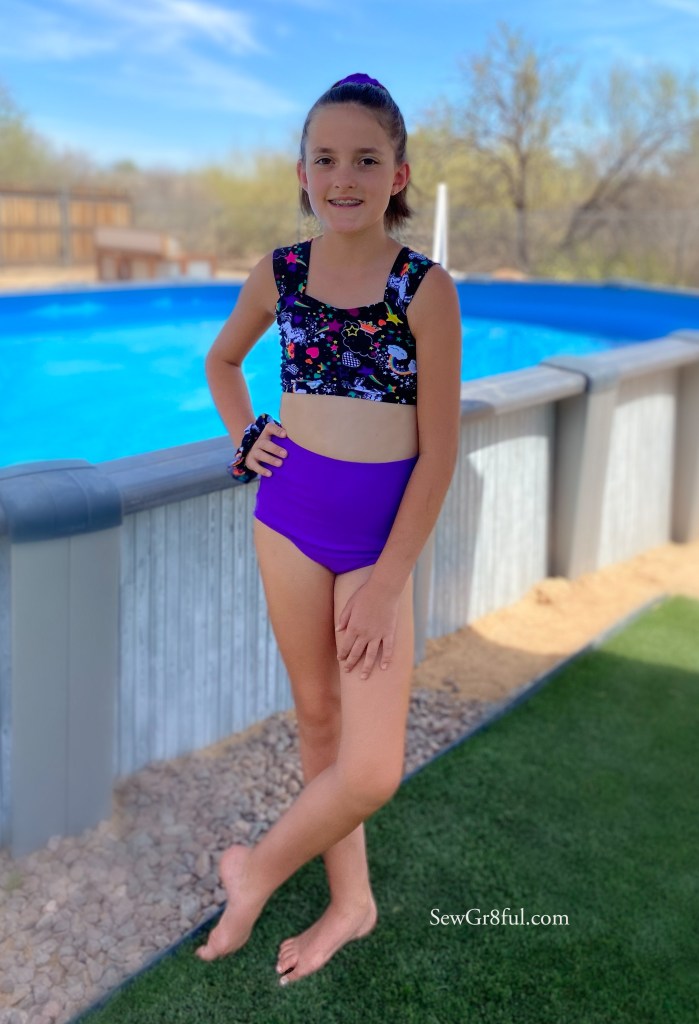
My daughter took a little longer to find the suit pattern she wanted, she kept changing her mind on one piece or two, one strap or two, etc. etc. One thing she was adamant about though, was that there be no ruffles, and she didn’t want any “extras”. When she first saw the Roxy from Made For Mermaids, she wasn’t a fan because the rouching on the bottom, belt, and peplum type skirt on the top. But once she saw the line drawings and realized that they were optional, she was sold.
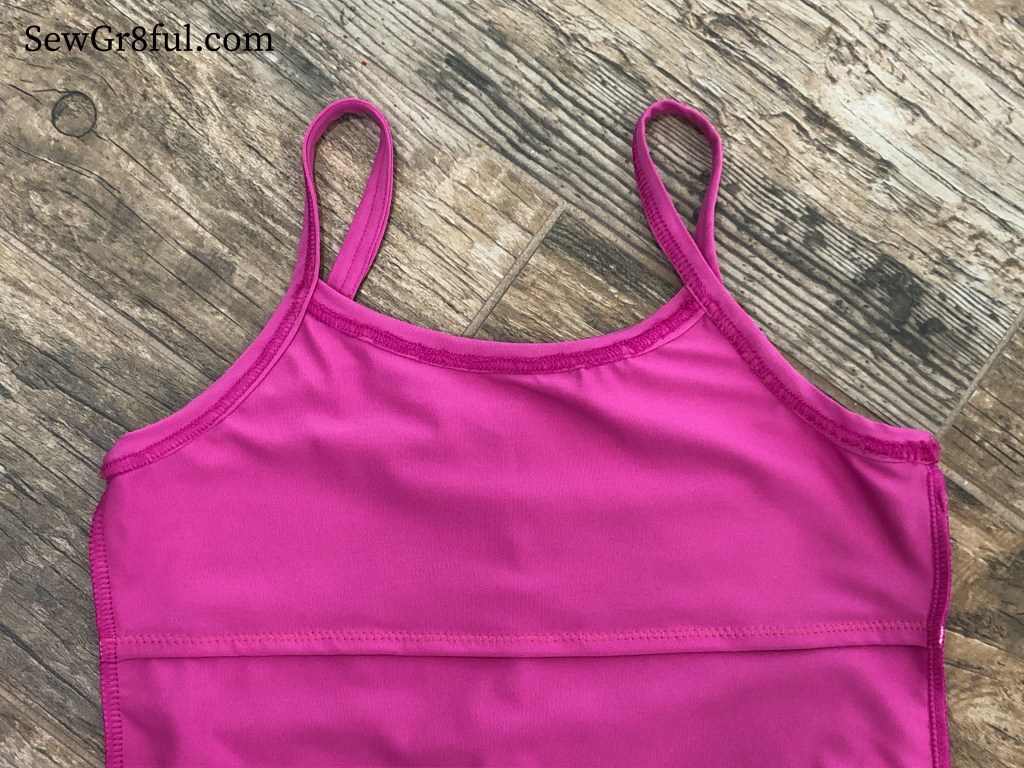
She picked the plain bottoms and the plain bikini top. While it is labeled as plain, it is anything but. The top has a really flattering sweetheart neckline with cute straps that are wider and slightly gathered at the bodice.
Fabric shopping for her was really fast. She saw the Unicorns and Rainbows and was done. She saw the two coordinating options and immediately chose the Plumtastic Kira to go with. Both these fabrics have a matte look, which she particularly likes, and UPF 50+, which I love!
The quality of these two fabrics was really nice. They weren’t super slick, had a nice weight to them, and they sewed up really well. We even had enough left over after her suit, to make two matching scrunchies. Now she can match and have her hair up when in the pool.
I was really surprised with how simple sewing these swim suits actually was. I really enjoyed the process and they both keep telling me how much they like them.
April has been a really busy month for our family with birthdays, events, schooling, and the home renovation we are doing. Because of it all, my sewing time has been little snatches of 15 minutes to an hour, here and there. As someone who hates incomplete projects and being in the middle of multiple projects at the same time, it’s been a source of annoyance and I have had to get really creative with fitting things in.
I missed out on testing a new pattern from Made for Mermaids, but knew I wanted to purchase it as soon as it released, and then I fell in love with a new pattern from Pattern Emporium and had to add it to my list. Since I knew these were both patterns I wanted to make right away, I ordered fabric for them and slowly worked on them both, at the same time. You can read about my first Pattern Emporium experience here.
The Made for Mermaids Siena is almost the exact skirt I pinned a bunch of times on Pinterest and as a woven pattern, I knew it would still be comfy to wear even with our rising temperatures.
The Siena has 6 different hemlines ( mini, knee, high-low in both above the knee or below the knee, midi, and maxi length), each with different tier amounts, plus the option to sew the tier seams with an enclosed or exposed raw edge. There are two different elastic waistband options, with three different elastic configurations, and an optional faux tie.
For this one I did the full maxi length with enclosed tier seams, and the basic elastic waistband, with one piece of wider elastic. I’m feeling very boho and crazy comfortable in this skirt.
For my height I added 2″ total to the skirt, adding 1/2″ to each of the four tiers, to keep it even. Once I got to the hem, I realized the length was almost exact for where I like to wear maxis at, and I decided to finish it with a rolled hem.
I love rolled hems, so fast, so clean, and such a fun little detail!
I like that I can wear this with my most worn Hey June Handmade, Union St. Tee, tied up, or this tank tied up or tucked in, and get a few different looks. I think the tied up tee is my favorite though. Which is your favorite top?
This post may contain affiliate links. This means if you make a purchase through that link, I may get a % back, at no additional cost to you.Thank you for supporting my sewing 💕
*** This was scheduled to post months ago, due to some error, it never went live. So please excuse the delay and inaccurate dates. ***
If you read my last blog post, you heard me talk about how my daughter is constantly growing. Well, as she is getting older, she is requesting different clothing and her needs are starting to change. When we had a recent talk about some new clothing she was feeling she needed, I had these horrid flash backs to my first shopping trips. I decided right then and there that I would try and sew her whatever I could and make things as comfortable for her as I possibly could.
I’ve never done anything like this and I didn’t have time to do my usual research, since we had an upcoming trip scheduled, so I just winged it. Of course, my machines all acted up, and I was far from happy with the results, but she loves the fit and the fabric and couldn’t care less about the funky, messed up stitching. Just look at this stitching 😂
To keep it simple, I measured down on her body, how far we wanted the extra front layer to sit, then did the exact shape of the front bodice piece, just at that shorter length, for her “shelf bra”. It ended up being about 3″ down from the armscyse.
I used some 1/4″ soft knit elastic, just a little shorter than the width of the bodice, and zig zag stitched it to the bottom of the “shelf bra” layer. Then I folded that raw edge up and when I serged up the shirt sides, I tucked the sides of the shelf bra layer in, to secure the fold. Since it’s folded up, the unfinished raw edge is against the bodice and she has a smooth comfy finish against her skin.
Once I had the shelf bra layer, serged into the side seam with the front and back bodice, I just treated it as one piece with the front bodice and added the neck and arm binding per the pattern directions.
She absolutely loves it and practically lived in it the entire week we were camping recently. This fabric is amazingly comfortable and the moisture wicking properties are perfect for our weather. She fell in love with the fabric base when her Dad and Brother got a bunch of new shirts from other color ways (you can read about their shirts here). I’m thinking I need to rectify the fact that I’m the only one that doesn’t have a shirt in this fabric 😂
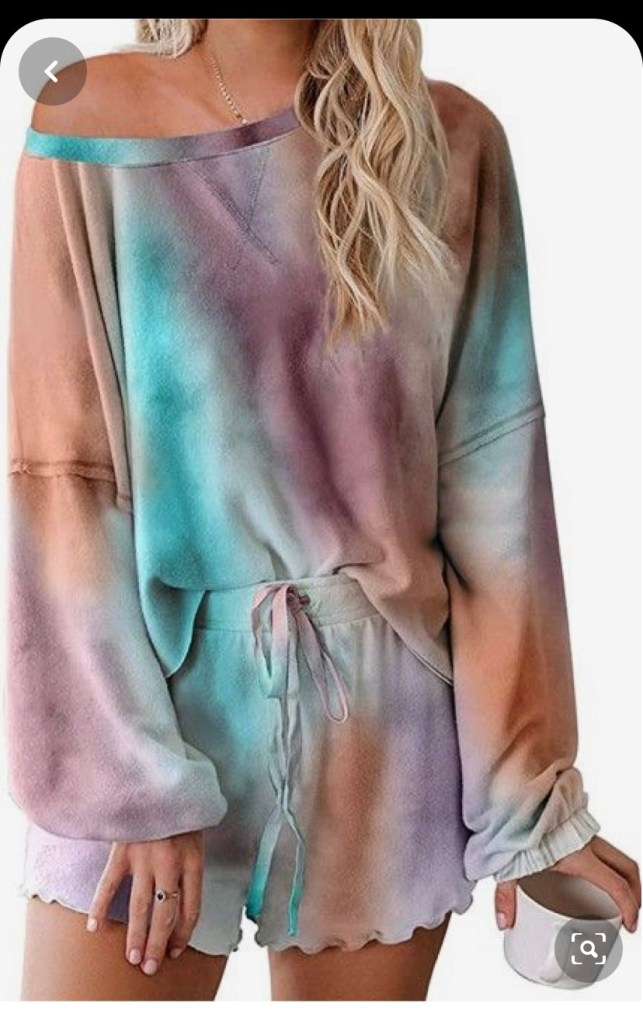
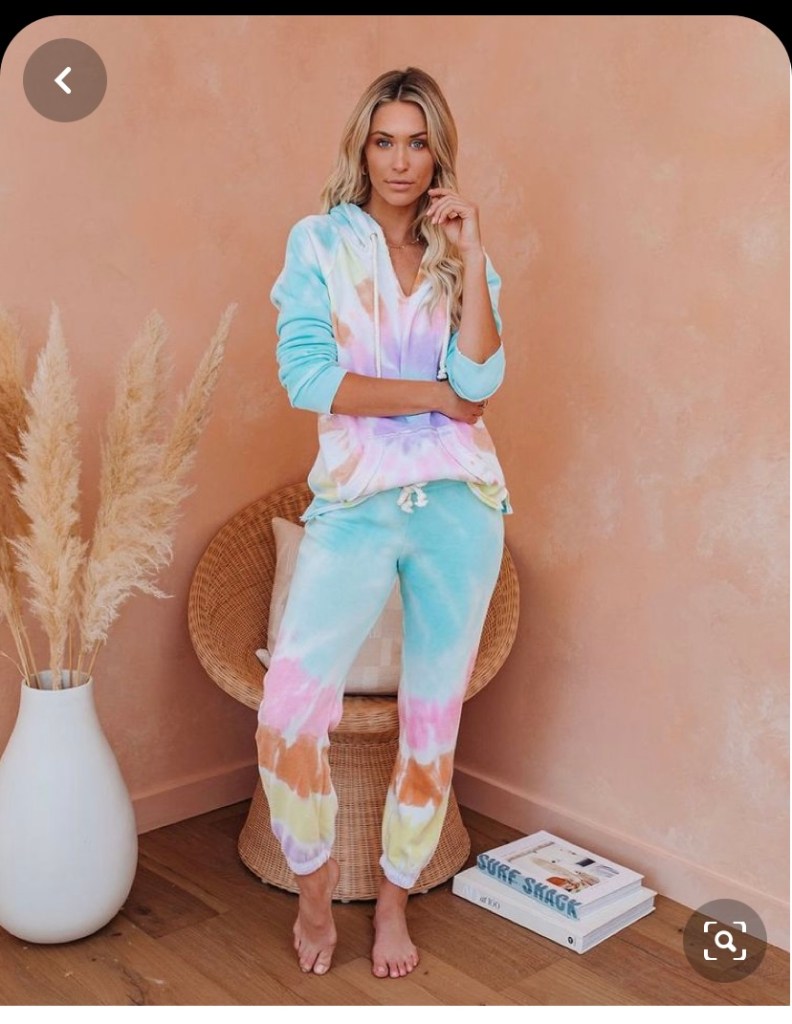
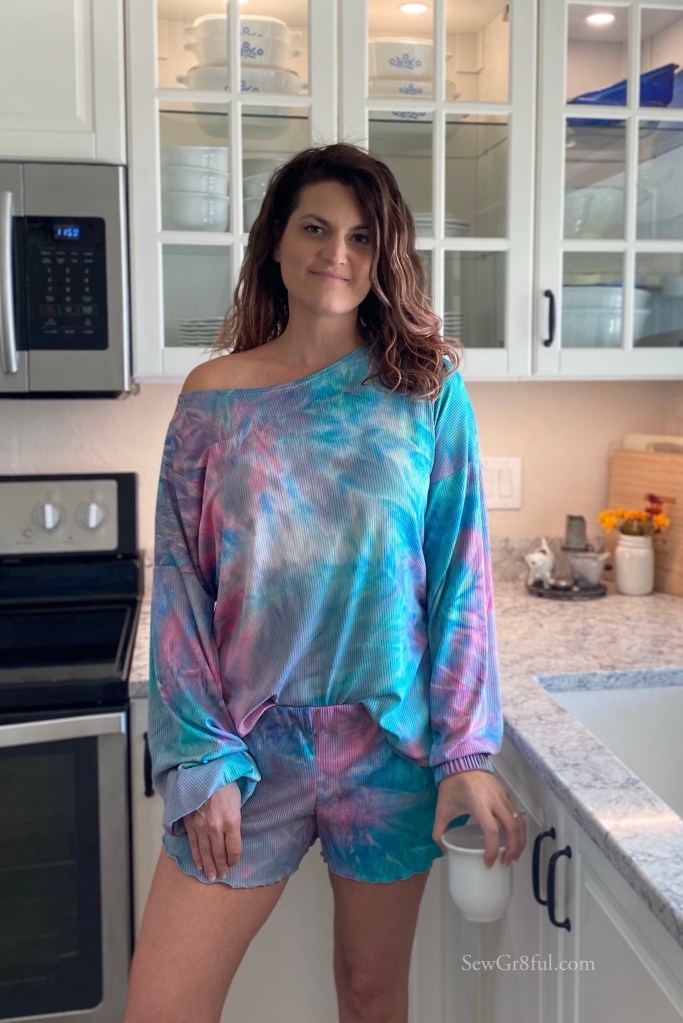
I have been wanting to sew something relaxed and comfy for a while. Something I could wear during the day that felt like pjs, but not my actual pjs. Something that I could put on in the mornings and pretend I was well rested and get my day off to a good start. So I started to formulate some ideas in my head and then went searching my friend, Pinterest. You all know I love to find pictures of what I’m thinking, and save them in my idea board to come back to later, if I forget what I had in mind. Fortunately for me, lounge sets are all the rage and it was a quick search to find what I envisioned.
Images from WeWeLily & VICI
Our current weather is still hovering around 100 during the day, but 60-70 in the mornings, and my body has been acting up so my temps are uncontrollable. Naturally that meant I needed two options 😂 a shorts set and a pants set. Then the fabric searching began. I fell in love with three tie dye prints from Fabmere Fabrics. I know!! Three tie dyes?? This from the girl that hasn’t really liked tie dye?? But these colors and the print pattern is not the normal swirl and I love them! With some difficulty I was able to slim it down to two, another reason for two lounge sets.
I used this rib and it feels so luxurious and I can’t get over how pretty these colors are! It has the absolute perfect drape for the bishop sleeves. I made a few mods to the patterns to get the look I wanted, but they were relatively simple. For the shorts, I sized down one, since the pattern was designed for woven and I used a knit. Then for the curved hem, I used a narrow three thread stitch on my serger, and gently pulled the fabric while serging, to give it a slight lettuce hem.
On the Rebekah, I went with the boatneck, curved hem shirt length, sized up one for more slouch. The pattern already has bishop sleeves, but since I wanted it elastic instead of cuffed, I needed to make a modification to the sleeve. I wanted to keep the width at the wrist as the pattern was drafted, so I cut the sleeve in half and added 5.25″. The 5.25 is 1″ for my normal sleeve addition, 3″ for the cuff we are not using, and 1.25″ for the elastic casing. I used 1″ elastic and to pick my length, I measured my wrist and added 3″. I overlapped the elastic ends 1/2″ which made my finished wrist elastic 8″. I wanted it loose enough to pull up, but not loose enough to slip over my hands.
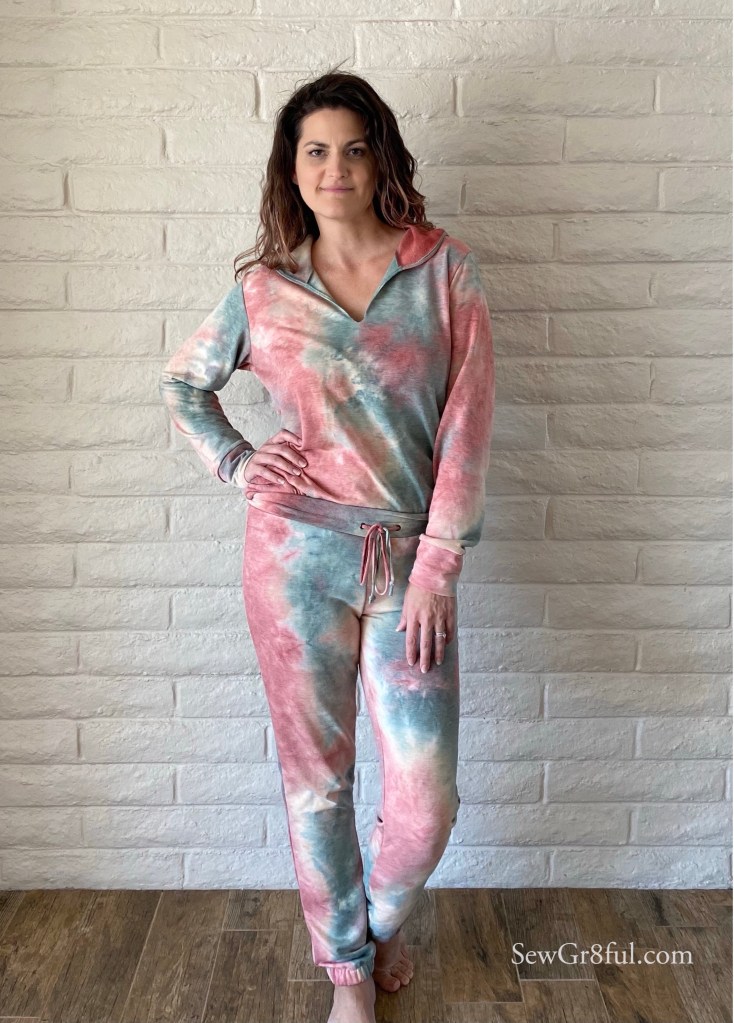
For the pants set, I used this brushed French Terry. It is really soft and cozy and will be perfect when I’m feeling chilled. For the pants I used the Greenstyle Creations Brassie Joggers. The mods I made for it were to omit the waist elastic and pockets, and change the ankle cuff to elastic. To omit the pockets, I just lined up the pocket piece with the front pants piece, and taped it together to make the front a full piece.
Then for the cuff to elastic change, I used the 32″ inseam length vs the cuff length, and rolled them up 1.25″ to make my elastic casing. I used 1″ elastic and for the length I did 12″. My ankle measures 8.5″ and I wanted to be able to pull them up to my calf, which is a bit larger so I added 3.5″ extra and did a 1/2″ overlap to secure.
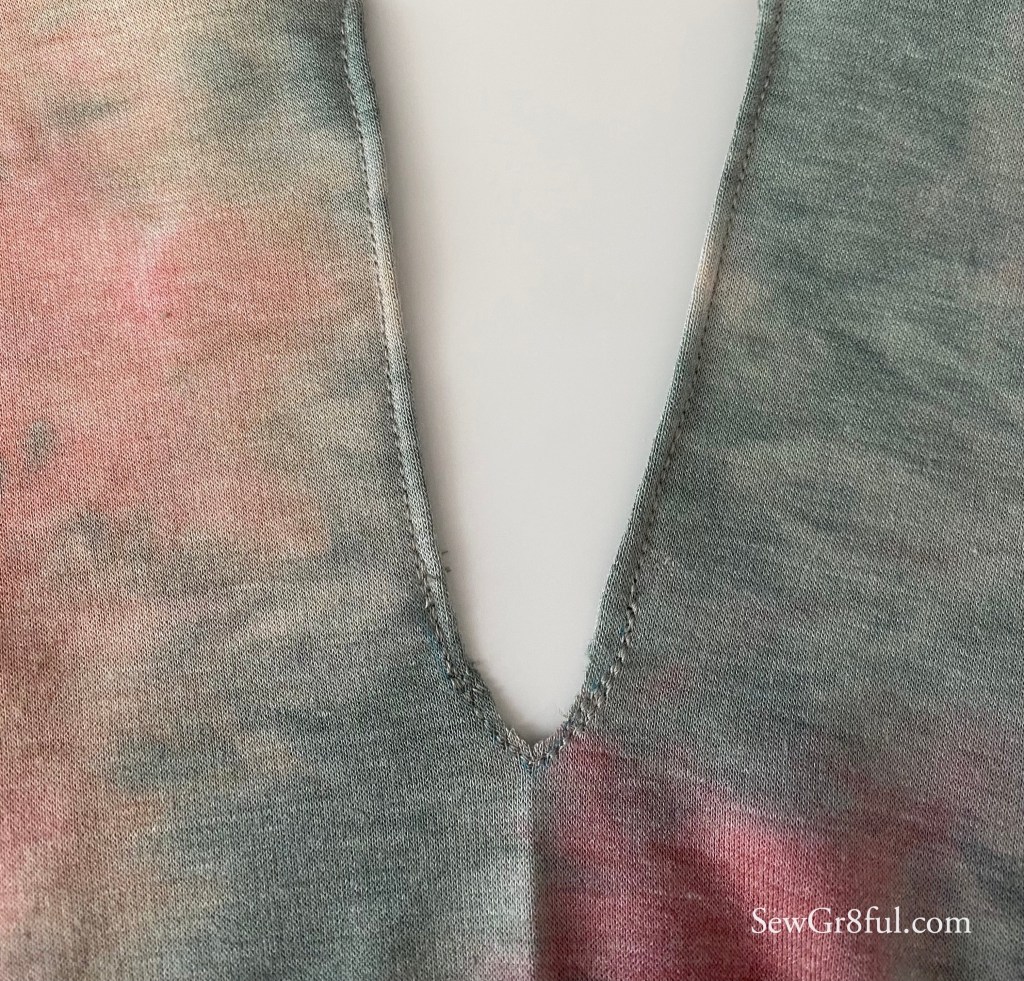
The top for my pants set took me a little longer since I messed up and then my machine ended up eating it, so I had to fudge it a little. I really wanted a hooded V neck, but almost every v neck I came across had a band and it wasn’t the look I was going for, so I chose to use the Hannah from Sonia Estep Designs, sized up one. It has a hood option and a quarter zip, so I decided to use that as my base, and just omit the zipper.
The hood is lined, but I really wanted the brushed texture of the French Terry to be exposed so I omitted the hood lining as well. Which actually helped with the v neck and skipped zipper since I planned to serge up one side, around the hood, and back down to the other side. Then turn the serged edge under and topstitch. When I serged up and around, I cut off the triangle point, where the top of the zipper would have been, and made it more of a curved edge from the neckline to the hood.
This is where things got messy though 😂. The pattern has you cut down from the neckline and make a triangle, which allows for a perfect rectangle shape to insert your zipper. I wasn’t paying attention to the rectangle shape not being a V shape I wanted, until after I had already serged, turned, and topstitched, the entire hood and almost full neckline.
As I was about to finish the topstitching, I looked at it and went, oh *%*%*%*. So then I tried to fix it and my machine ate it and there was some more *%*%*%*. My husband suggested I take a break at that point, which I ignored (not stubborn), and I sat there for 30 minutes mulling over ideas. After all that, I couldn’t see any way around it, so I grabbed my pen and started drawing. I drew the V shape I wanted, blended into the neckline I already had. Then I topstitched my pen markings and into the current topstitch. Grabbed my scissors and cut out the extra fabric, just short of the sorta V shape stitching. Fortunately it is a relaxed look and knit doesn’t fray so it actually works, even if it’s not the prettiest stitching or V shape, I’ve ever done.
After I finished sewing these all up, I realized that both the Brassie Joggers and Mama Lucy have been updated since I purchased them, and now I want to make more pairs to try out the updated versions, although, I like the fit I have, so maybe I won’t mess with it, maybe.
This post may contain affiliate links. This means if you make a purchase through that link, I may get a % back, at no additional cost to you.
If you read my last post, it was about my son’s clothing list he “needed”. My daughter’s list was a little more conservative in its length, but now that I have completed it, she seems to need additional things. I kind of feel like she is playing me. Oh, just make a few things Mom. Oh, would you look at that, guess I need this now and ohh what about that?? Hey Mom, what is that fabric for? Oh do you think you could make me something in it too?? Oh Mom, that is so soft, it’s like your hugs… Okay, I made that last one up. You get the point though. She loves my makes and that is such an awesome feeling.
My kids love the fabric options from So Sew English almost as much as I do, so when she was making her list, she asked if she could shop for fabric on their site. She made her list, complete with fabric choices, and this is what she picked.
First up is this super fun Lilac Unicorn print Double Brushed Poly. Not only does it have unicorns all over, but it also has the foil stars. I tried so hard to get good pictures of the stars, and just couldn’t quite get it. She wanted a shirt to wear with leggings and jeans, but requested something a little different than what we had done before. I showed her the patterns I had already but hadn’t made for her yet, and she picked the Spice Cake Dolman from Pattern for Pirates.
The Spice Cake is the girls version of their Pumpkin Spice Dolman for women, which just so happened to be one of the first tops I made myself. The pattern can be made with a short sleeve, 3/4 sleeve, or a long sleeve. You can choose a straight shirt length, curved tunic length, or a banded option with short or tall bands. For her unicorn shirt, she picked the long sleeve, curved hem tunic length.
After my last time lapse, I had a few questions regarding the clipping I did to my seams when hemming. You can see it at about 1:32 in this current time lapse. Since I took my coverstitch out of time out and have been giving it another chance, I have found that I get less skipped stitches, if I clip into my seam allowance, and split my hems opposite directions. I do not clip all the way through, just up to the left needle thread. This also helps when I am hemming sleeves or pants, as it allows me fold at exactly the right amount. One other note about this time lapse. I usually iron my curved hems while I am folding them. I just did a finger press on this one, since my iron was out of commission. Ironing before stitching is definitely something I don’t like to skip, especially when doing curved hems.
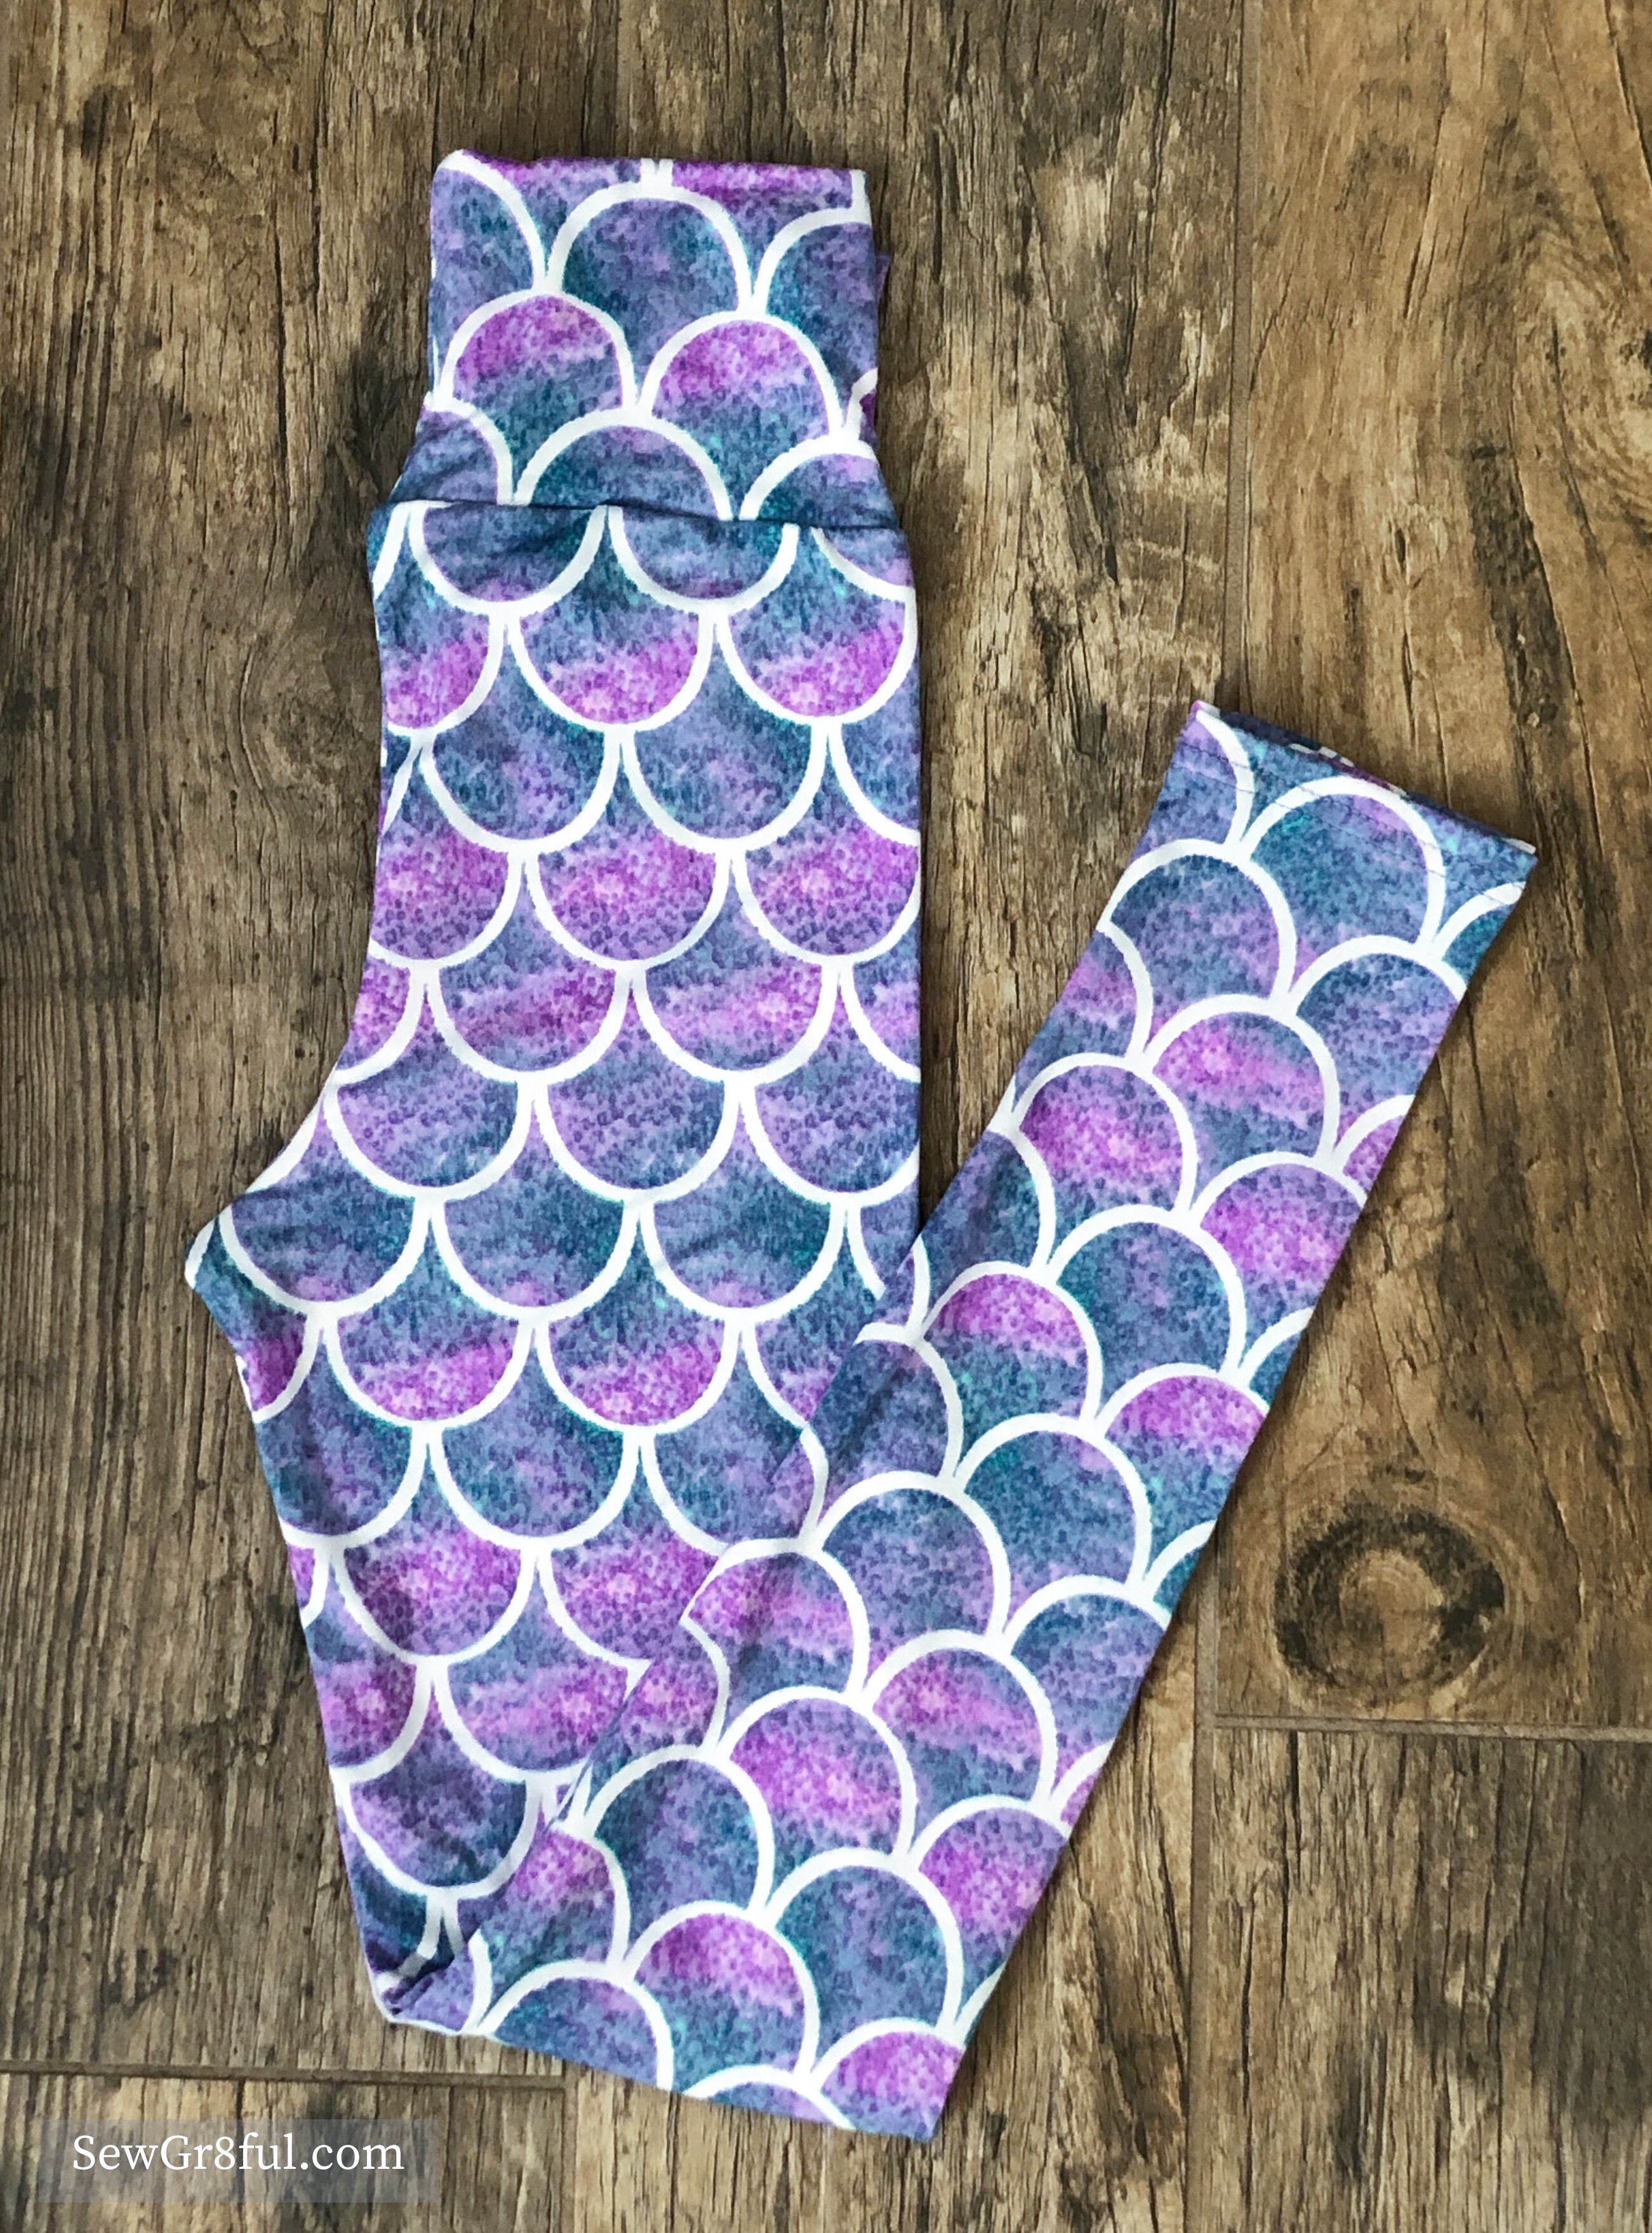
To finish off her “first” list, she asked for two new pairs of leggings. She wanted something really colorful with lots of pattern, that she could wear with solid tops. She picked the Navy “knit print” double brushed poly for this pair.
And for the second pair she picked this pretty Lilac scales print double brushed poly. The lilac dbp is only available in a bundle now, but there are some colorways of the French Terry scales, in yardage.
For both pairs of leggings we used the Bonny leggings from Made for Mermaids. This is a pattern we have been using for her for a while, and she just loves how they fit. The pattern is free, has several length options, and also comes with a skirt, which she loves as well.
I should have known her list was going to grow, once I found the piles of clothing they hid when making their need lists. Guess I should start working on those “extras” soon. Although, I do have a few things on my “need” list, so maybe they will be next. 😂
This post may contain affiliate links. This means, if you make a purchase through that link, I may get a % back, at no additional cost to you. Let’s be honest, we all know it goes right back to adding to my fabric stash. All opinions on this blog are my own.
When I sew, I usually try to make complete outfits or separates that I can add to my current wardrobe. I see it as a way to freshen up my wardrobe or allow it to transition into another season without too much effort. I have never made a full capsule, unless you count my, “I’m going on vacation and need new clothes”, as a capsule.
When So Sew English Fabrics hosted a Spring Capsule Challenge last month, the idea appealed to me but I decided to skip it since I already had my sewing list for the month. If you are a list maker like me, you know how it is always longer than the time we have to sew.
Then, when I was scrolling facebook one afternoon, my daughter was reading over my shoulder and piped up with, “Ohhh a capsule wardrobe? That sounds like fun! Mom, can you do one for me? My clothes don’t fit.” Off we went to shop the site and see what she could put together. I let her pick her fabric, patterns, and how she was going to wear them together. The rules were that you had to make 6 items, one of which needed to be a bottom (pants, skirt, shorts, etc). This is what she picked.
The fabric arrived. life happened , my health struggled, and the fabric sat. In a pretty, cordinated, freshly washed and folded pile, it sat. Just when I was getting caught up, my machines started acting up. But finally, it happened, her capsule was done, and only a month after the challenge. 😆
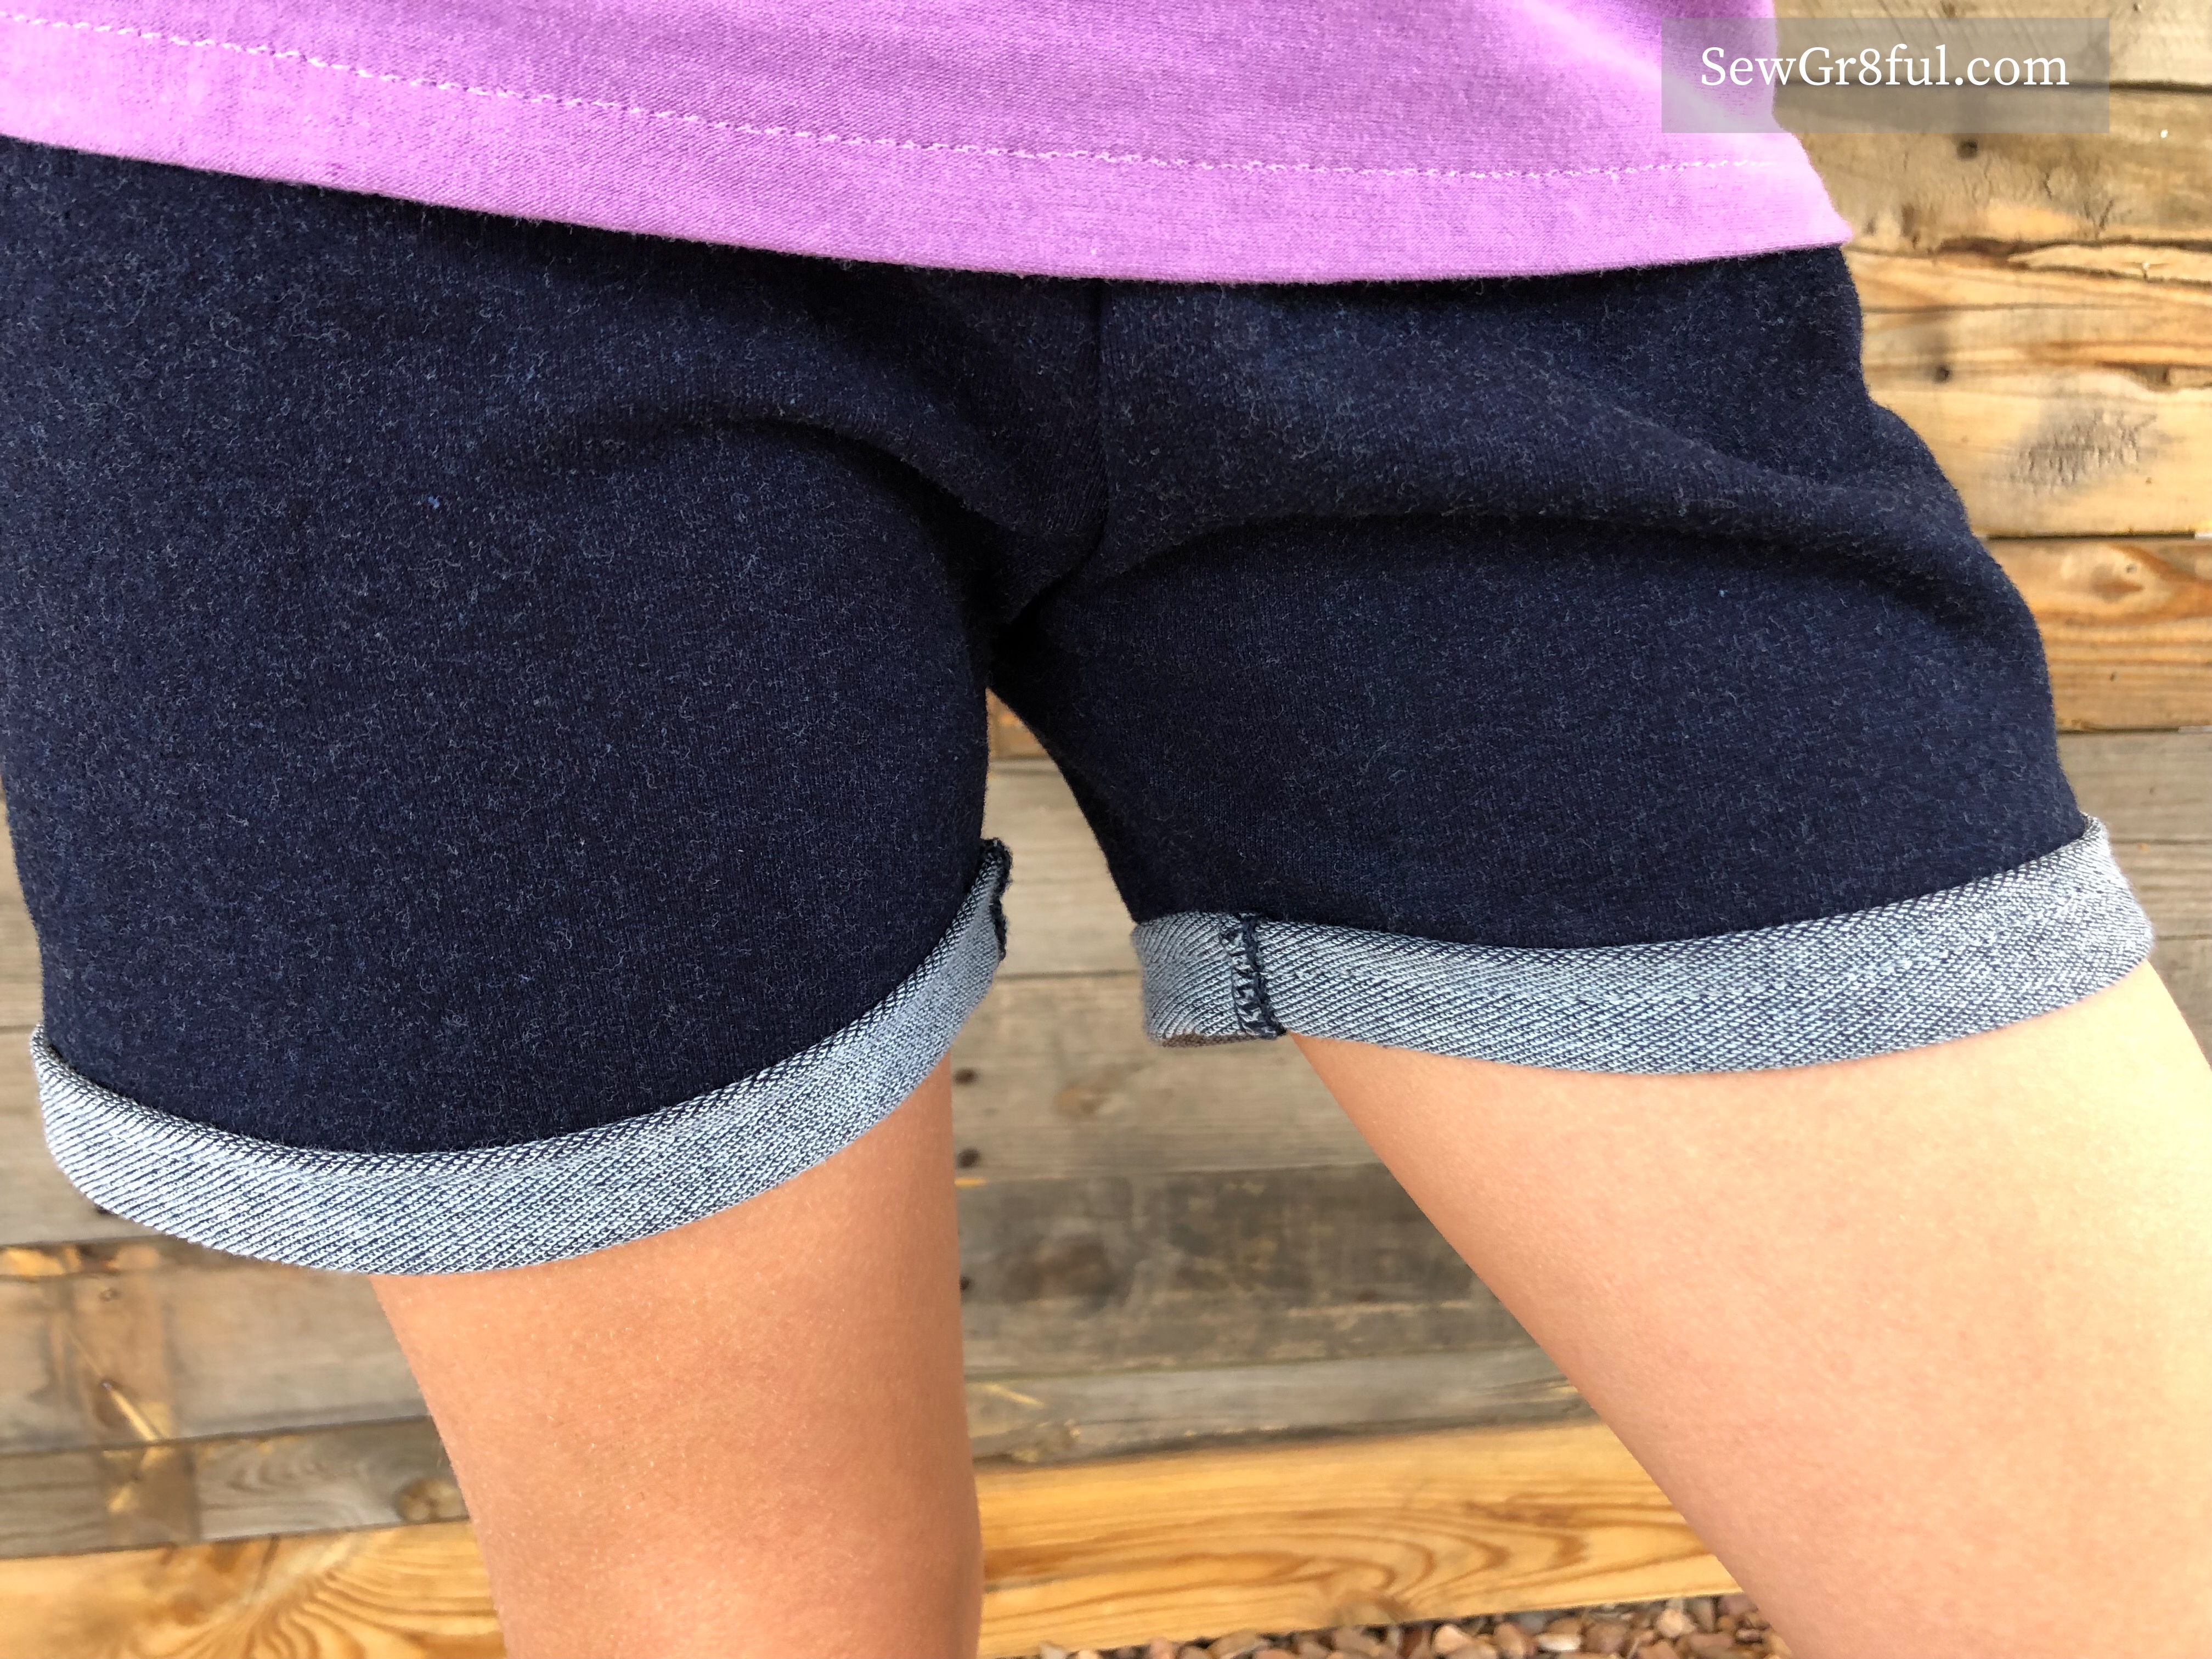
She didn’t have any comfy shorts so she chose two pairs for her capsule. I used the same free pattern for both, The Ginger Shorties from Sew Like My Mom. This was our first time using one of their patterns and it sewed up quickly. She wanted a rolled hem look, so that was a slight modification to the pattern, otherwise we did it as written.
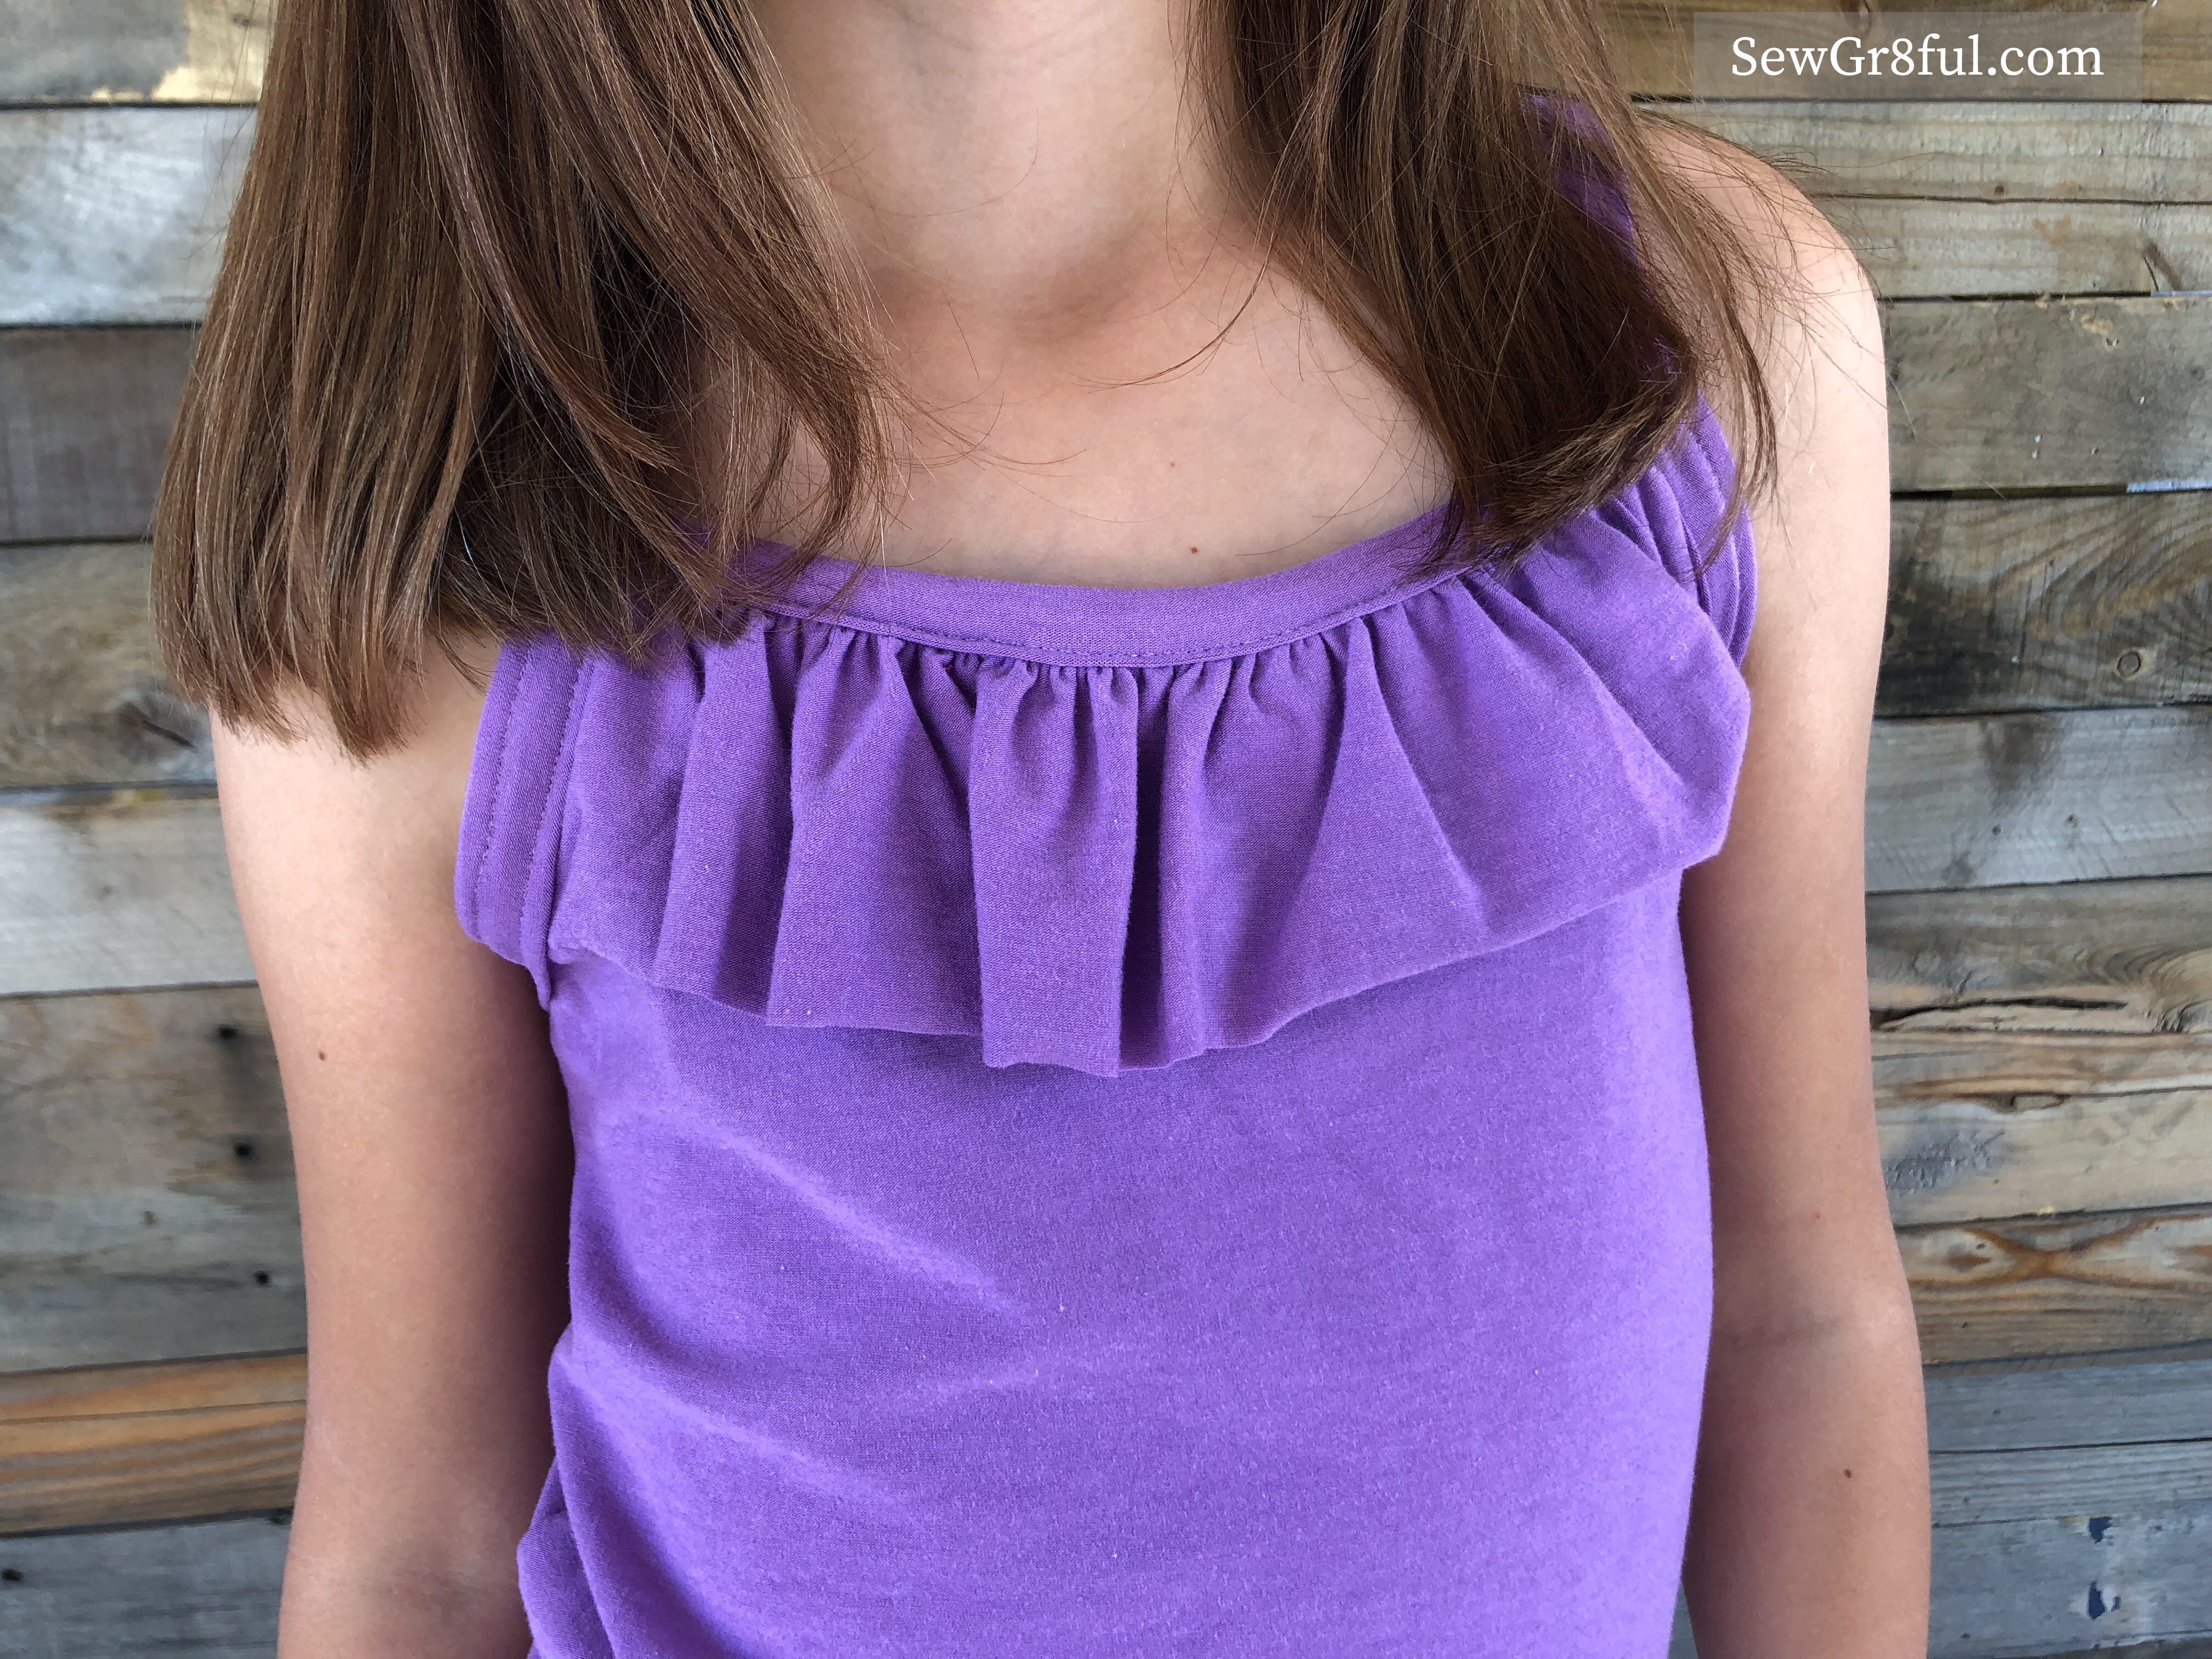
For this first pair we used cotton spandex heavy french terry, the same I used for my leggings in this post. This fabric is no longer in stock, but there is another that is equally amazing still available. She paired it with the Patterns for Pirates heart breaker cami, in lavender cotton modal spandex. The heartbreaker cami has a few different strap and ruffle options as well as different lengths. There is even a matching adult version. This fabric was super easy to sew up and with the cotton content it will be a great top for summer.
She really loves the addition of the front ruffle and how it took a simple tank to a dressier look. Pssst, it was super simple to do too.
For the second shirt she picked lilac cassidy venezia ITY. This is her first shirt from ITY and she kept talking about how smooth and cool it felt, ha ha ha. Yes dear, that’s why I like it so much. We used the Kaitlyn tank from CKC Patterns. This is a repeat pattern for us both, and this newest one didn’t disappoint.
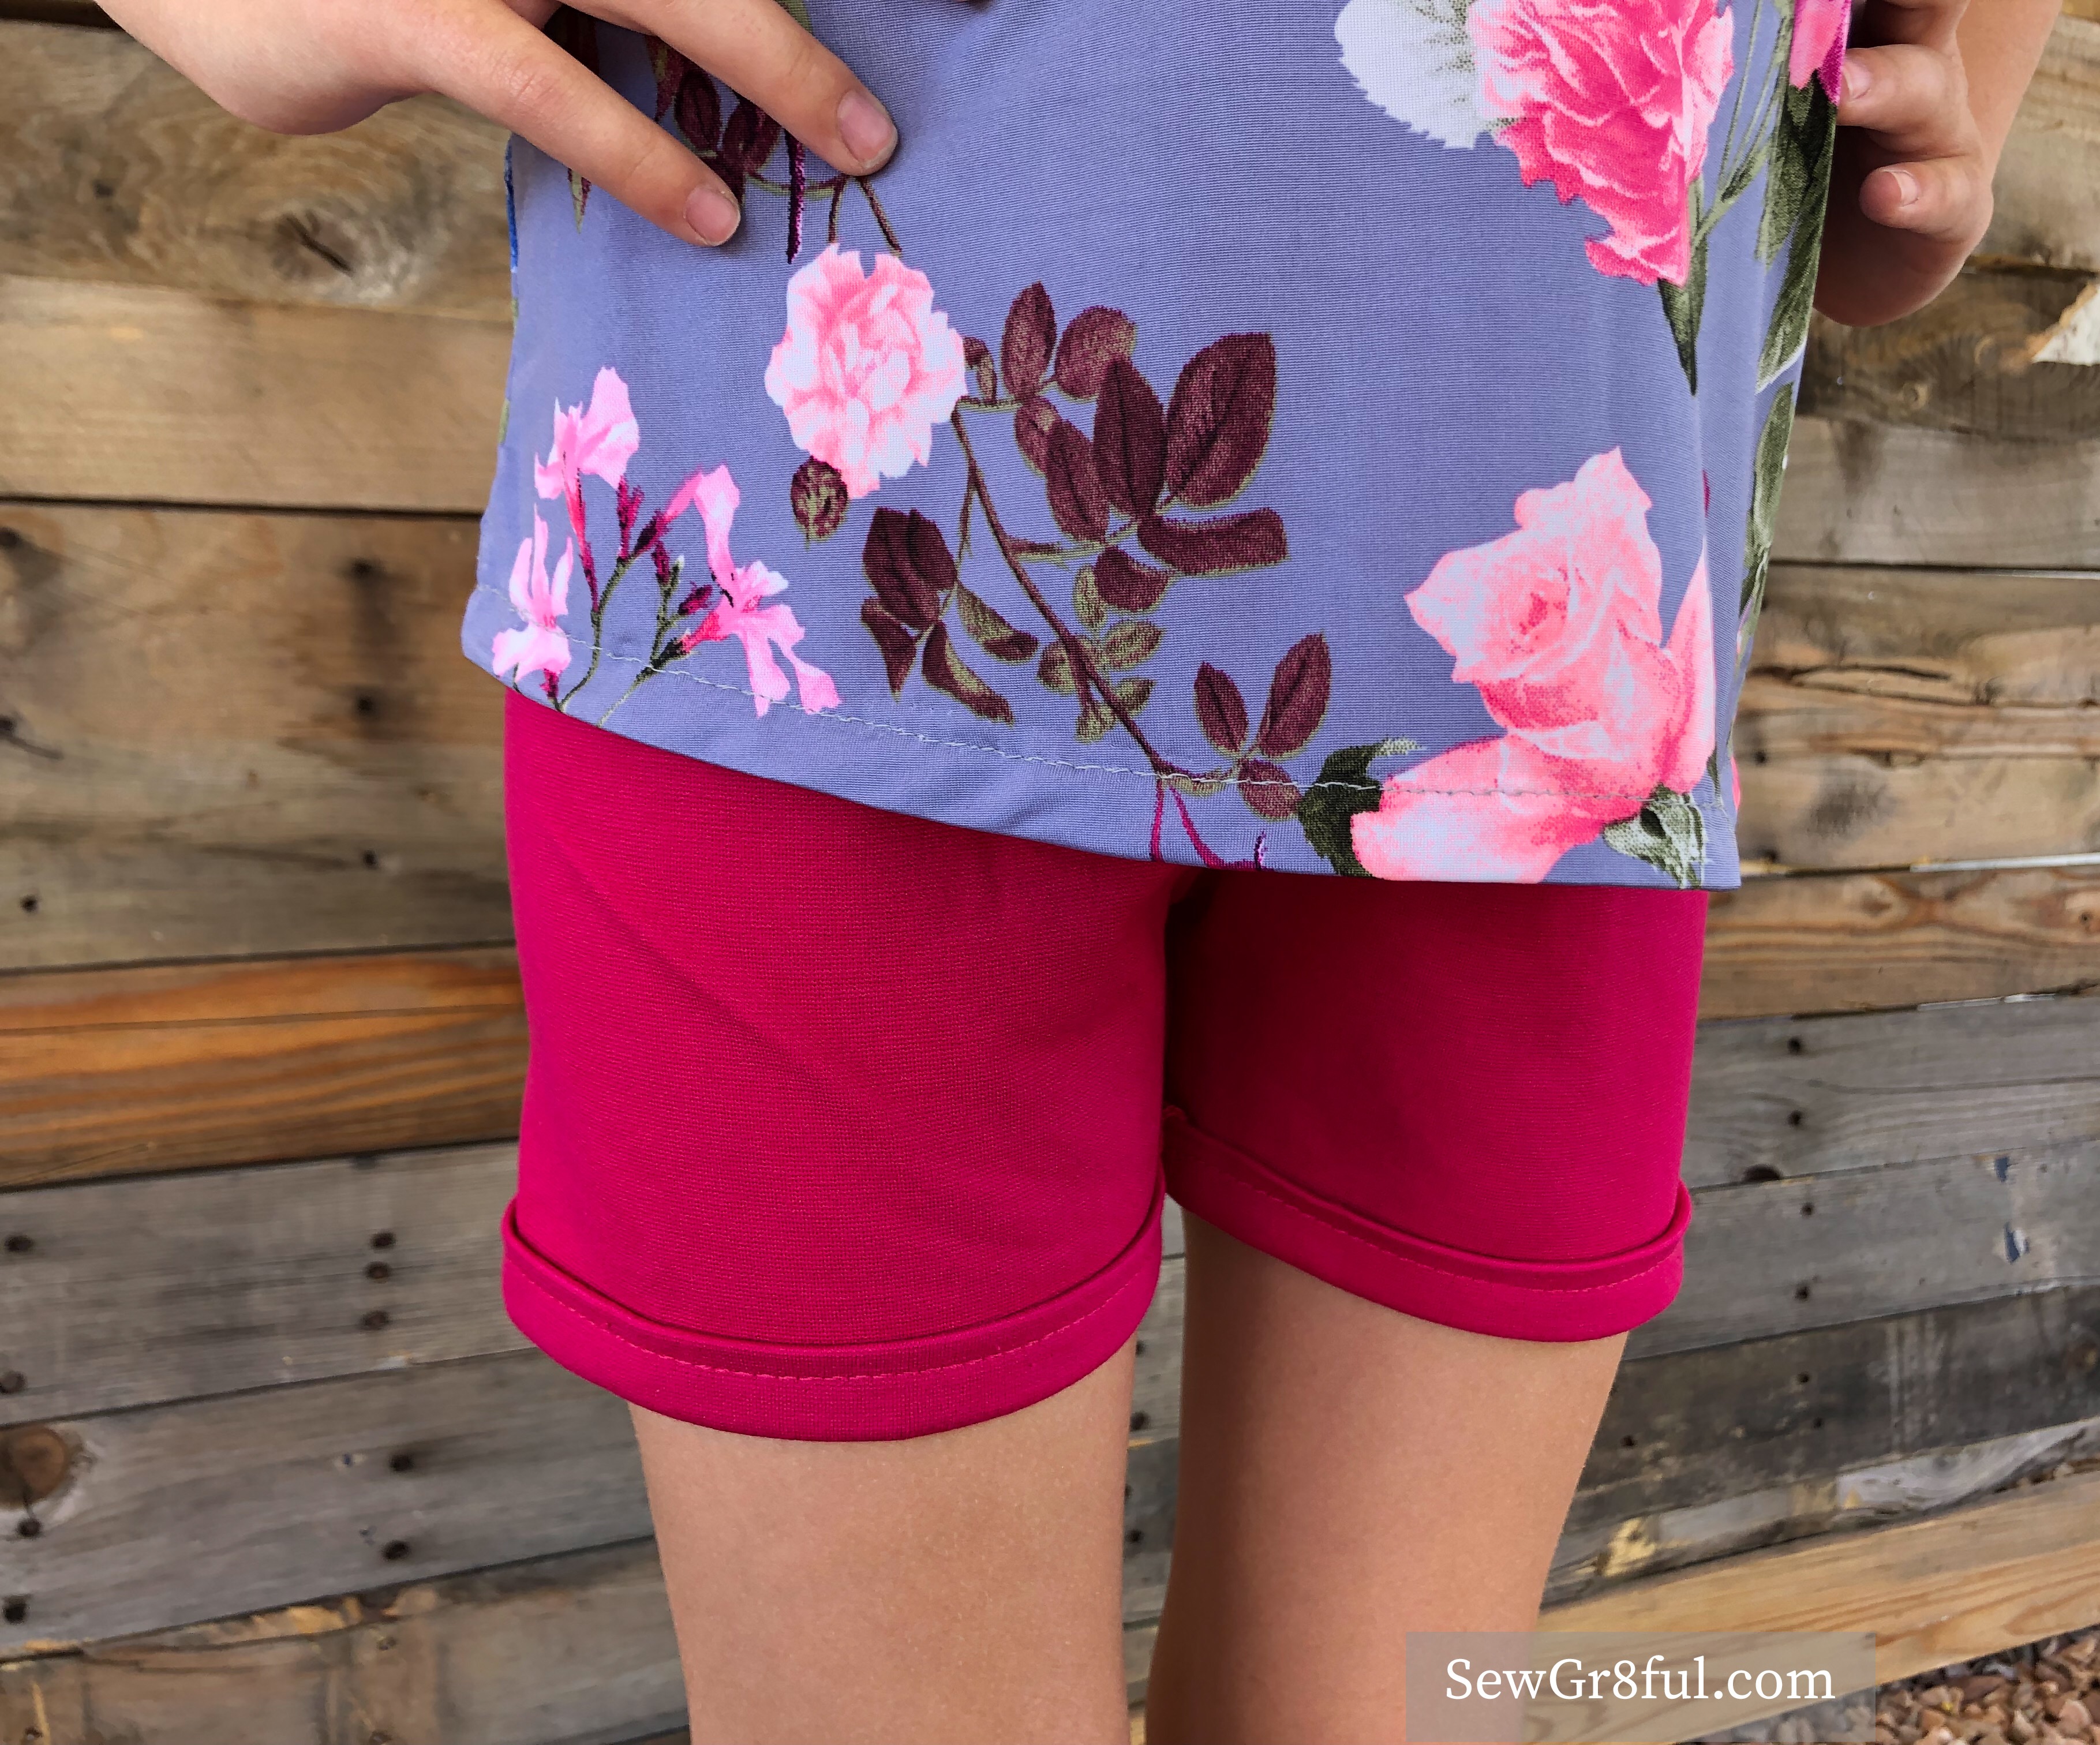
To wear her ITY top again, she added the second pair of Ginger shorties. For this pair she chose solid fuchsia ponte. I offered to add some pockets to this pair but she opted for some on her “next pairs”. I think I’ve created a monster.
She also asked for a rolled up hem on this Ponte pair.
When she was shopping for fabric she fell in love with this white butterfly floral venezia ITY. She wasn’t sure what ITY was at first, so I took her to my closet and showed her a few of my ITY items. She gasped and said, “That dress!! Can you make me one like that?”. Fortunately the pattern I used for my dress, also comes in girls sizes, so I was able to make that happen. I used the Annelaine girls Lexington. The Lexington has a few length options for the skirt and some different sleeves as well. For this one, we did the tank option with the high-low hem skirt.
I have to mention that both these ITY’s have such vibrant colors, but the butterfly floral one, it’s almost as though the print is popping off the fabric. They are just so beautiful!
I am really quite impressed with how she picked her outfits and the patterns she chose for each one. I kind of want to copy them for myself now. 😆
This post may contain affiliate links. This means if you make a purchase through that link, I may get a % back, at no additional cost to you. Let’s be honest, we all know it goes right back to adding to my fabric stash. All opinions on this blog are my own.
When I was younger I took an etiquette type class. This class covered things from how to set the table, all the way to dressing and walking. I learned quite a few things from that class, some I think are silly and some I actually still utilize to this day. One of the things I learned about was colors and shapes, when worn different ways, changing how your body looks. Ways to emphasize or downplay certain things and draw the eye up or down, for example. Now, don’t get me wrong, I think you should wear whatever you enjoy and feel comfortable in, there are no hard and fast rules when it comes to dressing (except the obvious ones of birthday suits 😉 ), but these little tricks are nice to know and have in your back pocket if you want to utilize them.
When it came to stripes, I learned that they can draw the eye in whichever direction they run. So, as an adolescent girl I shied away from horizontal stripes, because I had a fear of looking wider, and vertical stripes because I was already 5’9” and hated being tall. Stripes were very rarely found in my wardrobe, and that was the case until recently. I was seeing all these stripe fabrics and everyone making such cute outfits with them, and I wanted to try some for myself. Like any normal sewist, I went to pinterest and started searching for stripe outfits. I found some I loved and over this last year, I have made them, and more.
What do you know, I actually liked them. So much so, that I seem to forget the eye boggling dizzy reaction I get when working with most of them. Raise your hand if you know what I’m talking about!
Then I got the opportunity to test a new pattern for Made for Mermaids, the Jordan. I must admit, I have been applying to test for them and Patterns for Pirates, since I started sewing. I just recently got in; excuse me while I freak out over here for a few minutes. Okay, I’m good, now about the test. The Jordan is a top and dress, with a bunch of options. The top hem options are straight or split hem with a slight high low. You can do sleeveless, short, 3/4 or long sleeves, with an optional thumbhole cuff. There are also the options of a lined or unlined hood, kangaroo pocket, and a drawstring. As soon as I read the options, a specific picture popped up in my mind that I wanted to make. I picked the sleeveless dress with an unlined hood, drawstring, and a kangaroo pocket. And guess what? I made it fully out of horizontal stripes ❤
These stripes are a gorgeous rayon spandex from So Sew English fabrics. If I remember right, they were part of a mystery box, which is a super sweet deal!
Can we take a moment to appreciate the stripe matching on this pocket? I spent a good bit of time when cutting to ensure it matched. Pro Tip: Using wash away wonder tape to place the pocket on the dress is super simple. You don’t put any holes in your fabric from pins, and if your machine is picky like mine, the extra stability it gives when sewing, is usually just enough to avoid the fabric from being eaten.
I am so happy that the picture that popped in my mind came to fruition, and that I had these stripes in my stash to make it happen. I can see myself getting lots of wear from this dress this summer.
This post may contain affiliate links. This means if you make a purchase through that link, I may get a % back, at no additional cost to you. Let’s be honest, we all know it goes right back to adding to my fabric stash. All opinions on this blog are my own.