Faux Moto Patch Hoodie – Sewing for my Husband

I love Moto patches on clothes. Up until now the only one I have actually done though, was on my green pair of DIBY club Augusta Moto pants. These are legit fold and stitch pintucks! While I absolutely love them, I wanted to find something a little quicker when I got the idea to do a moto patch on a hoodie for my husband.

When I first decided to make this hoodie with the moto patch hack, I wondered if I could do a faux pintuck using my coverstitch. Over the past year, my coverstitch and I have had an interesting journey. I struggled to figure out all its little quirks to avoid tunneling and skipped stitches. We seem to be mostly on the same page now, so wanting to intentionally create tunneling made me cringe. Oh husband, how much I love you.

I cut some scrap fabric strips, cranked up my needle and looper tensions, and just gave it a try.

96DFCF5A-F4B5-4C9A-9C56-B3923B42E2E3.JPEG

Well, hello there, you gorgeous faux pintucks!! Maybe I should just use this coverstitch for exclusive faux pintucks and get myself a different one for regular coverstitching. I’m only sort of kidding.

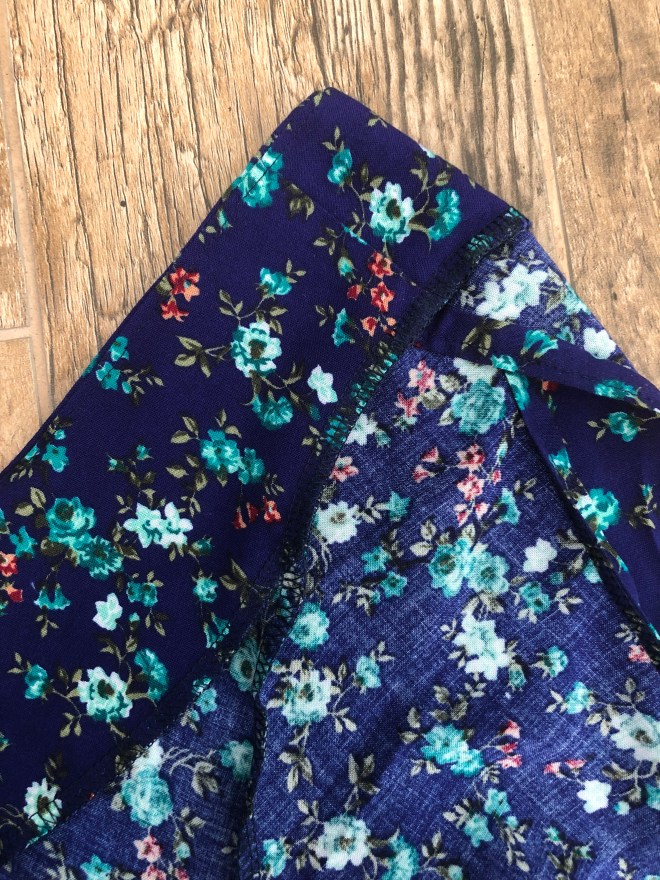
I have a Janome 900 CPX and the settings I used were, both the needles and the looper on 9, the highest tension it goes.Ā  Then I set my stitch length at a 2.5 and my differential feed at 1. You will need to tweak your own settings depending on the fabric you use and your machine, but the basic goal is to have a longer stitch and tighter tension to pull the two rows of stitching together, pinching the fabric and making a tunnel.Ā Ā Pro tip: before you start messing with your tensions and other settings, jot down a little note saying what they were set at for proper stitching. There is nothing worse than forgetting how to get back to your perfect coverstitch.

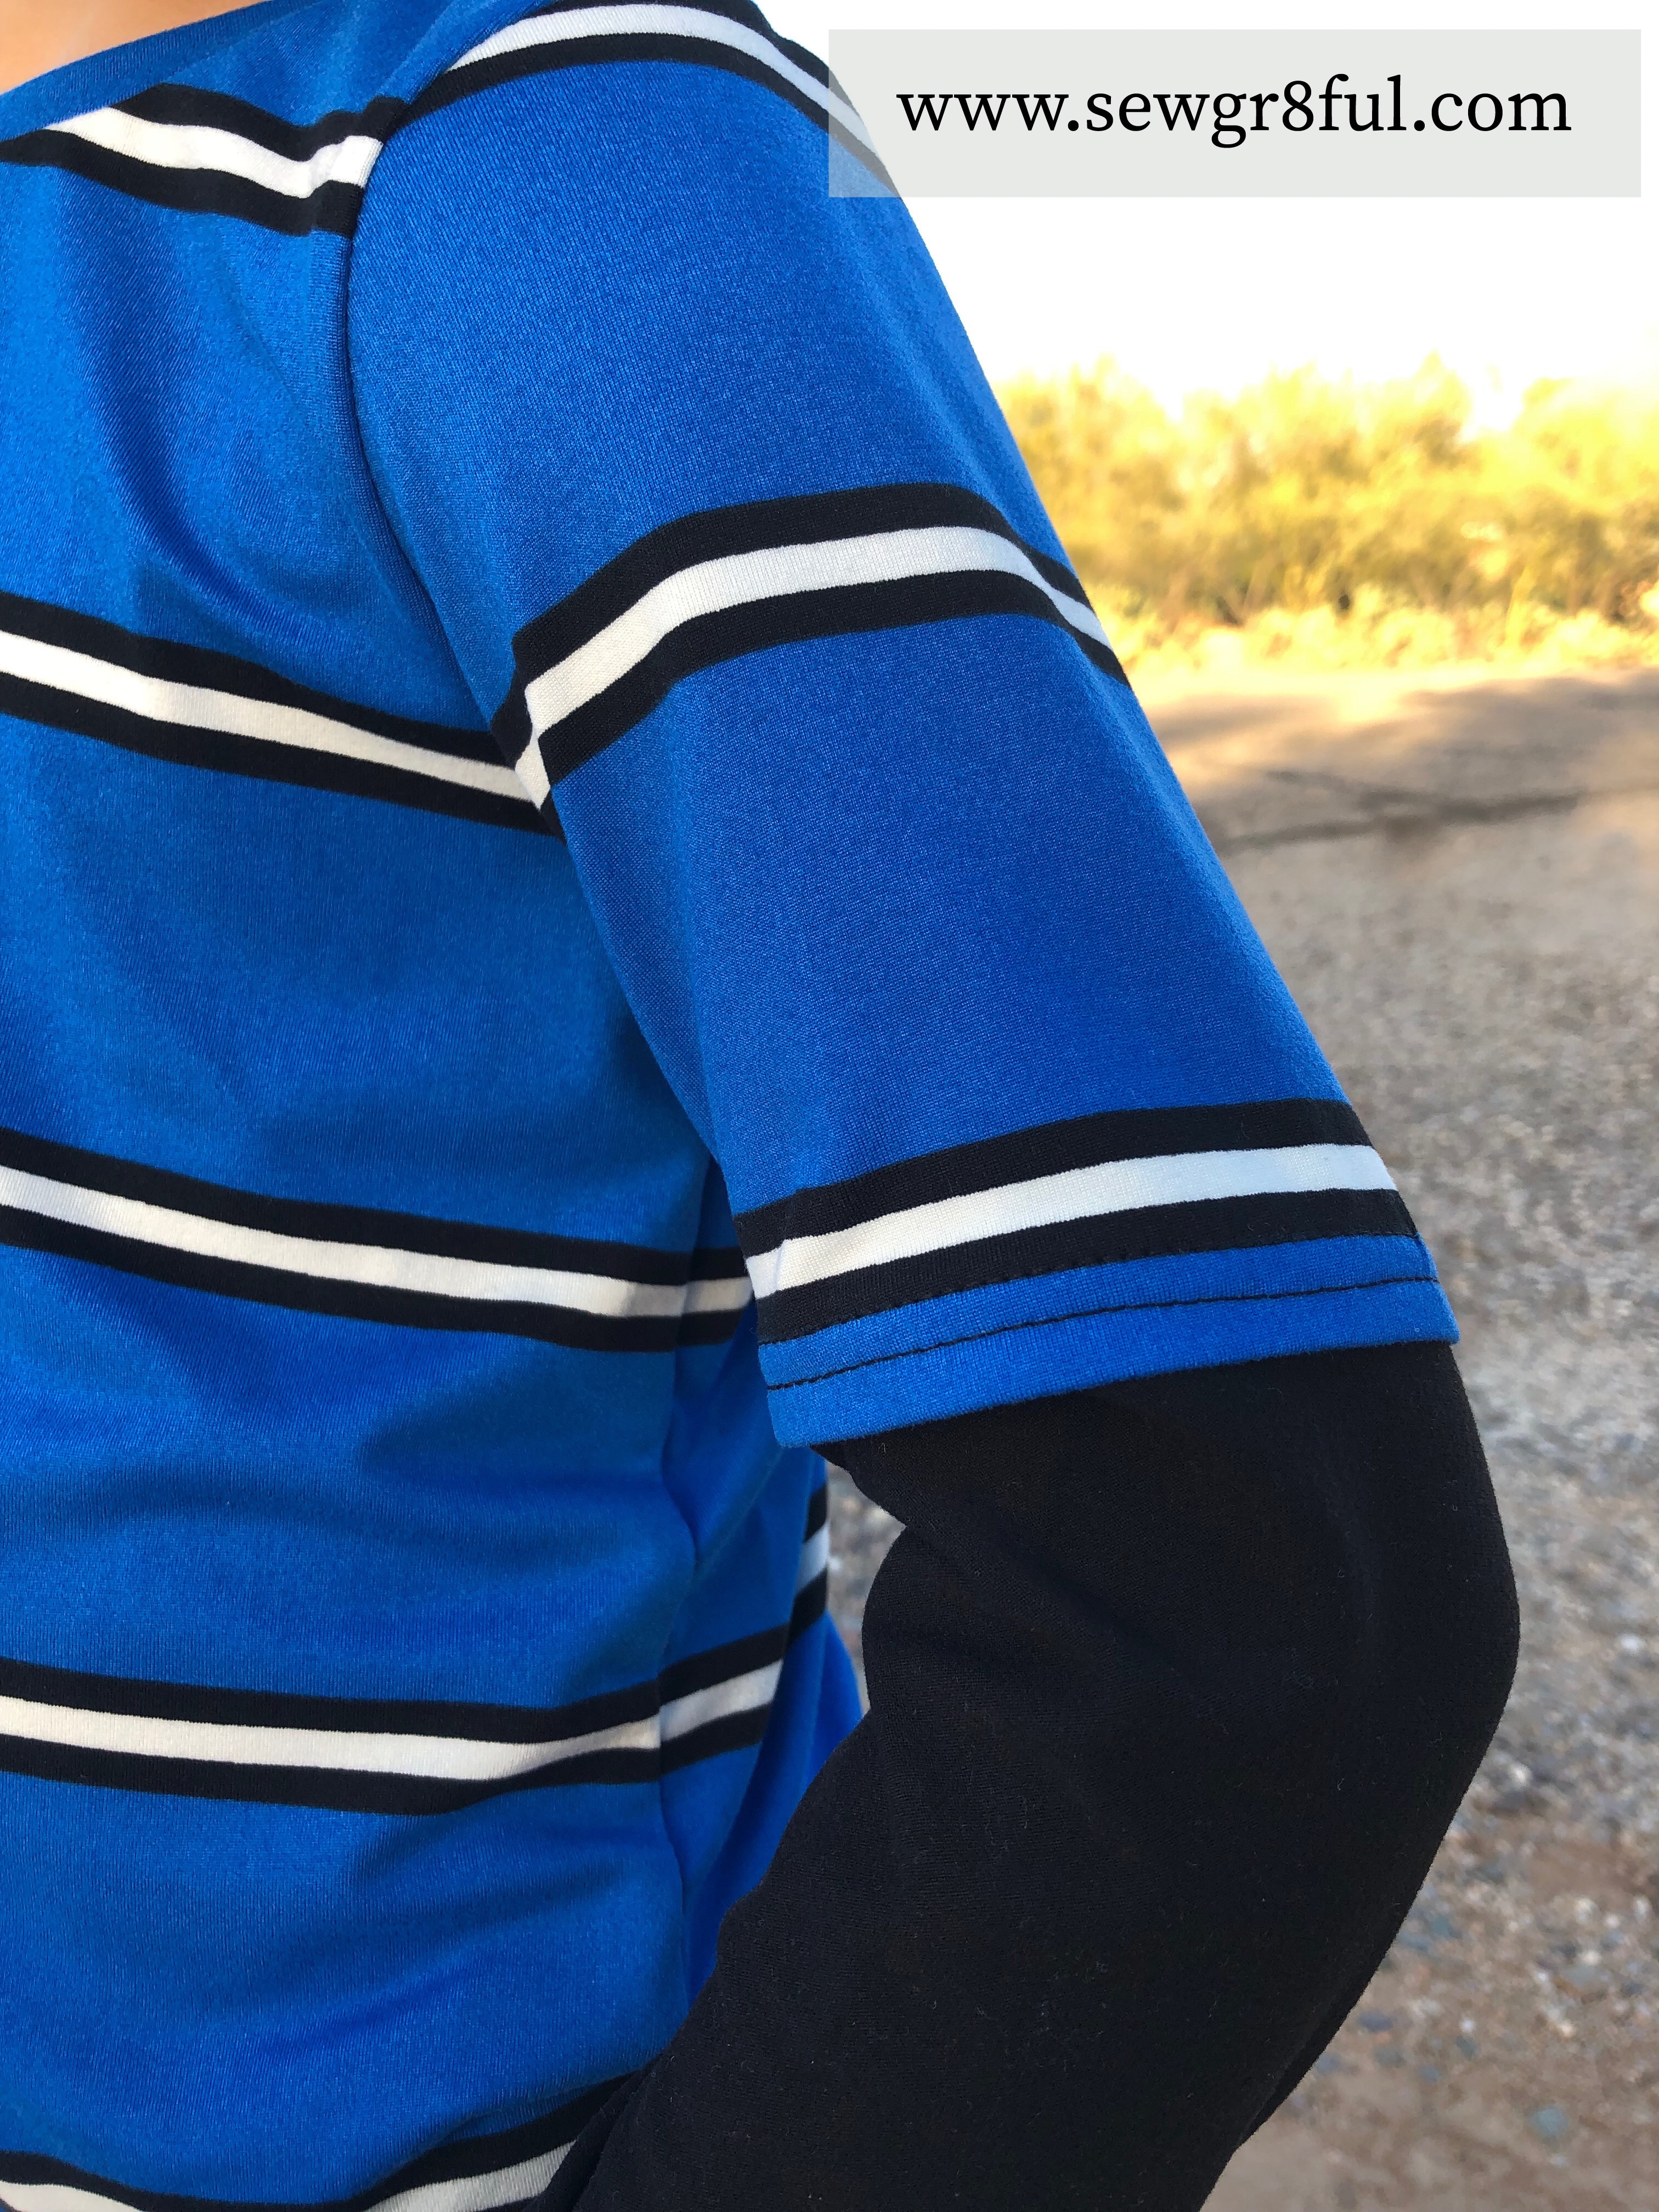
Now that you know how I made these faux pintucks, it’s time to talk about what I used them to create. I hacked the sleeves on the Greenstyle Creations Hudson Pullover, and made this awesome hoodie for my husband. I am so proud of this one !!

60780643-CBA6-45B6-AC84-0BACC453C7E7

After seeing a similar hoodie on Pinterest I showed it to my husband, thinking he would say no. Obviously, I was wrong. I admit, it doesn’t happen often (wink wink), but in this case, I’m glad it did. Since I have made this hoodie once before, I knew exactly how it fit on him and if I needed to make any adjustments for this slightly different look.

Let’s talk about making the moto patch first. If you are like me, when someone says they ā€œeye-balledā€ something, you just want to smack them. How are you supposed to duplicate eye-balling?? So I’m ducking over here as I say, I eye-balled most of this. To help with my eye-balling, I took pictures and general measurements that you can use to create your own, ā€œeye-balledā€ moto patch.

3122BFA5-42E2-4CAB-A69A-6564D8240C6B

The first thing I did was take the sleeve pattern piece and find the halfway mark. I used the wrist hem to find my center since the sleeve is a raglan and not exactly the same from front to back. I needed that center point though, to ensure the patch was centered on his arm when worn.

Once I had my center line I made another mark, approximately 12.5ā€ down from the neckline, along the center line. This line will serve as the bottom of the moto patch. You can bring it lower if you want it to come closer to the elbow, or make it shorter if you wanted a smaller patch. Eye-ball away.

9AA8150A-4F15-4AE3-B244-B2957606D6B6


Now that I had my lower mark on the center fold, I needed to determine what kind of a shape I wanted for this moto patch. Since I was using the seams for the full top and most of the side lengths for the patch, I just eye-balled a curve. It ended up being about 9.5ā€ down from the top for the back side and 7ā€ down for the front side. Both were more than halfway down the total seam length. Ā Make your marks and smooth out the curves until you are happy with the size and shape. If you have your recipient handy, you can even hold the sleeve piece up on their arm and make sure you like where it will hit. My husband was gone so I just winged it.

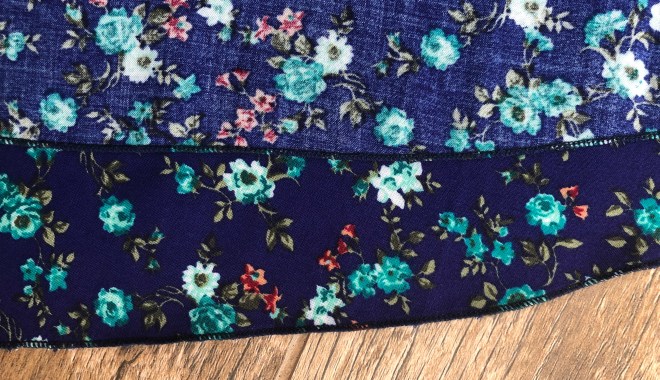
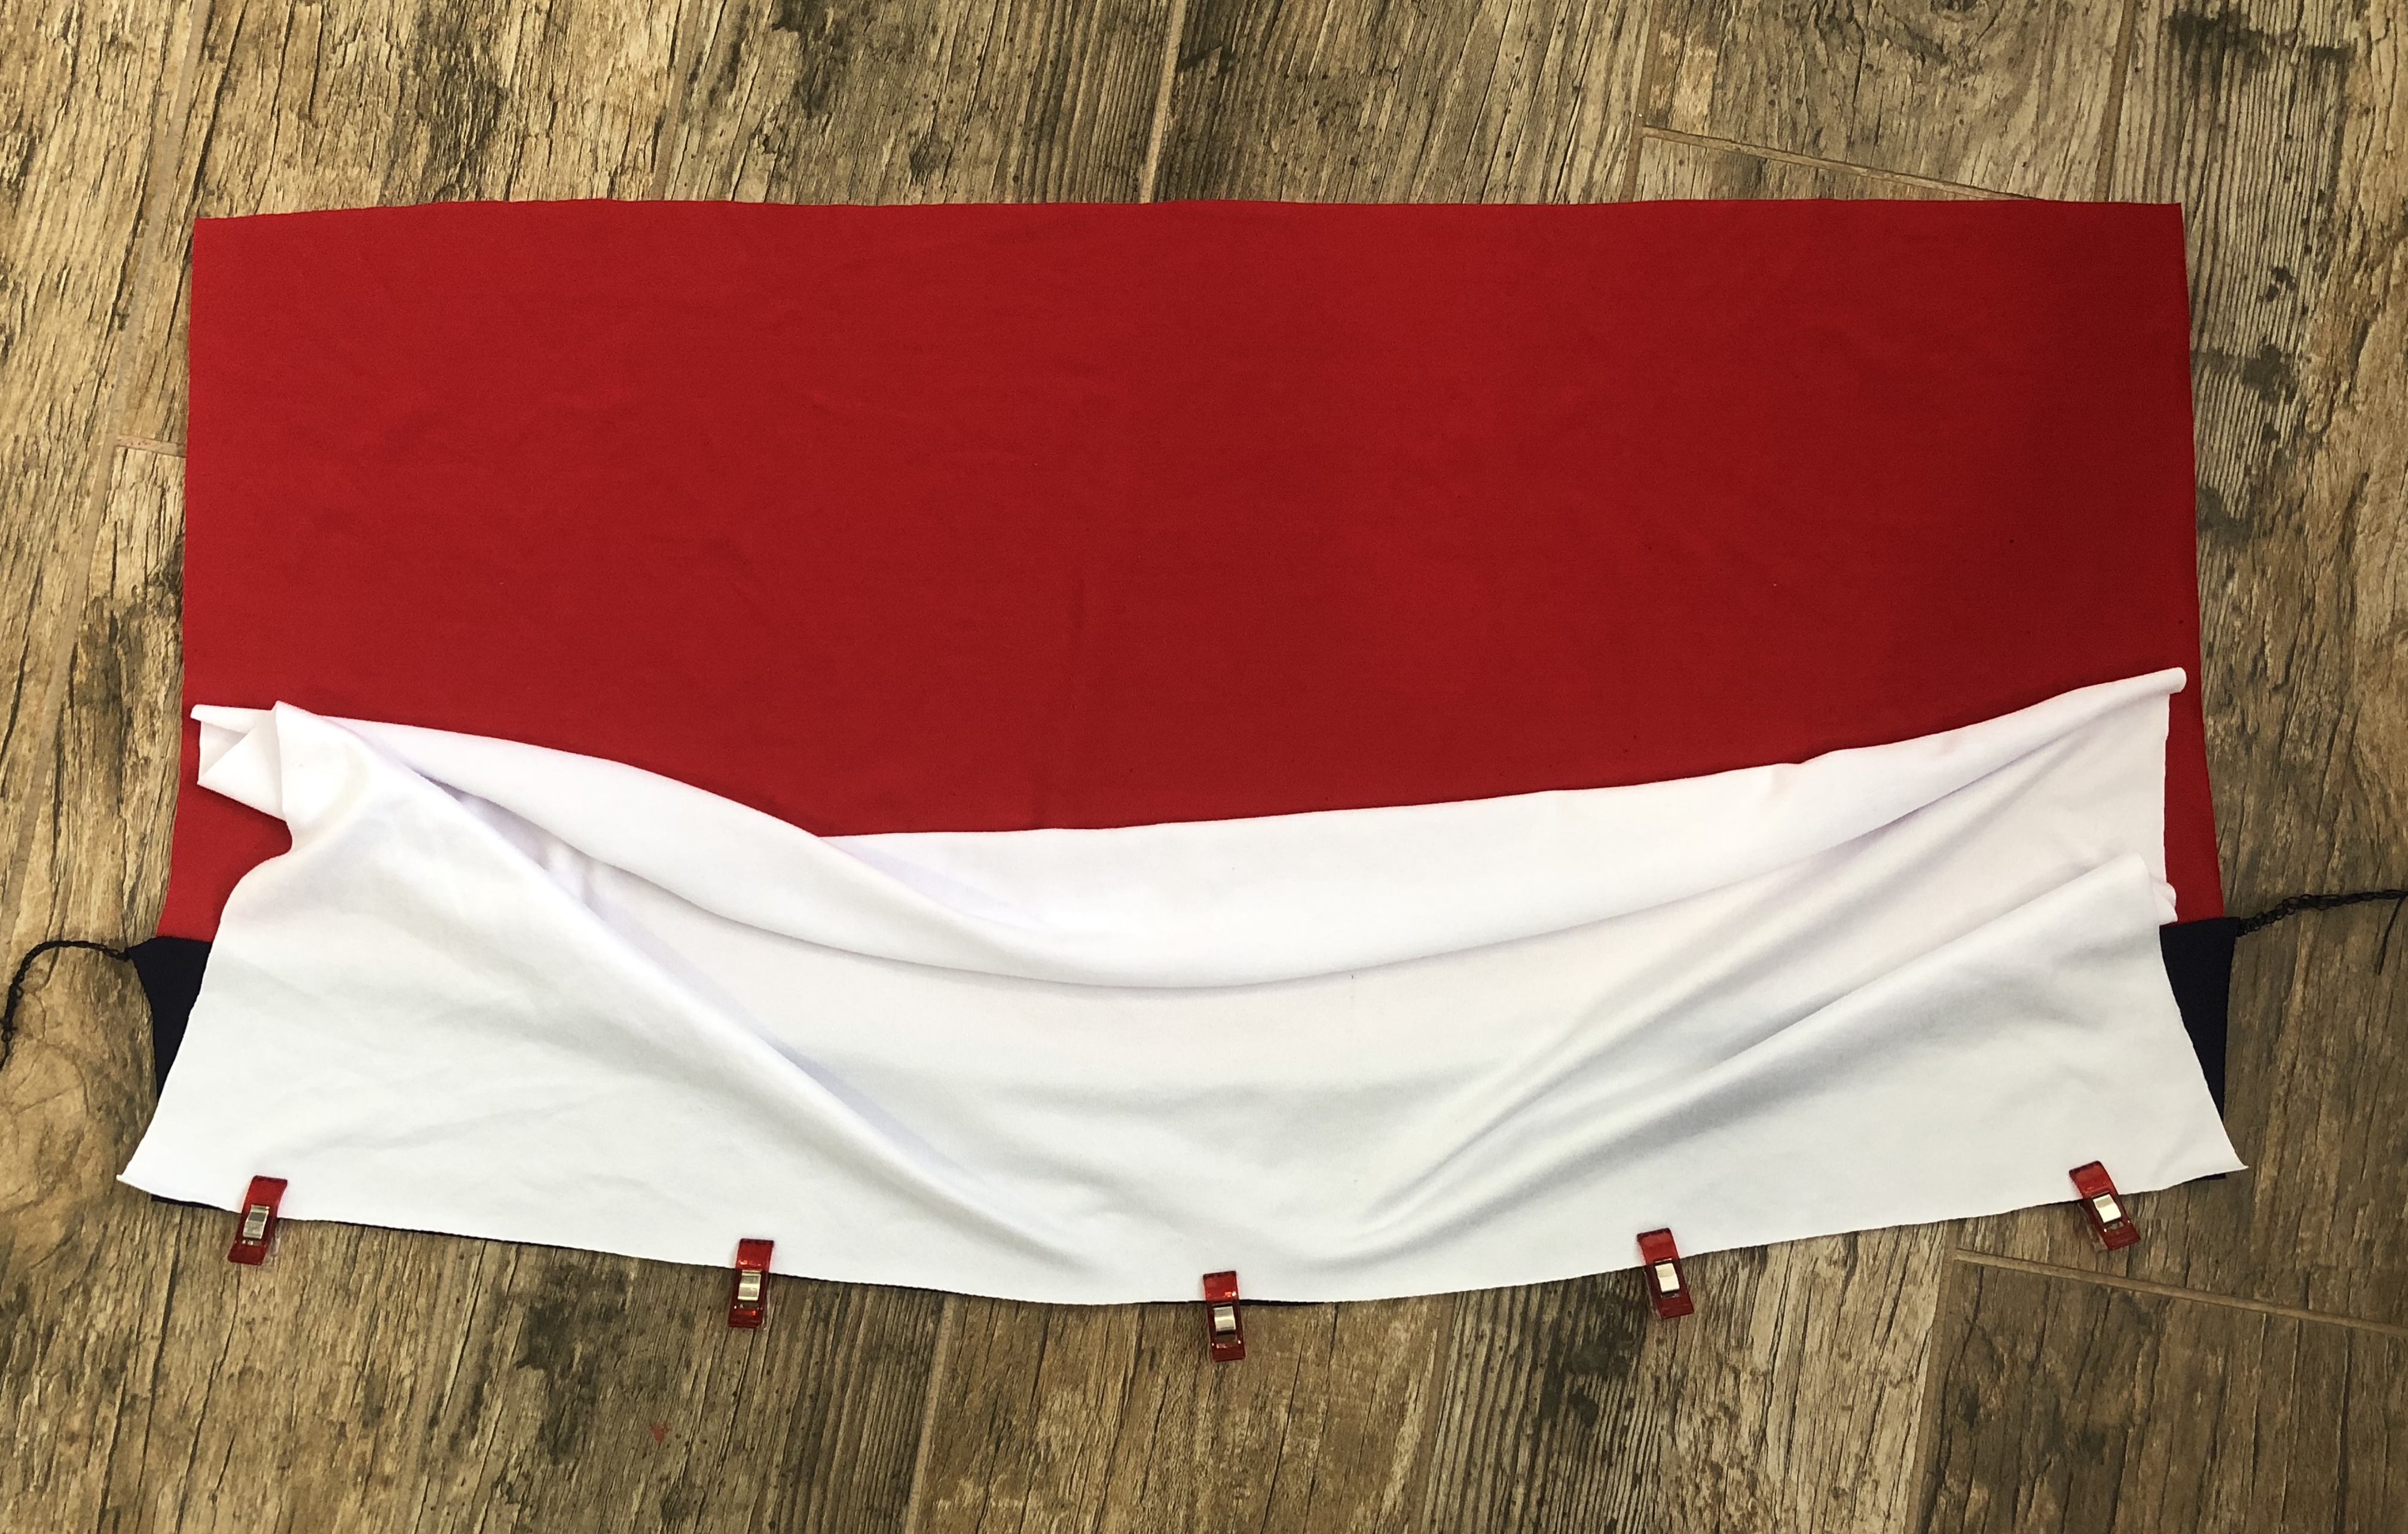
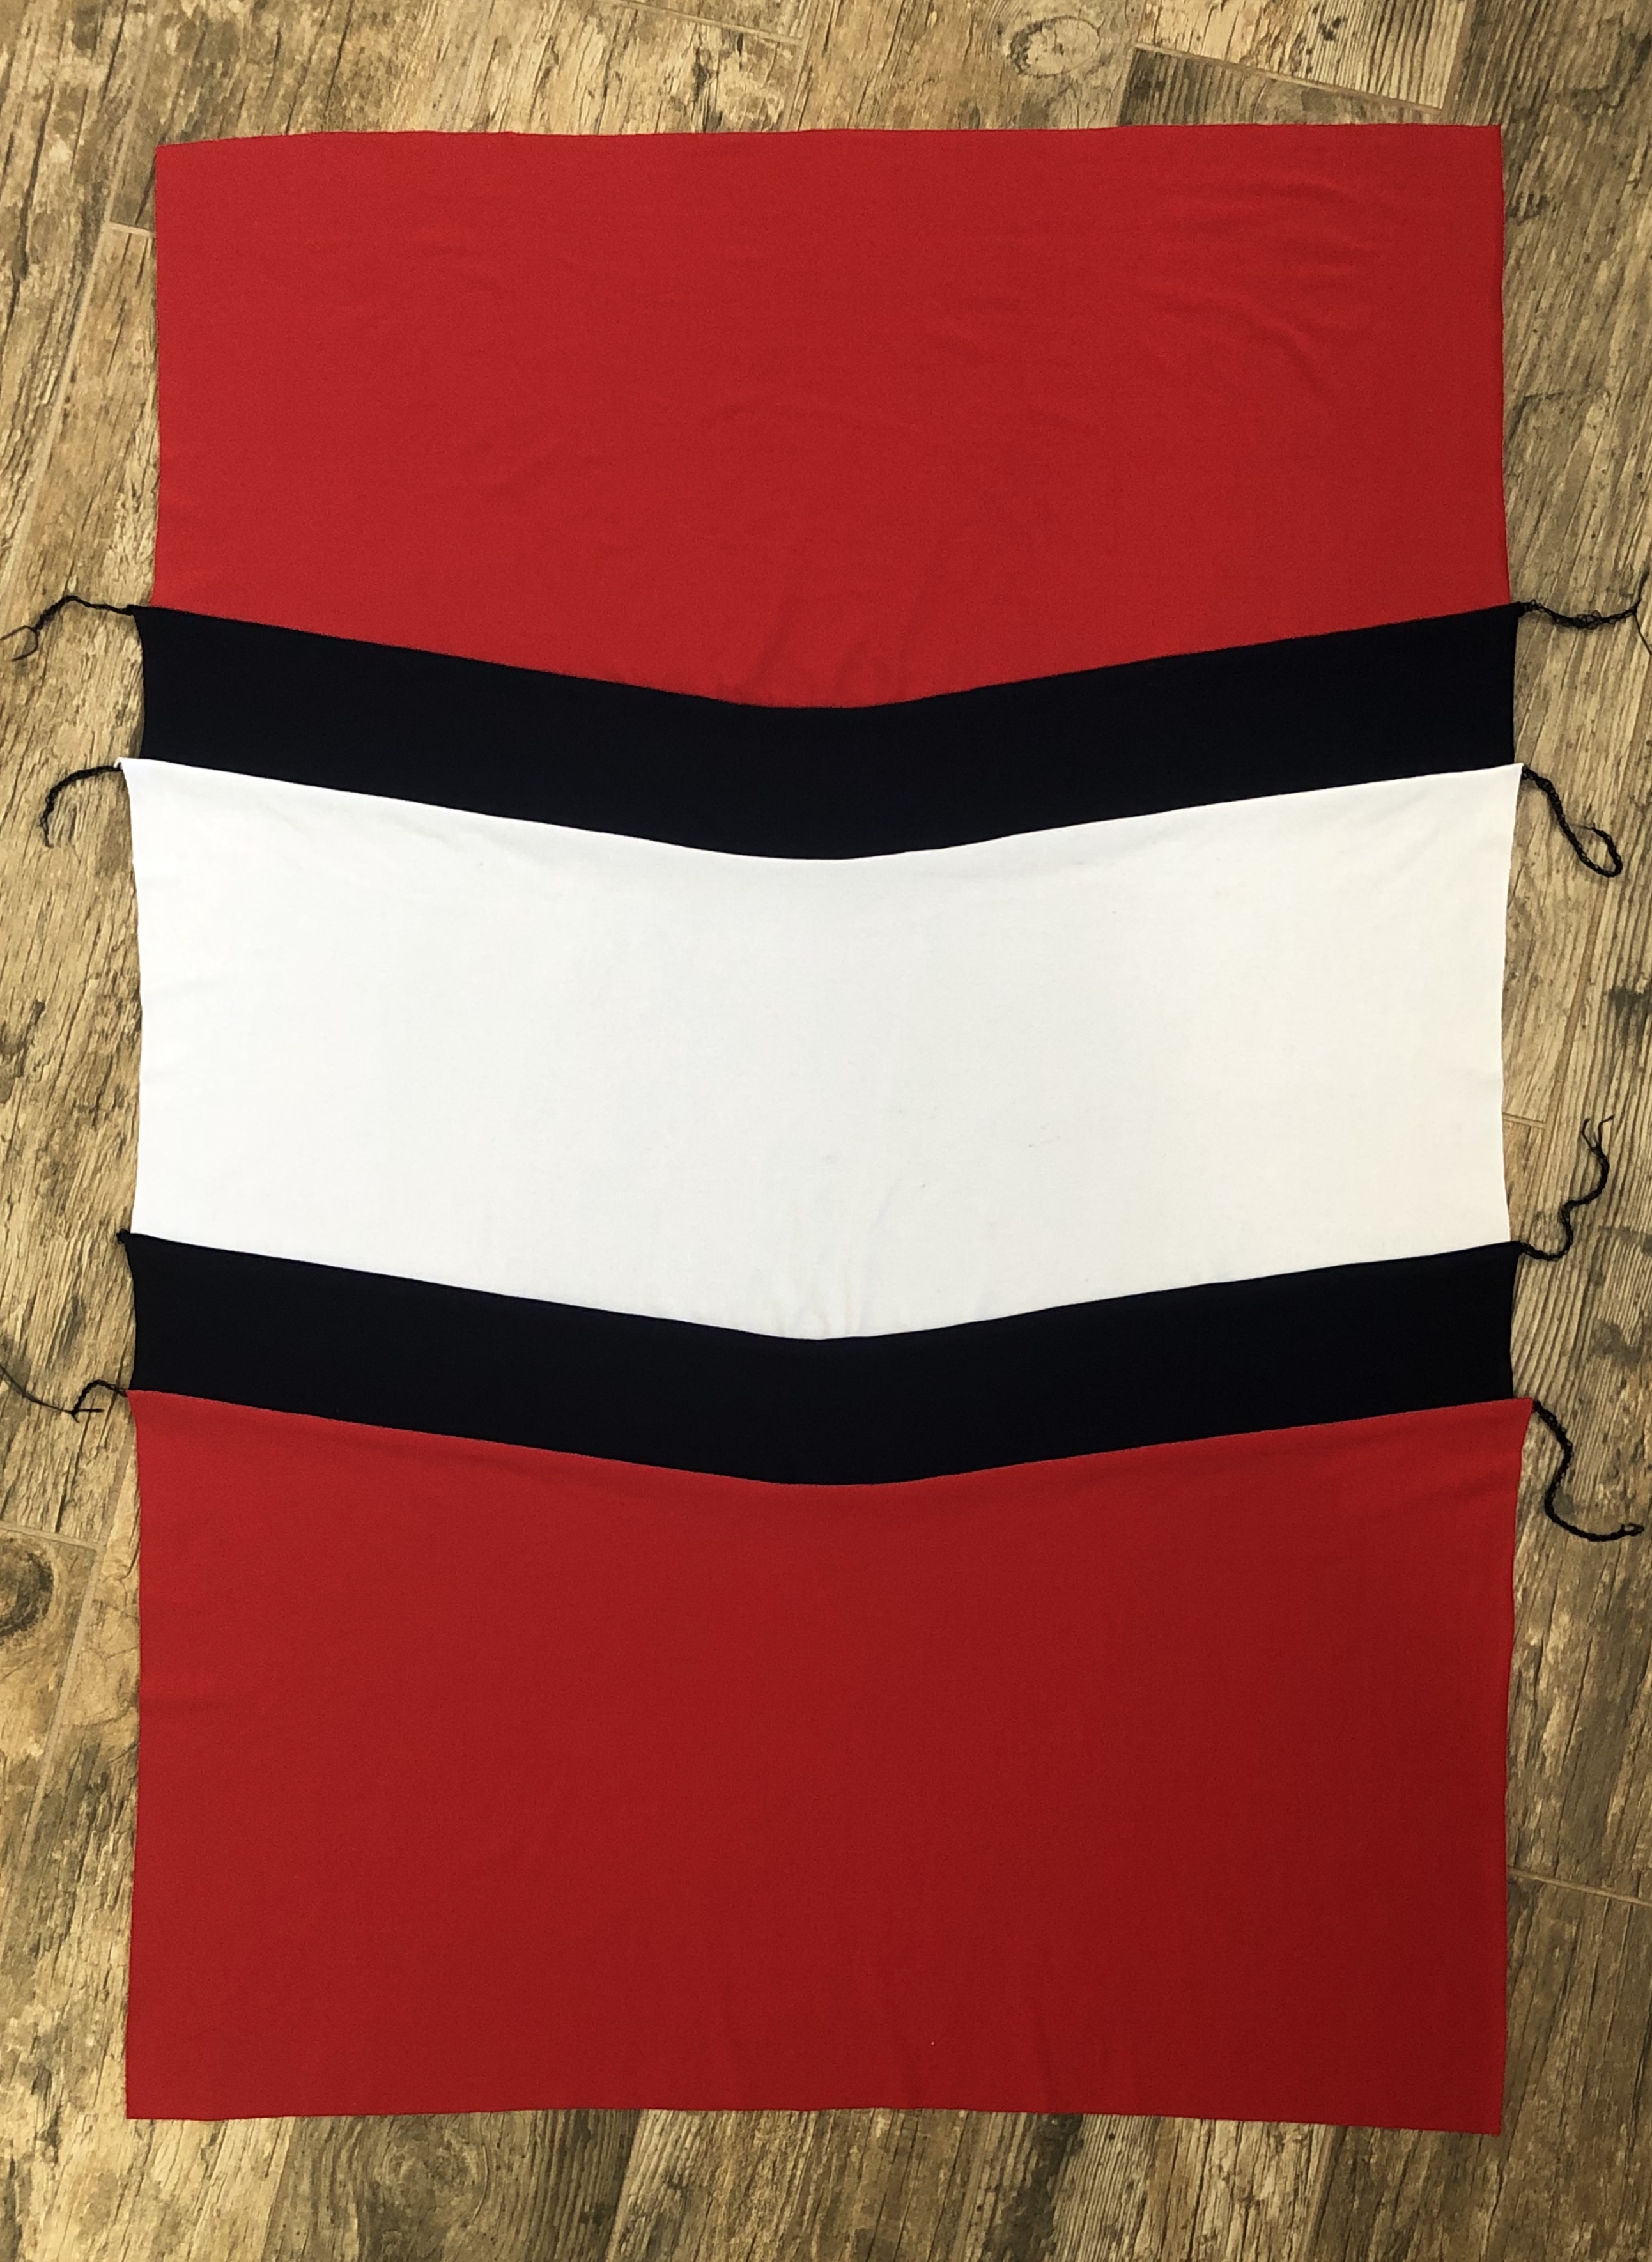
Once you have your moto patch pattern piece made, you will want to measure it. I prefer cutting a square piece of my fabric, mirrored, the size of the patch pattern piece, plus some. Then I take that square piece of fabric and do my pintucks. Once it is done, I cut out the moto patch from it. When you tunnel, it will shrink your fabric piece. My 16ā€x17ā€ piece ended up being around 14ā€x 16.5ā€, when done.

00E177A9-9228-4831-BC03-547C74EFC53A

If I did this again, I’d make my piece 17ā€x 17ā€, which is about 3ā€ bigger than my moto patch pattern piece. I ended up really close to the edge on my pieces.

0F8D7491-AF97-48D6-A9DB-5A709C408346

Don’t forget to add seam allowance to the bottom curve of the patch pattern piece and the top curve of the plain sleeve pattern piece.

6F162A5F-7FDD-4465-B7A3-8AE4FC542CED

You don’t need to add seam allowance to any other part, as the pattern already includes it.

Making the faux pintucks is seriously my favorite part. Make sure to do a few test rows on your chosen fabric, to get your level of desired tunneling and double checking that there are no skipped stitches. Once you are happy with your pintucks, grab that square piece of fabric. Line up your fabric edge, with the edge of your presser foot, and go. It’s important to take your time and make sure the first row is straight. You will be using the first row to line up each subsequent row, and if it is off, your final stitches will be REALLY off. Make sure you keep your beginning and ending threads at each row too, this prevents your threads from being pulled back in and unraveling all the tunneling you just did. Once you have your first row complete, line up the edge of the presser foot with the edge of the first rows stitching, and make the second row. Continue in that manner until you reach the end and your fabric square is complete. Repeat the same steps for the other patch piece, then sit back and admireĀ all those beautiful pintucksĀ  ā¤

CAA81D1F-81E7-41A4-9676-158CEC90FD4A

If you want to see my tunneling in action, you can watch my time lapse video here. I have to say, making the faux pintucks and watching the video is really soothing and mesmerizing, even my kids enjoyed watching it.

This is a good point to finish cutting out all your regular pattern pieces and preparing them for assembly. I don’t cut my moto patches from the pintucked fabric, until the very last minute. Once it is cut, you have to be careful not to pull or mess with them too much. As soothing as I find making the pintucks, I think I’d find it less so, if I had to double my work.

In addition to the moto patch sleeve change, I also made a slight change to the hem of the shirt. The inspiration picture had a curved hem and my husband thought it looked cool too. Brace yourself, here comes some more ā€œeye-ballingā€. I lowered the center of the hem an inch ish, and free handed an upward curve as it reached the side seam. Then I mirrored the back pattern piece so they would line up when done.

3377B63E-6B3A-4F9F-8C9D-22819F94809E

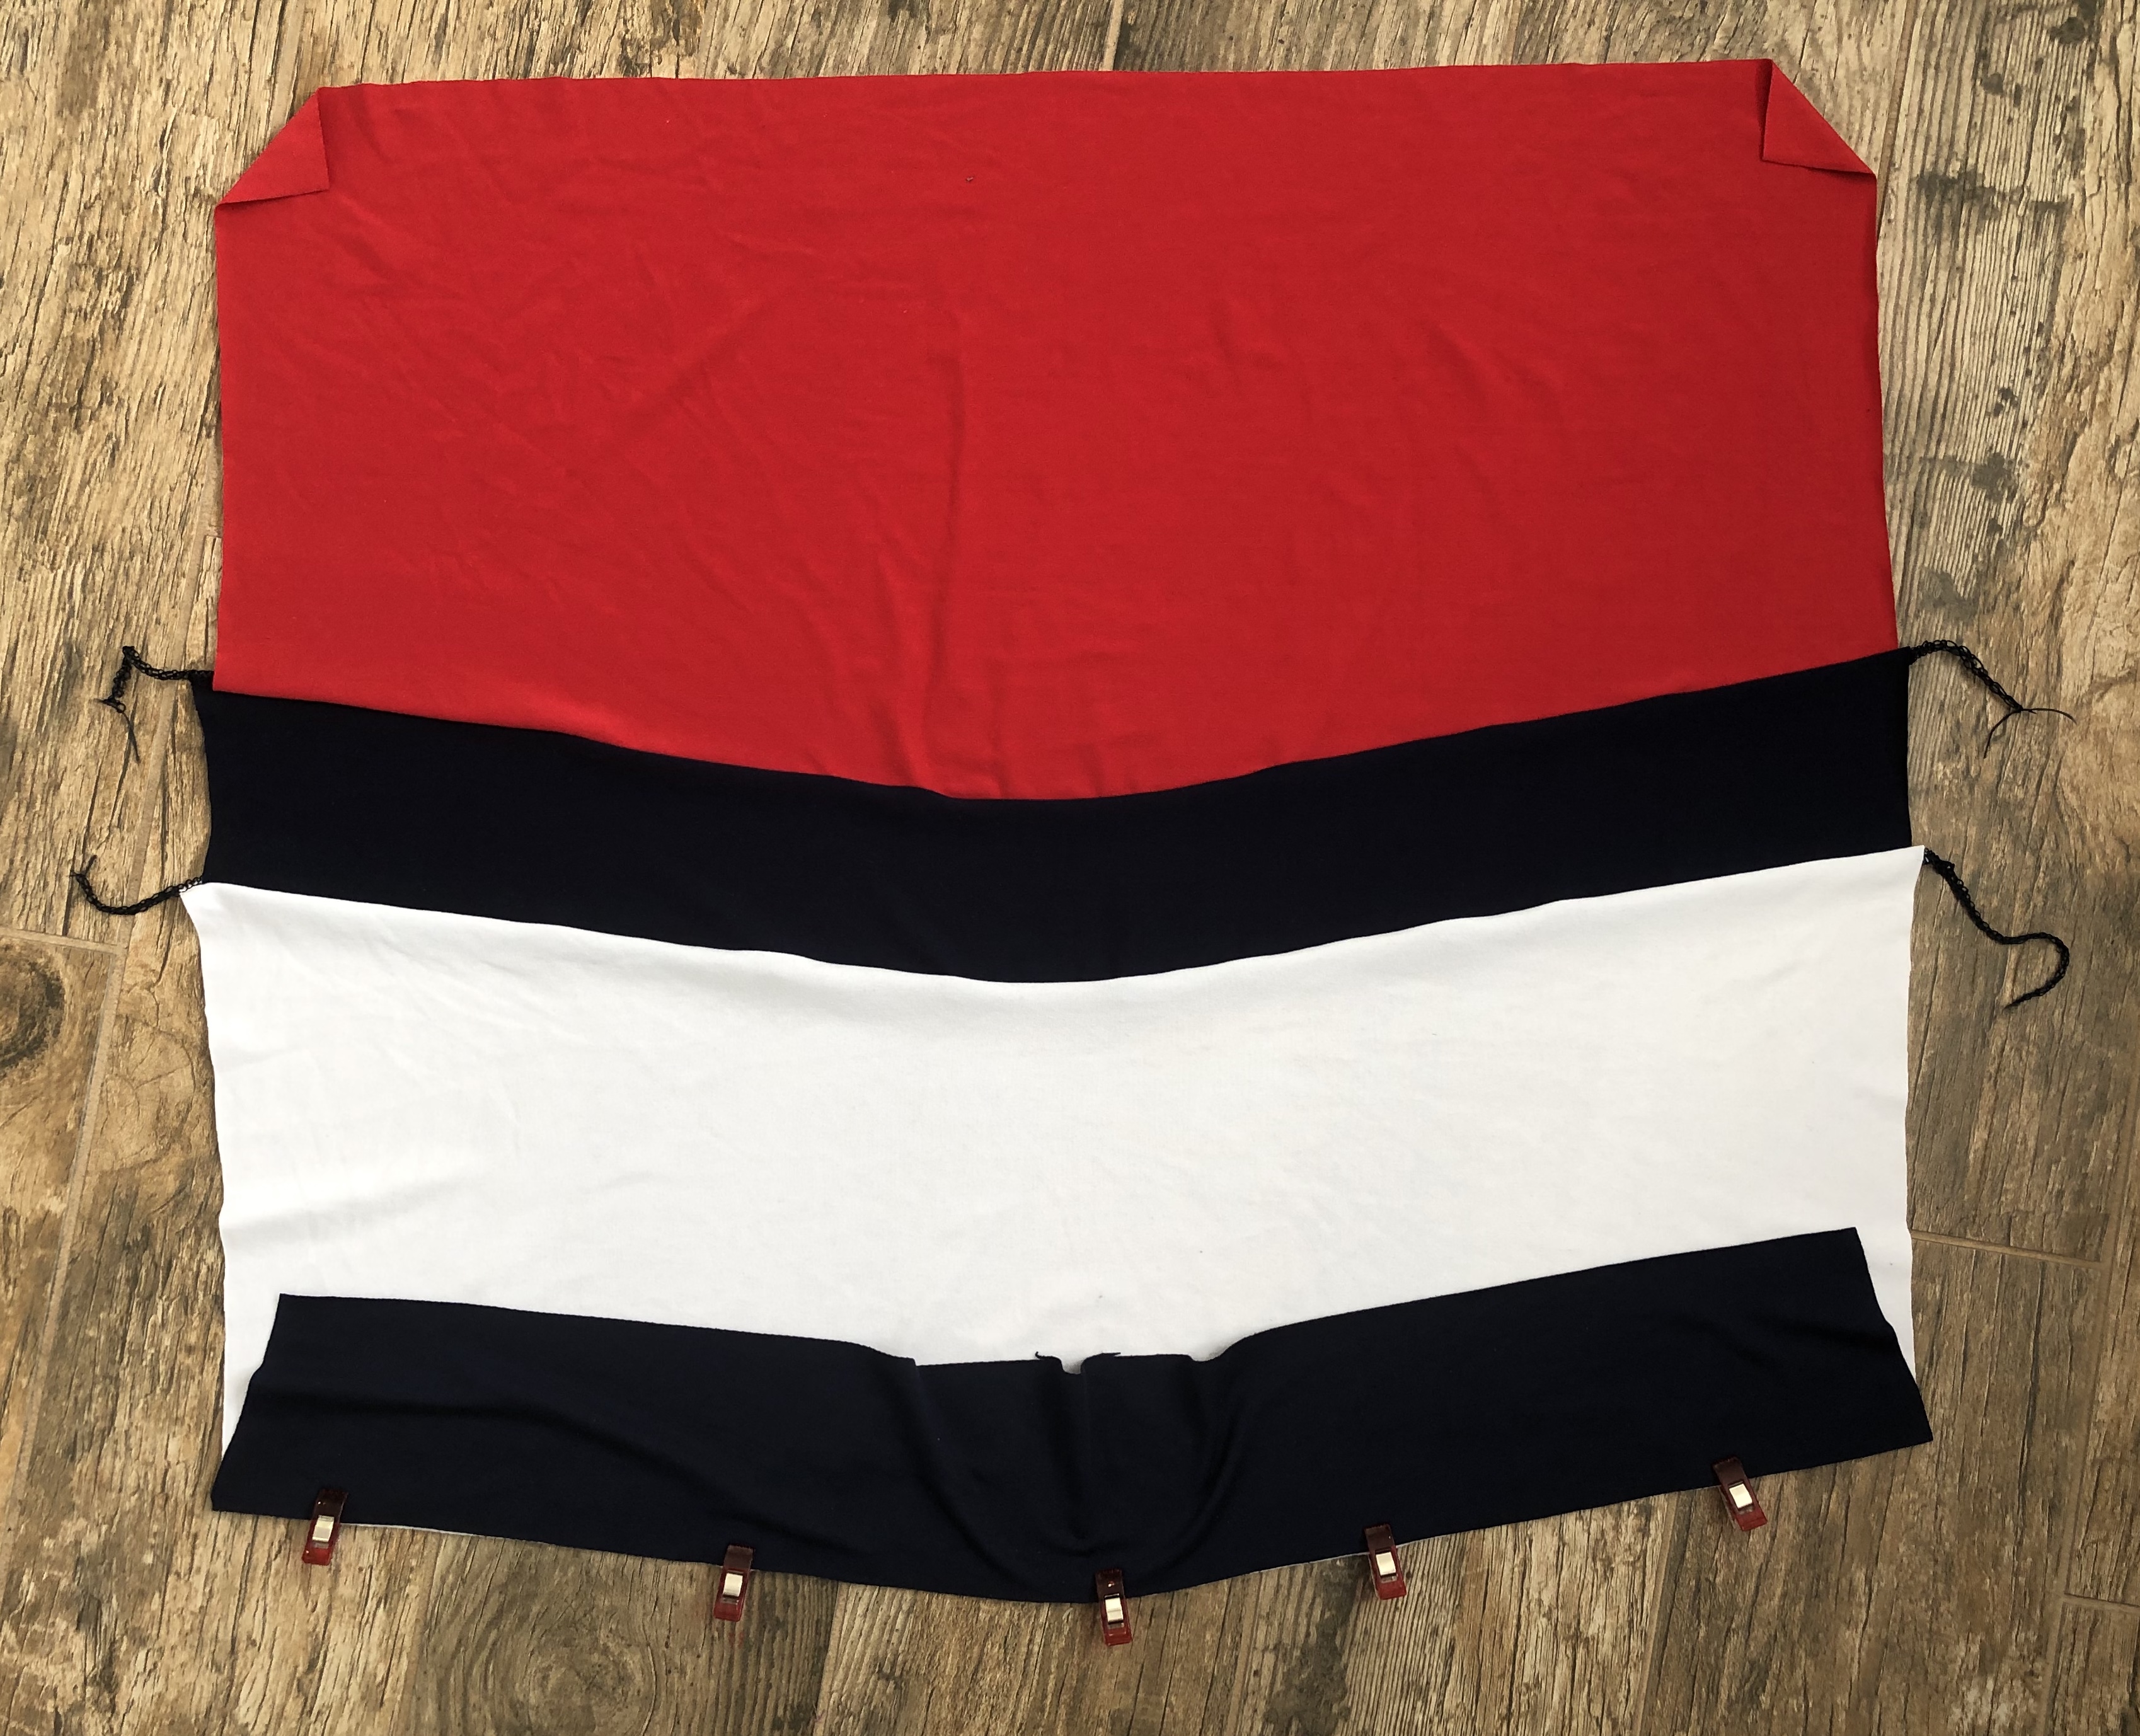
At this point I started assembling. Since I wanted to be able to secure the pintucks in as soon as possible, I skipped ahead to the hood assembly in the pattern instructions. Once the hood was complete and ready to attach to the bodice, I went back and cut my moto patches. Remember, be very careful with those patches once you cut them.

0FE0F05F-9583-42C8-8626-990B174C0585

I placed the moto patch, right sides together, with the lower sleeve piece, and sewed them. Repeat with the other sleeve.

EBAC02C6-5721-4D63-8BA5-4FABF1F8D713

Now you will have two complete sleeves that can be attached to the front and back bodice.

15B08EB9-D99C-4C21-81E5-AA0AD795C1A0

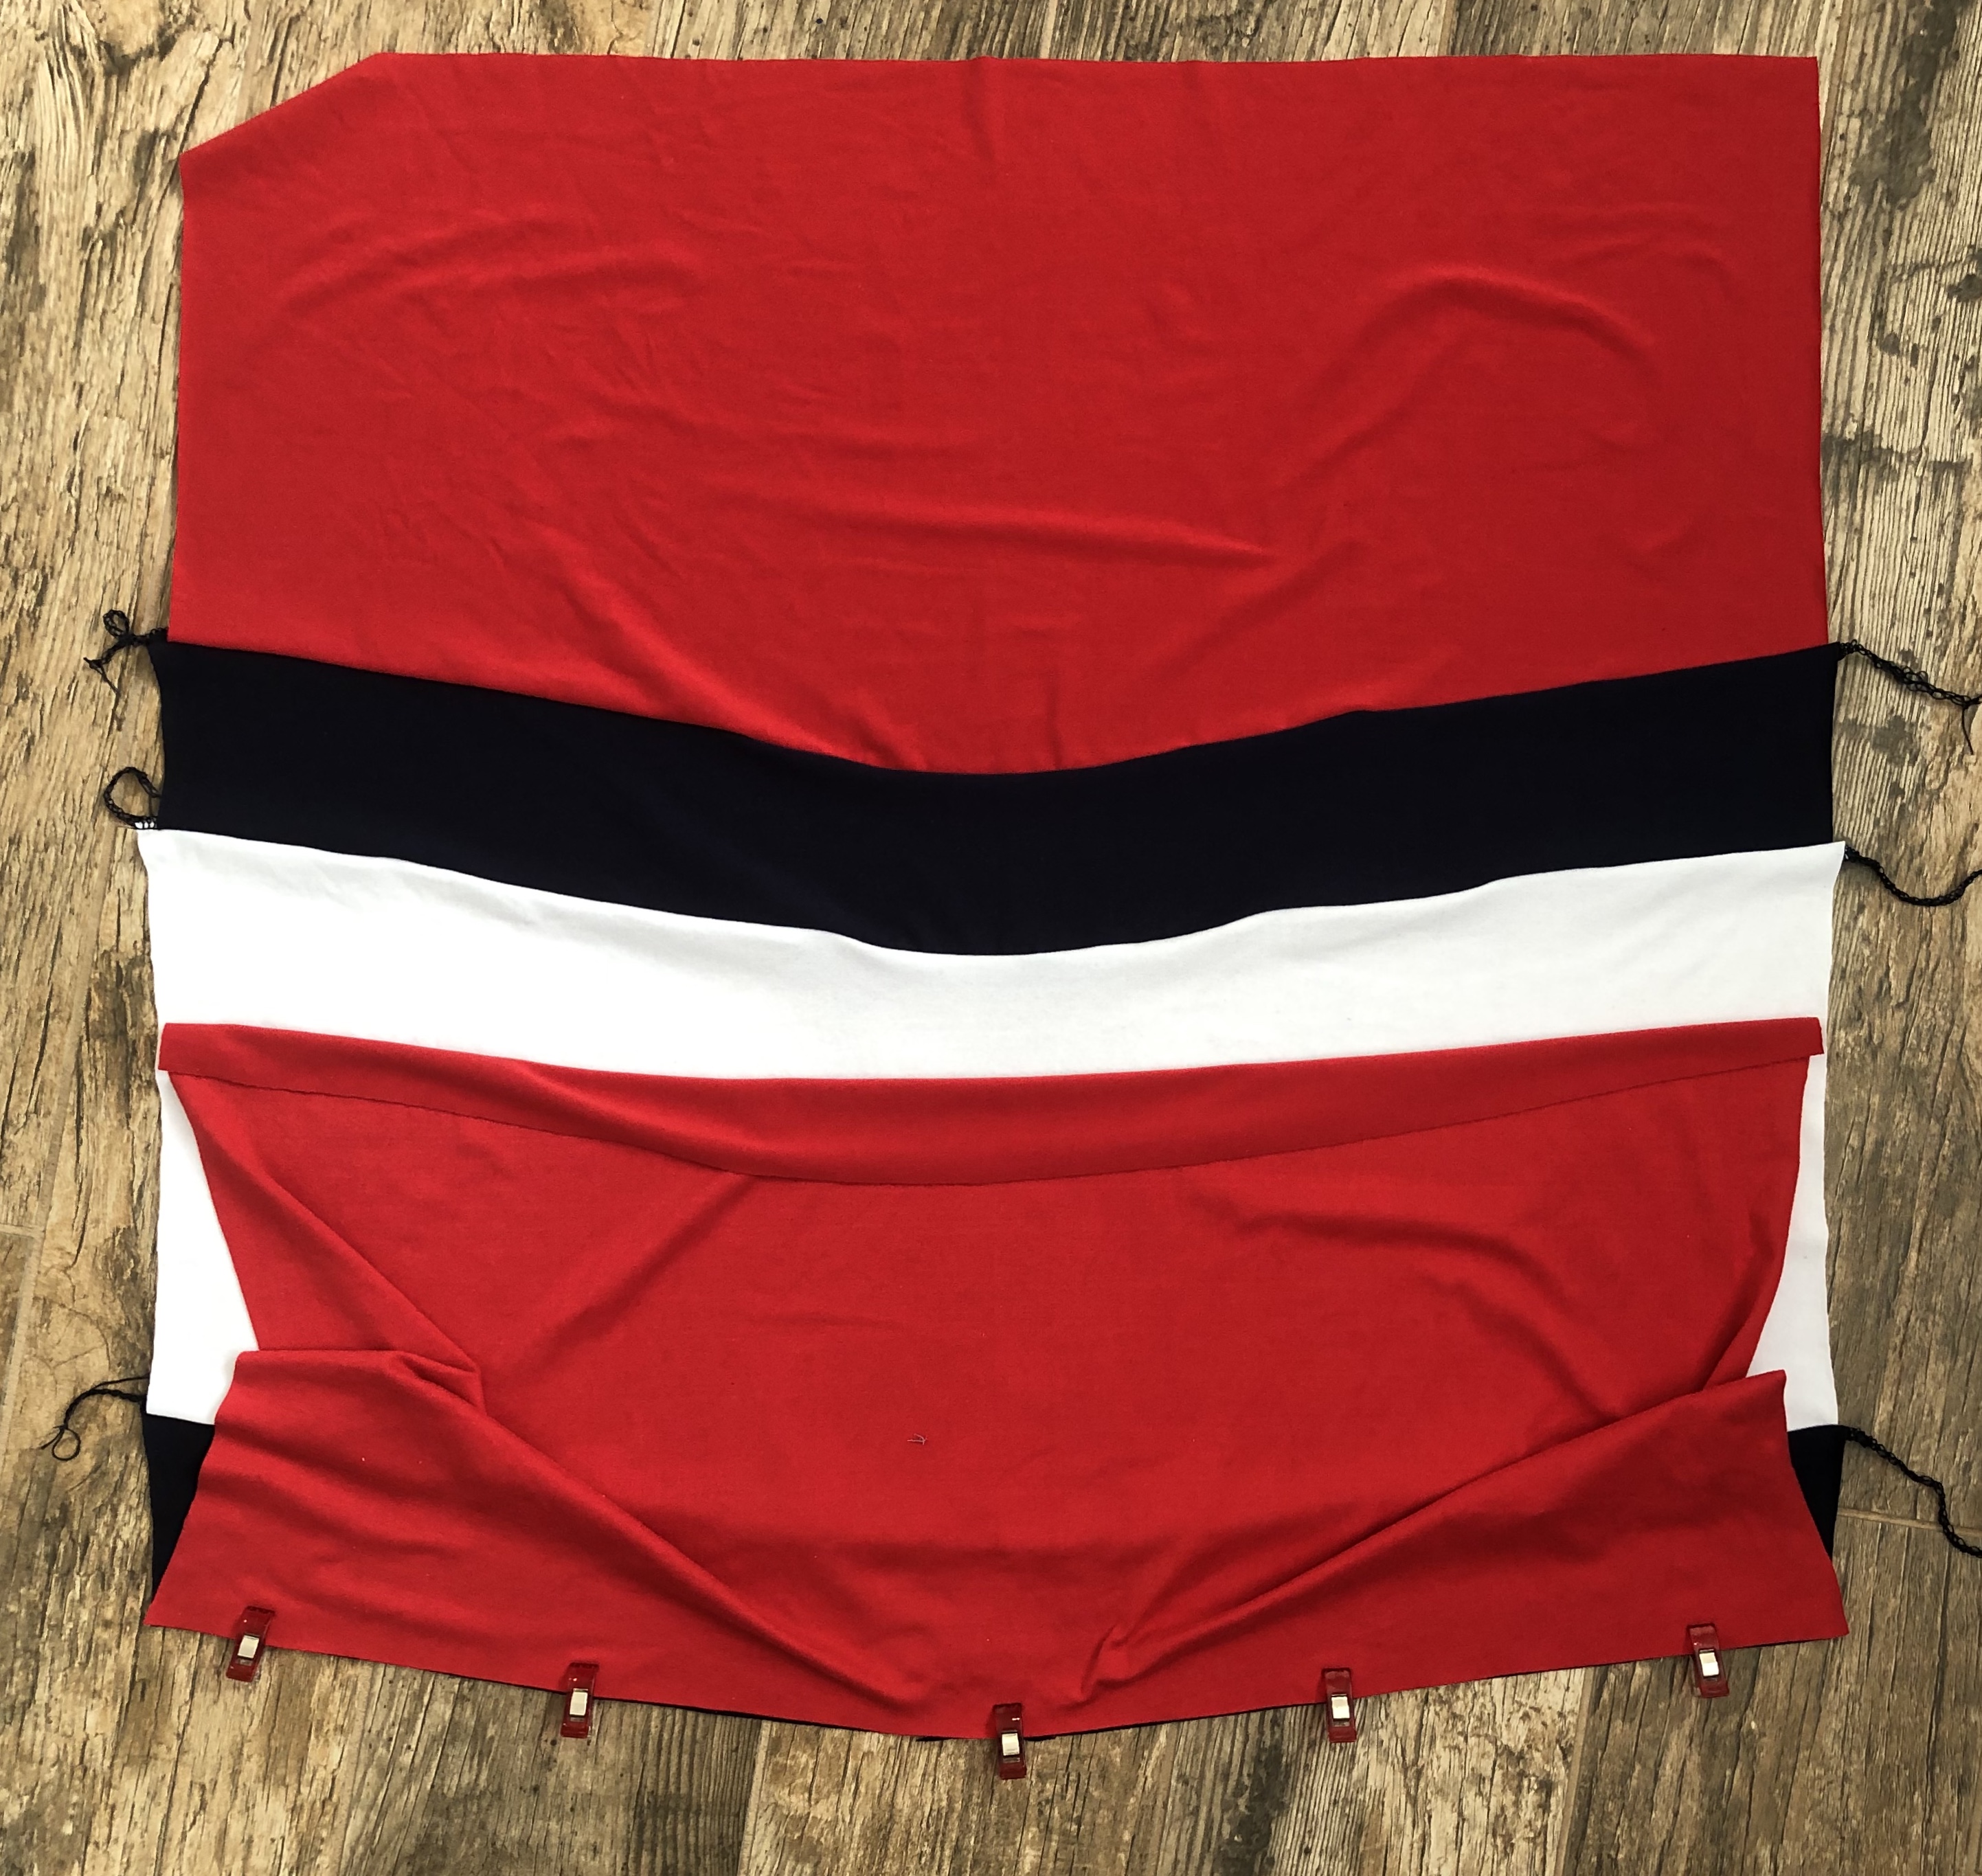
Do the front sleeves to the front bodice, right sides together, stitching both. Then take the back sleeves and attach them, right sides together, to the back bodice.

2E9B1250-6966-49C1-B5C3-4B0BB0BDF352

You will now have a circle with only the neckline of the moto patch, unsecured.

Since we already did the hood portion and it is ready, we can attach it to the bodice, following the pattern instructions.

76EBF583-46C8-4991-AB6D-2BC9954A7435

Now all the moto patch stitching is secured in another seam and we can go back to finish the sleeves and side seams, then hem the sleeves and bodice. Whew, if you hung with me this whole time, you now have an awesome faux moto hacked hoodie.

782D00A4-43C0-4838-9DB2-A4371A77F30A

Would you believe it took me longer to write this up than it took to actually sew the hoodie?? It did! Now I’m thinking of other places I can sneak in these faux moto patches. Where would you place a moto patch?

F9A65462-514D-4A3A-95FD-BD750A0471BD

The fabric I used to make this hoodie was brushed French Terry from So Sew English Fabrics. I used the hooded version of the Greenstyle Creations Ā Hudson pullover for this hack. If you want to watch my time-lapse video of coverstitching these faux pintucks, you can on my youtube.


This post may contain affiliate links. This means if you make a purchase through that link, I may get a % back, at no additional cost to you. Let’s be honest, we all know it goes right back to adding to my fabric stash. All opinionsĀ on this blog are my own.

Wardrobe Staples – Tank tops

Wardrobe staples are just that, staples. They are such great building blocks that can take a simple outfit up a notch or allow you to quickly expand your current wardrobe. Since I live in a pretty warm climate, year round, the wardrobe staple I use the most, are tank tops. When I got the opportunity to test the new Greenstyle Creations Staple Tank, I was excited. I enjoy testing and helping out pattern designers, but it can be a lot of work, fabric, and time. So when the item I’m testing, happens to be something I will get a lot of wear from, it’s a huge plus.

This particular tank is great to wear solo, layering over a sports bra, layering under a jacket or even a loose fit slouchy top. Ā It fits the bust nicely and allows for a little breathing room throughout the rest of the bodice. The staple tank is available in the size range of XXS – 3XL. It has a pretty scoop back, perfect for showing off those fun bra straps if you wanted to.

3845068C-24EF-4843-9009-EE426A9165E9

Another thing I love about this tank, is the option to finish your neck and arms with either a band or binding. Ā I’ve become fond of binding on my clothes. I really like the low profile look it gives and I don’t find it more or less difficult to do than a traditional band.

C55C908B-9E27-45F4-BB33-0AA2ED91A48A

I used the binding method in the pattern for both my tanks. Yup, you read that right, I have already made two, and have a few more planned. Did I mention these are fast sews and don’t take up much fabric?? Ā Both of my tanks were made from leftover fabric from my camo leggings and ombre maxi. I did my exact size per the chart and added my usual length for my height. Boom, done.

For the camo tank, I used double brushed poly, from So Sew English. I really love camo and I’m enjoying the addition to my wardrobe. I was so pleased with the versatility of this tank that I couldn’t stop trying different ways of wearing it. I kind of wonder what my neighbors were thinking as I paraded in and out of my house with all these outfit changes, ha ha ha.

For this outfit, I paired the tank with a new pair of Greenstyle Stride tights, in Supplex, and my black tennis shoes. This was super comfortable when I rode on my recumbent bike and for running around with the kiddos. This supplex was my first and I got it from So Sew English (SSE). It has a GSM of 440 and has totally been squat proof, plus it was a dream to sew up.

I changed my shoes into my white tennis shoes and threw on my cuffed sleeve jean jacket. Perfect for those cool mornings and evenings, or whenever I want to pretend that I don’t live in tanks and leggings most days. There is just something about the jean jacket and camo combo I can’t get enough of.

Change the shoes. Switch to some stretchy jeans and add a long necklace. Tucked in or left out. With a cardigan (This one is the Coffee & Tea from Annelaine, in a ribbed sweater knit from SSE) or without. Another three looks! SERIOUSLY!!Ā  5 looks so far and I didn’t even get to take pictures of this tank with my slouchy tops, darn laundry.

B5D40813-2C55-45FA-B03F-2CF2357EFBB7

ITY is one of my favorite fabrics to wear for summer here. It has a cool touch to it and it feels so flowy that I wanted to try it as this tank. This particular ITY is the blue ombre Venezia from So Sew English. It’s only been available in bundles recently, but they do have other Venezia ITY options. I hung on to my three yard cut for a while and finally used it for my recent maxi. I was left with around two yards of not quite half the width of fabric. Turns out it was the perfect amount to make this tank. I really like how it looks with the white shorts. I’m thinking I need to add pair of loose leg white pants to my wardrobe soon. Wouldn’t that be cute??

1A685726-7A6F-498E-9CE7-0404B3C1C5B9

The Staple Tank is available from Greenstyle Creations and is on release sale right now, ending Wednesday, March 27th.Ā  How would you wear your staple tanks??


This post may contain affiliate links. This means if you make a purchase through that link, I may get a % back, at no additional cost to you. Let’s be honest, we all know it goes right back to adding to my fabric stash. All opinionsĀ on this blog are my own.

Comfort Zone Redefined – Sew Expo

I have made it my goal, the past two years, to get out of my comfort zone. I had a health scare, I guess that’s the best way to put it, and my entire world was shaken up. It impacted things to the point where I had to stop normal daily life, sewing included. I don’t like dwelling on it, but it is reality, and I am ā€œnot supposed to be hereā€, or ā€œsupposed to be in a wheelchairā€. Ā As you can see from my pictures and this blog, neither is the case, and for that I am so incredibly grateful. Hence my blog and Instagram name.

These health issues are a struggle I will always have and some days are better than others, but I truly am grateful for where I am today. When I talk about my comfort zone it is mostly relating to the things I sew and wear, but it also encompasses so much more. This blog, my Instagram, going to a local Sewcial (my husband came with for moral support, he rocks), taking pictures of my makes and posting them online for all to see, testing patterns, helping others with their sewing journey, and sewing for others. All these things have been out of my comfort zone and usually I talk myself out of them, repeatedly, before I give myself the mental butt kick and go for it.

I know I mentioned I was going to a Sewing Expo in this blog post. Well, I did it, even though I was so nervous! I was nervous about traveling solo, meeting people in person that I had only met online, the weather, my health, my clothes, so many, many things. In reality, it was amazing. I realized that these were my people. I fit with them and our mutual love of sewing and fabric. I met so many new people, people I had seen online, and friends I had made online but never hung out with in real life. I laughed and smiled so much, my jaw and neck muscles were sore, ha ha ha. Life lesson – Laugh more! I wish I had gotten more pictures but I will forever cherish this experience and I can’t wait until the next time.


While at the Expo I took a class on ā€œThe Ins and Outs of Fitting the ā€œBootyā€, by Lorraine Henry.Ā  It appealed to me as something that isn’t typically spent time on in the groups I’m in, yet is so important. Since one of my sewing goals is involving more pants and shorts, I saw it as the perfect opportunity. I wish the class was longer because I wanted more info and I am curious how some of the fitting adjustments would vary depending on the type of pants I was making. She used a neat tape measure to easily measure her rise and crotch depth, among other important measurements.Ā  I took a few notes and can’t wait to research more and incorporate the info in my future makes.

IMG_2572

There were so many neat machines and gadgets at the Expo too. It was pretty cool seeing them in action. I got myself something new to try. It’s called a Lil’ Hookey. I have been looking for a more efficient way of finishing off my serger tails and I’m hoping this is it. You can join me here as I try it out for the first time.

IMG_2698

If you ever get the chance to attend a sewcial or sewing expo, I would highly suggest giving it a go. You never know who you will meet and what you may learn. I am eagerly awaiting my next opportunity. My comfort zone has been redefined, yet again, and I love it. Here is to sewing and growing ā¤


This post may contain affiliate links. This means if you make a purchase through that link, I may get a % back, at no additional cost to you. Let’s be honest, we all know it goes right back to adding to my fabric stash. All opinionsĀ on this blog are my own.


The great boxer brief debate

One of my sewing goals this year was to sew more for my husband. I have made a few things for him on my sewing journey and some he has loved and others, meh. I really want him to enjoy custom fitting clothes too. Plus all the fabric options out there, maybe he would like something more than just a regular cotton t-shirt.

I decided to start by making him some boxer briefs. I used the Walbrook boxer briefs from Greenstyle Creations (available in boys and mens). The pattern has a few options to choose from like a functioning or non- functioning fly, an encased elastic waistband or an exposed elastic waistband, and two different lengths. The sizing range is S-XXXL (28ā€- 50ā€ waist). To make these fully his, I had him pick the options he wanted. He chose functioning fly, encased elastic waistband, and the longer length. Whew, progress.

Now for the fabric. I didn’t know what kind of fabric he would prefer and people swear by different ones, so why not make a few. He is working hard on learning fabrics but I figured I’d play it safe and slim down his choices. We ended up with a cotton spandex (ice cream cones, I know right?!? He is such a trooper), double brushed poly (plaid), and MVC (Micro Viscose Cotton, black). When talking breathability and softness I see these three come up quite often so I figured this would be a good comparison for them.

F28F68FF-B708-4391-A4C4-FFE3BD0627D6

Let’s talk sewing first. I much preferred sewing the DBP. The MVC was a close second, with the Cotton Spandex bringing up the rear (wink wink). The pattern requires at least 50% stretch, and while they all have that, a few parts were a bit more tricky with the MVC (wanting to roll) and Cotton Spandex (a bit more bulky) vs the DBP. I sewed up the Cotton Spandex pair completely first and then switched my thread, (yes I am one of those that need matching thread) and sewed up the DBP and MVC at the same time. The MVC was harder for me to tell the right from the wrong side so I marked them once cut, to keep things correct. While I used the same options for all pairs, I’m not exactly sure what happened to the fly on the DBP pair. It is still ā€œfunctioningā€ but it is more of a functioning air vent, shall we say?, vs a functioning access port. Ha ha ha. Seriously no idea.

When I gave the three pairs to my husband I also gave him a spreadsheet questionnaire to give me feedback. Ā Ya’ll my husband is so awesome! Not only did he fill out my stupid questions but I told him I was going to write up a blog post about it so I needed honest feedback. The man totally gave each a good solid wear! He went running in them. He went to work in them. He did housework in them. He slept in them. He even washed and dried them and wore them again. I had him rate them on a scale of 1-5 for a few categories and then an overall rating, plus any notes he wanted to share. This is how they ranked, and honestly I was surprised with his choices.

His overall least favorite was the Cotton Spandex (ice cream cone) pair ranking at a 3 out of 5. He gave it a 4 for fit and support. A 3 for breathability and it ranked a full 5 for access. It lost points in the overall comfort and came in at a 2. His reasoning was because the fabric felt too thick and bunched up easily.

A2ECE933-A558-4818-B58A-D1ED62C2E107

Next up was the MVC (black) pair which ranked at a 3 out of 5 as well. The differences here that pushed it ahead of the cotton spandex pair was in the support (a full 5) and over all comfort (4). The reason this pair didn’t come out on top was because he felt it twisted and turned into a wedgie too easily.

8DB54923-F05C-4E3E-9E5C-69747193B38C

His favorite pair was the DBP (plaid) with a full 5 for overall preference. He gave it a 5 in breathability, a 5 in overall comfort and a 4 in support. His only complaint was the access, which got a 2. I guess he wasn’t a fan of the ā€œair ventā€. He felt that the DBP was the most comfortable fabric as well and score, he even asked for a few more pairs.

4B718F3F-A2C9-4E32-9B34-B7EEE6B7B285
Front
1841F4CC-5A91-467E-9BE5-4D20703E4AC0
Back

I plan to let him do some fabric shopping and make him a few more pairs. I also put in a request for him to reevaluate the three when summer hits and see if he still ranks them the same. I think it is pretty cool that we ranked them the same. It makes it nice when he prefers wearing the ones I preferred sewing. Now my son is asking for matching pairs, so maybe that will be next.

All fabric was from So Sew English Fabrics. The pattern I used was the Walbrook Boxer Briefs from Greenstyle Creations.

This post may contain affiliate links. This means if you make a purchase through that link, I may get a % back, at no additional cost to you. Let’s be honest, we all know it goes right back to adding to my fabric stash. All opinionsĀ on this blog are my own and I have a lot

Unexpected fabric and a new dress

My most recent make was a complete gamble with the pattern and fabric both. When I got this black foil hacci fabric, I discovered it wasn’t exactly what I had envisioned when I ordered it. I set it aside since it wouldn’t fit for what I had originally intended it for. Then along came the opportunity to test a new pattern for Sonia Estep. I love how she drafts so I felt confident it wouldn’t be a waste of my fabric, but the actual look is not my norm and made me nervous to try. I stepped out of my comfort zone again and I am so happy I did.

The Charleston from Annelaine Patterns, is a swing dress designed for sizes 00-30. It has a scoop neck, a subtle or deep v neck, and a button up v neck. Not into buttons?? You can totally do snaps too. You can pick a short, ¾, or a long sleeve and the three hemline options are straight, a subtle high-low, or a dramatic high-low. Since I was going for it with a leather looking dress I decided to amp it up a bit and picked the deep v neck. I did the long sleeves with the high front hem and the back straight hem. I followed the instructions and graded for my size and height, it fit great. Total shocker I know (insert sarcastic laughing).

Then came the, ā€œhow do I wear thisā€, moment. Since this was out of my norm, nothing came to mind immediately. Thank goodness for my sewing friends, they are seriously amazing!! After some general suggestions and a closet raid I came up with a few ways I could see myself actually wearing this.

Let’s go with the date night look first. I usually dress simple so adding heels, a long necklace, and some bigger earring studs was just enough for me to feel dressed up.

AC53FF51-F346-4A35-834D-68CF82A1B9AB

For a relaxed look I paired it with some white tennis shoes, a subtle long necklace, and a jean jacket. I rolled up my jacket sleeves too and I felt like it gave it a classic relaxed look. I could see myself wearing this out for errands or a lunch with friends.

203C679A-24E1-45DA-BE73-026830719A5C

For a little less casual look or utilizing an extra layer for those cooler days, I swapped my tennis shoes out for my boots. I kept the necklace and jacket, but rolled the sleeves down. I like how the jacket pulled the dress in a little and gave me some more waist definition yet I still have the movement and comfort of the swing dress.

139C75C1-484C-4FED-BAE9-1696FBC05C33

Guys!!!! I have a leather look dress, that I love, and will see frequent rotation in my wardrobe. Happy dance for unexpected fabrics and stepping out of my comfort zone.

Pattern is the Charleston and on new release sale for 50% off until March 10th. The fabric was from a So Sew English bundle and isn’t in stock currently. Since this pattern only needs 20%, 4 way stretch, there are lots of other options you can use to make your own Charleston.

AE85FA4E-C43E-4879-916A-2B9FD34149BC

This post may contain affiliate links. This means, if you make a purchase through that link, I may get a % back, at no additional cost to you. Let’s be honest, we all know it goes right back to adding to my fabric stash. All opinionsĀ on this blog are my own.

Venice in Spring

Last summer I ventured into woven garments for myself. I really loved the different looks I was able to achieve with them and the variations it added to my wardrobe. With the ever increasing temps here, I went looking for some new patterns to try this year and found the Venice dress from New Horizons Designs. I had previously overlooked this pattern in my search because I didn’t realize it was drafted for wovens. I had seen that it was able to be used with lightweight knits and I completely missed the woven part. Being able to use both wovens and knits is a benefit in my book since it allows me to use it more often and with more of my fabric options. Something about my custom fitting clothing being even more cost effective makes me all warm and fuzzy inside.

The Venice has several length options, mini, high-low, and maxi. I am continually blown away, with how the simple change of length can completely change up the look of a dress, love it! In addition to the length options, you can choose several sleeve options. There is the sleeveless, long sleeve, and both long and short split sleeves. I love how the split sleeve adds just a little something different and allows for air flow while still giving you some arm coverage. I decided to go with the high-low length and the short split sleeves. Look at these pretty sleeves!!!

Since this is a woven, there is the concern about fraying edges and seam finishes. The way the Venice is constructed accounts for that and I just love when the inside of a garment is as pretty as the outside. The neckline has a facing and the way it is finished with the sleeve is super clean.


I usually find something to modify on patterns and this make was no different. I really try to follow things to a T but unless I’m testing a pattern, I usually fail in that regard ha ha ha. Last summer I discovered the rolled hem feature on my serger and this dress seemed like the perfect opportunity to try it again. I feel like rolled hems are so pretty on garments that need flowy drape, it just seems to add to the look. It also makes the inside hem seam not visible when doing the high-low option, which I love.

The second tweak I made was to the split seam hems. The pattern has you fold over Ā¼ā€ and then fold over again to hem. I like to finish the edge, before folding, by running it through my serger. I’m not cutting anything off and it gives me an easy fold mark for the first Ā¼ā€ fold.

 I got this print last summer, but ran out of time to use before our ā€œwinterā€ began. I didn’t have to wait long to sew it up, I guess that’s a positive to living in the desert?? This is the Blue Leslie Rayon Challis from So Sew English Fabrics. Rayon challis is one of my favorite woven fabrics I discovered last summer. It has gorgeous drape, it’s not usually see through, and has a cool smooth feel to it. Perfect for all those light and flowy spring/summer dresses I have on my list.

This post may contain affiliate links. This means if you make a purchase through that link, I may get a % back, at no additional cost to you. Let’s be honest, we all know it goes right back to adding to my fabric stash. All opinions on this blog are my own.

Sew Expo – Travel clothes

With my upcoming trip to the Sew Expo, OMG I’m SOOOO Excited, I realized I didn’t have anything to wear. I know this is a typical problem and in the past I would run off to the store and try to find a few new things to refresh my wardrobe. In this case though, I got to sew. The benefit of having a full wardrobe in my sewing room, some assembly required.

Being a desert dweller, I am not used to really cold temps. Layers for me consist of undergarments and one outer layer or two layers of rayon spandex. In the winter my layers are a shirt and sweatshirt. Very rarely do we get to break out the beanies, gloves, thermals etc. When I looked at the weather for the Sew Expo, I realized I was going to be needing actual layers. I mean, seriously, they had snow in the forecast. Of course after deciding this and making my sewing plan for outfits, we ended up with a winter storm and even got snow. It only lasted the one day and two days later we were back out in shorts and t-shirts, but it was a great opportunity to try out my newly expanded layers. Plus the mountains were so pretty!

IMG_2260

I am a planner so I decided to start my outfit planning from day one, travel day. I had just received some camo performance tactel from So Sew English and thought it would make a nice pair of Greenstyle Creations Stride Athletic Tights. The stride tights have a few different options allowing you to do a plain or pocket side insert, mid rise or high rise waistband, and several different lengths. You can also add a gusset, cross cuffs, and a hidden waistband pocket. Since I was mainly wearing these for travel I chose the plain side pocket and high-rise contoured waistband. I really didn’t want to chance them being see through, when bending over, and with my health issues I didn’t want them too snug, so I sized them up. They came out perfectly !

Then I realized I didn’t have any long sleeve t-shirts for layering so I went through my pattern stash to find just the right one. I couldn’t find what I needed and trying to be frugal, I didn’t want to purchase a new pattern. I decided to do a mash and hack from several patterns and some store bought tops to create just what I wanted. “Self drafted” with some white double brushed poly from So Sew English, and I love it.

EAB2A38E-B3FF-4BA0-B97B-2B62C61180A1

I paired my new leggings and top with a new jean jacket. I’m still looking for the perfect pattern so it’s store bought, but at least it was on sale and we had old gift cards so it didn’t cost anything.

F28CF98E-3CAD-4A69-8FF2-AD8F4AEE0FFF

Now I have a comfy but cute outfit, perfect for airport travel. If you see me strolling through the airport, say hi. I’m kidding, don’t say hi, I’m really shy and wouldn’t know what to say, ha ha ha. Again, kidding!!!! I am really shy, but I’d love to meet fellow sewing addicts in person.

C19AC8CA-5AD6-4FA0-BC78-E6452134CCAF

This post may contain affiliate links. This means if you make a purchase through that link, I may get a % back, at no additional cost to you. Let’s be honest, we all know it goes right back to adding to my fabric stash. All opinionsĀ on this blog are my own.

Lexington love and my newest hack

The Lexington recently released from Annelaine patterns, and if you saw my last post, you know I absolutely love the pattern. If you didn’t see it, you can read all about it here.

In typical Danielle fashion I immediately pictured a hack of it to create a matching mother daughter maxi dress set I had pinned.

inset 2

I decided to do the red, white, and navy combo with double brushed poly solids that I purchased from Amelia Lane Designs.

I used the empire cut line for the bodice and skirt, which meant that the only modifications/color blocking I needed to do was to the skirt piece and this is how I did it.

To start with I eyeballed my lengths for the color blocking and used the peplum front and above knee front cut lines to gauge a starting point. In the case of my daughter’s, it was the front peplum and front dress cut lines.

IMG_1584

From looking at the pinspiration picture, I felt that the top red portion and the bottom red portion were about the same and the white portion was a little smaller than them. I also knew I wanted my blue strips to be the same size, and around 3ā€, when finished. I marked the skirt pattern piece a few times for each section, until I got it to where I wanted. Keep in mind the actual measurements, for your skirt color blocking pieces, will vary depending on your specific size chosen. Just to give you an idea, I will share what I used for my daughters and mine. I ended up with around 14.5ā€ for the red pieces, 4ā€ for the blue pieces, and 9.75ā€ for the white piece. On my daughters, I ended up with around 11ā€ for the red pieces, 3ā€ for the blue pieces, and 9ā€ for the white pieces.

IMG_1590

Now comes the fun part. Since the center of the skirt piece color blocking was lower than the side seams, I needed to create that V for each piece. To do so I measured from each point I had marked on the fold line, UP 2ā€, and marked it on the side seam edge (pictured in red below).

IMG_E1591

I repeated until I had all 4 pieces marked.

Then taking my ruler I drew a line from the upper mark, to the lower mark, for each one. I wanted to curve my centers so I went slightly past my lower mark when connecting the two marks.

IMG_E1599

I chose to make my center points less V like because I figured it would be easier to attach the pieces and with the skirt gathers I didn’t want my lines to look choppy once the dress was done. Then I smoothed out the line and the marks to have a clear cutting line.

IMG_E1602

Seam allowance needs to be added to each piece as well. You can choose to do so now, by making new pattern pieces for each color block, or you can do what I did, and add it when you cut the fabric out. If you choose to add it when cutting the fabric, make sure you do, or your skirt will end up too short. I forgot on two of my pieces and it made me panic before I reminded myself that it was my hack so I didn’t have to follow exact amounts, whew, bullet dodged. To account for this ā€œdesign adjustmentā€, I added a little more seam allowance to the connecting pieces.

When adding seam allowance, you will only need to add it to the bottom of the top red piece (R1), the top and bottom of the blue pieces (B1 & B2), the top and bottom of the white piece (W), and the top of the bottom red piece (R2). The original skirt pattern piece has the top seam allowance and the bottom hem allowance already included, so we can skip those.

You can use your new skirt pattern pieces to cut out your chosen colors. Since we are doing the straight floor maxi skirt, the front and back skirt pieces are the same which allows for us to cut two of each color block piece. When cutting, I marked my pieces and made sure to keep them in order so my skirt would fit back together correctly. I labeled them as R1, B1, W, B2, R2, in descending order from the top of the skirt.

IMG_E1603

Once you have all your pieces cut out (10 in total), you can assemble your skirt. To assemble I did both the front and back skirts at the same time, to avoid any confusion of which piece went where. I have this bad habit of walking away to tend the kids or some house thing, and I forget where I was in my sewing. I didn’t want anymore ā€œdesign adjustmentsā€ and I figured this would be easiest to keep it organized.

IMG_E1617

Take your R1 piece and lay it right side up, fully open. Taking your B1 piece, lay it right side down on R1, lining up the bottom of R1 and the top of B1. Clip and sew that seam. Repeat for the back skirt piece.

IMG_1618

Take your R1B1 piece and lay it right side up again. Place your W piece right side down on R1B1, lining up the bottom of R1B1 with the top of W. Clip and sew that seam. Repeat for the back skirt piece.

IMG_1622

Take your R1B1W piece and lay it right side up again. Place your B2 piece right side down on R1B1W, lining up the bottom of R1B1W with the top of B2. Clip and sew that seam. Repeat for the back skirt piece.

IMG_1623

Last one! Take your R1B1WB2 piece and lay it right side up again. Place you R2 piece right side down on R1B1WB2, lining up the bottom of R1B1WB2 with the top of R2. Clip and sew that seam. Repeat for the back skirt piece.

IMG_1625

Now you have your front and back skirt pieces complete and you can attach them together and finish the dress exactly like the pattern instructs.

IMG_1626

We really love our matching pinspiration and are on the lookout for our next color combos.

PAII9462

Pattern used was the Womens and Girls Lexington from Annelaine patterns which is on sale through February 13th. We used the empire, floor length maxi, sleeveless, and the scoop neck options. Fabric was red, white and navy solid double brushed poly from Amelia Lane Designs. If you haven’t heard of Amelia Lane, they are a newer fabric company. They have some pretty neat offerings and I’ve been impressed with the quality, shipping speed, and customer service. They are currently having a site wide 20% off sale with code PERFECTPAIR ending February 17th.

This post may contain affiliate links. This means if you make a purchase through that link, I may get a % back, at no additional cost to you. Let’s be honest, we all know it goes right back to adding to my fabric stash. All opinionsĀ on this blog are my own.

Wrong this whole time but now I’m obsessed

You want to know what I learned during a recent pattern test for Annelaine Patterns?? I learned that I measured my side waist wrong, let’s say, around 2 years ago. I have been operating under the assumption I had an 8ā€ side waist when in reality I have a 9ā€ side waist. How is this possible and how have I not had major fitting issues? As for the fitting issues I usually add length to my shirts at the natural waistline, but for my overall height. Add that to looser fit garments that have less defined waistlines or slouchy fits, and I haven’t had any issues. Kind of like a, two negatives equal a positive, type situation.

In the case of this recent test though, the side waist measurement was extremely important. The top/dress was designed to be a slimmer fit and hit right at the natural waist, thus making my inch difference very noticeable.

Curious about how to measure your side waist? This is how. You know those stretchy selvedge pieces you usually throw away or let your kids tie things up with? Those work great for this, so grab two. Take one and tie off your upperbust. Then sing, ā€œI’m a little teapotā€, and when you get to the tipping part, make a note of where your side crease is and tie it off. You can also tie off where you think your waist is and move around for a bit, allowing the fabric to move to its natural spot, for those of you not into fitting musicals. Now that you have your two spots tied off, you measure from the upperbust one down to your waist one. Here is the important part and what I missed my first time. This measurement should be along the body, tracing your natural curve. Mind blown people. I had an extra inch hanging out in my curve.

Once I knew about my extra inch I was able to add it to the pattern and ended up with a wonderful fit. So wonderful that I have made 4 for myself, plus I hacked a 5th, and made two matching ones for my daughter. I’m totally obsessed !!

The pattern is the Lexington and is available in womens sizing (00-30) and girls (9 mon-20). It has several options so you can decide which look you prefer and allows for year round wear.

BCRC1583

For this one I used thisĀ floral vine rayon spandex from So Sew English. I chose short sleeves, scoop neckline, the waist cutline for the bodice and the skirt is the subtle hi-lo peplum. It was the perfect top to wear with my new pair of hunter green ponte (available at SSE)Ā Peglegs. I have been wanting a green pair for a while so I was really excited I finally could make them and get them in my closet.

CXYE9864

For my second one I went with this gorgeous floral Amber bulgaree ITY. I got it last year from So Sew English and I can’t believe there is still some in stock. I just love how it gathers and drapes. Combine that with the above knee subtle hi-lo skirt and I am in love!! I chose the sleeveless, empire cut bodice, with a scoop neckline.

BJHX9407

This third one I saved for ā€œlastā€.

HHFU8607

I’ve had this ombre blue Venezia ITY in my So Sew English stash, for quite some time. I hadn’t found the right pattern to showcase the gorgeous ombre so it sat in my cabinet. Once I had the first two done I knew this was the right pattern for it. I did the sleeveless, empire bodice with a scoop neckline. I also did the optional side slit for a little extra. I LOVE it!! I’m so glad I saved the fabric for this floor length maxi.

XXCV7849

My daughter saw my Lexingtons and asked for a matching one. Since I didn’t have enough of the fabric I used for my first three, I ordered some double brushed poly fromĀ Amelia Lane Designs and made us a matching pair. This solid navyĀ compliments the Santa Fe print beautifully and she loves her Lexington as much as I do. These are both the sleeveless, empire cutline bodice. Mine is the scoop neckline and hers is a standard. Both are the floor length maxis.

KZCF9900

Not only have I found an amazing pattern that will get lots of use in our house, but I also learned something new about measuring my body to ensure a better fit. I call that a sewing win.

*Enabler alert*

The women and girls Lexington is on sale for 40% off until Wednesday February 13th, 12pm mst.

Amelia Lane Designs is having a 20% off site wide sale until Sunday February 17th. Code PERFECTPAIRĀ  Plus they are running a shipping special that all orders over $40 ship for $10 (international excluded) WOWZERS!

This post may contain affiliate links. This means if you make a purchase through that link, I may get a % back, at no additional cost to you. Let’s be honest, we all know it goes right back to adding to my fabric stash. All opinionsĀ on this blog are my own and I have a lot.

Sewing for my son – Sawyer Shirt

My son loves when I sew for him. He enjoys picking out his pattern and shopping in my fabric stash. His favorite part is picking options though. I just love his reasoning behind what he picks too. This last sew was the newly released Sawyer shirt from Annelaine Patterns. I showed him the pattern and got his resounding approval. ā€œMom, I like that one, and I need a new shirt because I’m 5 now and I’m bigger.ā€ It’s amazing all the things that have changed, now that he is five.

Annelaine patterns has a large size range (6 mon – kids 20) which I particularly love. Kids grow so fast and I like being able to use the same pattern repeatedly, it really makes sewing economical. The sawyer shirt is loaded with some great options too. There is the classic tee version, with sleeveless, short, standard or faux layered long sleeves. You have an optional placket, color blocking, lined or unlined hood, and pockets (inseam or circular kangaroo). You can either hem or cuff your sleeves and hem or band your bottom hem. I have no idea how many combos you can make with all of those options, I’d rather sew than do the math, but it really allows customization and talk about maximizing a patterns use even more.

The options my son picked were the classic tee, faux layered long sleeve, cuffed sleeves, and regular hem. Are you ready for his reasoning?? He likes hoods but since I just made him his Bubby and Bee hoodie, he wanted, ā€œsomething different this timeā€. Then he said he likes two shirts on the sleeve but doesn’t like how, ā€œthe under shirt gets all twisty in my armpits and I can’t do this.ā€ At which point he jumped up and down and waved his arms around. Ha ha ha, guys, this kid cracks me up. As for the cuffed sleeves, that was because they ā€œhold up my sleeves when I’m eating foodā€, and the regular hem, he just liked the line drawing. Makes total sense to me.

A4ED15CF-2399-42F1-A09C-CE9F1E66B670.JPEG

Now on to his fabric choices. I will usually show him a few options when I’m ordering and allow him to pick some things for my stash. Then he has some options to choose from when we decide to make him something. He knows where most of his picks are located in my stash so it makes it quick for choosing. This time he picked the blue corey stripe double brushed poly and a solid black double brushed poly to go with. He really likes how soft double brushed poly is and I love how well it holds up. With the amount of washing his clothes get and the things that end up getting washed with his clothes (rocks, tissues, toy cars, etc), I appreciate things that stay bright and don’t get all pilly.

The best part of sewing for my son is his reaction when I finish and show it to him. He usually runs up and hugs it and asks if he can wear it. He has learned that I like to get pictures before he wears them, so he usually asks if we can do pictures, right now, so he can have it immediately.

Pictures with a 5 year old active kiddo can sometimes be a challenge and this time he asked if he could do a video instead. Who am I to say no if it helps him get his wiggles out? His video turned out so cute I just had to share, and note, no armpit twisting while he jumps around with his arms waving.

Enabler alert – the Sawyer shirt pattern is on release sale until Feb 5th, so be sure to check it out before it ends. All fabric is from So Sew English Fabrics.

977A9E09-A105-46E5-8575-E469D0E76E5A
Love this faux sleeve detail!

This post may contain affiliate links. This means if you make a purchase through that link, I may get a % back, at no additional cost to you. Let’s be honest, we all know it goes right back to adding to my fabric stash. All opinionsĀ on this blog are my own and I have a lot, ha ha ha.