Two pattern hacks – I love fringe

Sewing is creative. It can also be a challenge. It is something that causes me a myriad of emotions from stress to euphoria, and I can’t seem to get enough of it. One of my greatest sewing joys is hacking patterns. I love taking something and making it into something else. Letting my creative process run wild and seeing what happens.

I will find myself purchasing a fabric, not knowing how it will be used, just that I love it and someday I will figure out what it needs to be. That was what happened when I got this Walter plaid woven, back in 2017. This fabric sat in my cabinets for a “little while” and then along came the pattern and an idea formed.

271EF94A-F6E5-42DB-B6CF-739DBFB77409

I used the Callie Cardi from Sonia Estep Designs, vest option. It is drafted for knits but only needs a minimum of 20% stretch. It also has quite a bit of ease so it was a good candidate for a woven hack. I made a size 10, and sized up the upper portion of the bodice, to a 14. The only places it pulled, was across the shoulder blades on the back, and that two size addition was enough to stop that. I probably could have gotten away with just sizing up one, but I didn’t want to chance it being too snug, so I went two. I love it as is. I started at a 14, at the underarm point and graded it down to a 10. You can see part of my grading path in the picture below.

E95B21A0-3055-45DB-9AA3-C0E3B320DABF
Once I had that graded, I knew I wanted to add some length, both to the cardigan itself and to the front waterfall. To determine the overall length, I measured the length of the dress I made and added the needed amount to the cardi, to have it hit around the same part on my back. I know, super scientific 😉. It ended up being about 5 inches.

To lengthen the front waterfall pieces, I just extended it as far as my fabric would allow. Since I had it folded in half to make my mirror front pieces, this ended up being about 7 inches. Again, super scientific. Then I redrew my front line to keep the shape of the pattern piece.

I sewed up the cardigan, folded the armscyse back 1/2″ and hemmed them, per the pattern. Then came the fun part. I frayed all the remaining edges to create a fun fringe look. If you like watching things, I have a short video tutorial on my youtube, showing how I did this.

If you like to read about it, I added a straight stitch all the way around, 1″ from the edge, to keep it from fraying more.

CE551E8A-A1B5-4F09-9A86-28C9329083A0

Then I grabbed my seam ripper and a pin and started pulling out the threads.

D6747F5A-614B-418A-AF44-1E0D33176BFB

It took a while at first, but then I figured out how the threads were woven and it went much faster. I am obsessed with the finished product! Look at all that gorgeous fringe !!

F94F0A08-78B8-4CA8-9786-A229B288AD8E

To finish off my idea, I needed a slim fit dress to wear with it. The Magnolia Tee released with the Callie Cardi and was the perfect base to turn into a coordinating dress. I loved the cupro I used for my first Magnolia tee (blogged here) so I looked at the color options that might work with this woven. The solid grey from So Sew English Fabrics, was just the right one! It almost has a blue tone to it, which I really love.

FD7A0B82-9F25-44B6-8DD6-4A5E1D661D98

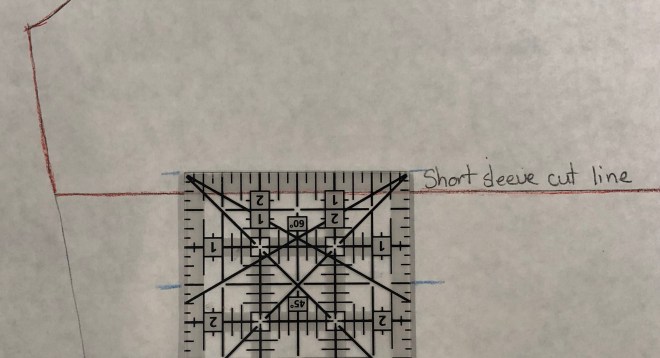
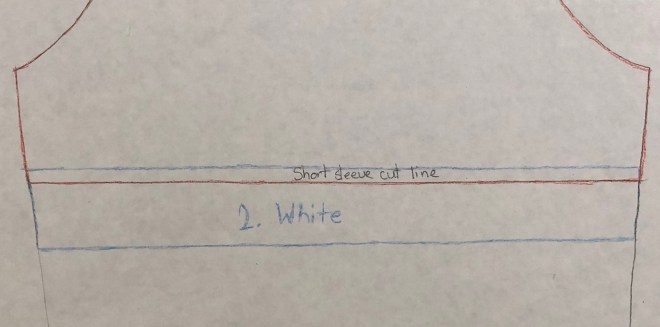
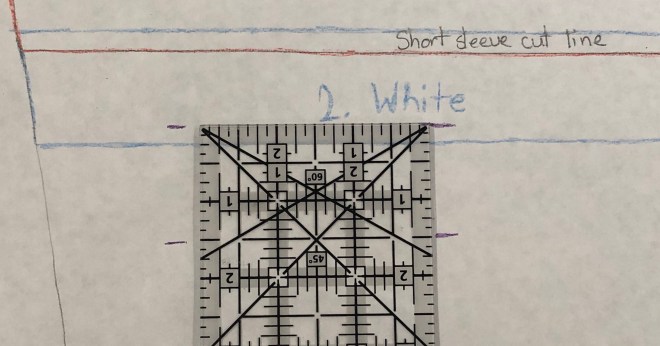
To make the dress, I just measured where I wanted the hem to hit on my body, and added the needed amount to the pattern. I had already added 1″ in the upper bodice, to account for my 9″ side waist, so I added an additional 5″ to the bottom curved hemline.

F975013A-D589-4C67-BC36-AB6FC9349BE8

I connected my dashes and redrew the side line, creating my new pattern piece. I repeated the same steps on the back bodice so they would match, and that was it.

6E1A1A5D-B82D-49B8-99E7-8D158E558149

I will definitely wear this dress on it’s own, but I do think I need a different pair of shoes for that. I tried on my fluffy grey boots with it and my daughter said it looked like pjs. Maybe a pair of white tennis shoes? What do you think? Have any shoe suggestions for me?

0F33B66E-5B65-4763-A5AE-88B7EEAF7EFC

I can’t get enough of this combo. The waterfall look really showcases the fringe and I couldn’t be happier with this two pattern hack.

BFD1B6C7-CBE4-45BE-94E6-551591FB965E

The Callie Cardi is on sale for $5 through Sunday, September 22. If you want to get the Magnolia Tee for free, check out the Sonia Estep Designs facebook group. There is a code in the comments of the first announcement post.

A355A779-5A31-4573-A68E-660B696B0B00

I hope this inspired you to let your creativity run wild and maybe hack your own patterns. Happy creating 💕

This post may contain affiliate links. This means if you make a purchase through that link, I may get a % back, at no additional cost to you. Let’s be honest, we all know it goes right back to adding to my fabric stash. All opinions on this blog are my own.

Mint Pants and My Marbella/Valencia Mash

At the end of last summer I scored an awesome bundle from So Sew English Fabrics. The bundle had this beautiful mint ponte and the perfect complement of this Alyssa ITY.

BTPI1174

Being the end of summer, I decided to wash it and put it away for this coming spring. Fortunately where I live, the time from summer ending and spring beginning feels relatively short, and it was here before I knew it.

I was indecisive as to making shorts or pants with the ponte, but decided to go with the pants so I could try out a new to me pattern. I picked the Patterns for Pirates, SOS skinny leg pants, and instead of doing the pattern waistband, I used the contour waistband from the Peglegs.

0960D3D2-BC87-43F1-A36E-120714A12A74

I decided to go with the contoured pegleg waistband for that extra stomach support and my personal comfort preference, due to my health stuff.  I also chose the back pocket, faux fly, and front pocket options. I wanted them to look like pants even if they felt like leggings. Want to see the pants being sewn up? You can view my time lapse video here. An item to note: I did my pocket construction a little different than the pattern instructs.

For the Alyssa ITY, to wear with the pants, I pulled out a pattern mash I did last year. I actually have done it twice already, but this time I decided to write up how. It felt like the perfect springy, complement to wear with mint pants. I mashed the crossback version of the New Horizons Designs, Valencia, with the sleeveless fit of their Marbella tank.

C47FDBDD-8BCD-45F9-9F52-14887B9B5E4B

You could probably do something similar with another tank pattern you may have, but I went with this combo for a few reasons. First, I had both patterns already. The second reason was with them being from the same company, I figured they would have similar design fits, making the mash easier. The final reason I chose these two was because I had made the Marbella tank several times previously and loved the easy neckline and armscye finish, which I wanted to incorporate into this shirt.

Want to make your own Marbella/Valencia mash? Here are the steps I did to make mine.

Let’s start with the back piece first. I laid out my Valencia crossback pattern and put my Marbella pattern on top, matching up the top shoulder seam.

AXQS7788

I then transferred the Marbella armscye to the Valencia and blended it into the original curve of the Valencia.

WUGF6897

At this point you have a few options, since the opening is bigger than the Marbella you can determine how much gap and drape you want.  I made one with some drapy rayon spandex and took out ½” . It worked well for showing off my cute bralette under the arms and on the back.  For this ity version, I wanted a little less drape and to wear with my regular bra, so I took out about ¾”. Whatever amount you choose, make sure you taper that in to the original side seam of the Valencia. If you aren’t sure on the amount you want, start with a smaller reduction, as you can always take out more later on, before finishing your arm topstitching.

AFKD8271

Now that our armscye is done, we can move to the crossover portion. I wanted extra gathering and drape on my crossover pieces so I extended the shoulder seam of the crossback Valencia, 2”.

WOYO1934

I tapered that and blended it in to the original cut line about 12” down.

ILIL9360

We will be gathering the shoulder piece in a future step, but if you don’t want to gather or have that extra drape on the back, you could skip this 2” addition and just make the back shoulder piece match the front shoulder piece. Total personal preference.

For the front pattern piece, again lay your Marbella pattern on top of the Valencia, lining up the shoulder seam and front fold line.

ENRC9718

Transfer the Marbella armscye to the Valencia pattern, blending in to the original Valencia cutline.

KKQM4129

Remove the same amount you did on the back piece, and taper it to blend in to the original Valencia side seam.

XBFR7602

Cut one of your new front pieces on the fold and two of the new back pieces, mirrored.

NYNF0865

If you want to have a back strap like the original Valencia, you would cut that as well. I like it to have more movement so I opt to skip the strap. If you have your shoulder straps normally slipping off your shoulders, you may want to add the strap, to keep things in place. Now that we have all our pieces cut, we can assemble.

If you added the 2” to the back shoulder, you will now sew a gathering stitch along the shoulder seam, and then gather it to match the front shoulder seam width.

BLPJ8692

Repeat with the other back shoulder seam. I would recommend gathering with your sewing machine vs your serger, just to minimize the bulk for future steps.

CODE0400

Lay your front piece, right sides together, with the two back pieces and sew the shoulders.

PXLR1484

You will have all three pieces connected at the two shoulder seams.

Starting with one back piece, fold over the crossover edge 3/8”, and work your way around the neckline, ending at the other back crossover edge. Topstitch.

Fold up the bottom hem on the front and both back pieces, ¾”, and topstitch.

Lay your front piece right side up. Cross over the right back piece, aligning the left bottom edge with the left bottom edge of the front piece and the right upper edge with the armpit of the front piece. Right sides together, and clip in place.

YCED5788

Cross over the left back piece, on top of the right one, align the edges and clip in place.

APXQ7959

Sew the sides together, starting at the underarm and ending at the hem. At some points you will have three layers so be sure to catch them all.

IKQA5381

Press and fold the seam allowance towards the back of the bodice and stay stitch.

QBIW5415

I like to fold up and tuck my serger tails in, before I fold the seam allowance and stitch. Like this.

If you decided to add a back strap, now is when you would do so.

If you opted for no back strap, you will fold over the armscye 3/8” and topstitch. Repeat with the other side.

KUJP6881

You are done! As slow of a seamstress as I am, I actually find this mash to be relatively quick.

80AFE78C-28F7-479A-B0E8-21739B5D986A

Since this is a cross back with two back pieces, it uses a little more fabric than a single tank with only the front and back piece. I started with a little over 2 yards and ended up with a full ½ yard plus another ½ yard that was about half the width of fabric. I probably could have done better at cutting it out but I was cutting distracted and didn’t pay attention, oops.

0DAEF0CD-A2E6-4217-A99B-E7DB48548C06

To see the other included options and get your New Horizons Designs patterns, you can here- Marbella and Valencia. You can get the Patterns for Pirates SOS pants here. Both fabrics were purchased from So Sew English Fabrics.  They just stocked a bunch of solid Ponte and some gorgeous ITY’s so be sure to check them out.


This post may contain affiliate links. This means if you make a purchase through that link, I may get a % back, at no additional cost to you. Let’s be honest, we all know it goes right back to adding to my fabric stash. All opinions on this blog are my own.


Faux Moto Patch Hoodie – Sewing for my Husband

I love Moto patches on clothes. Up until now the only one I have actually done though, was on my green pair of DIBY club Augusta Moto pants. These are legit fold and stitch pintucks! While I absolutely love them, I wanted to find something a little quicker when I got the idea to do a moto patch on a hoodie for my husband.

When I first decided to make this hoodie with the moto patch hack, I wondered if I could do a faux pintuck using my coverstitch. Over the past year, my coverstitch and I have had an interesting journey. I struggled to figure out all its little quirks to avoid tunneling and skipped stitches. We seem to be mostly on the same page now, so wanting to intentionally create tunneling made me cringe. Oh husband, how much I love you.

I cut some scrap fabric strips, cranked up my needle and looper tensions, and just gave it a try.

96DFCF5A-F4B5-4C9A-9C56-B3923B42E2E3.JPEG

Well, hello there, you gorgeous faux pintucks!! Maybe I should just use this coverstitch for exclusive faux pintucks and get myself a different one for regular coverstitching. I’m only sort of kidding.

I have a Janome 900 CPX and the settings I used were, both the needles and the looper on 9, the highest tension it goes.  Then I set my stitch length at a 2.5 and my differential feed at 1. You will need to tweak your own settings depending on the fabric you use and your machine, but the basic goal is to have a longer stitch and tighter tension to pull the two rows of stitching together, pinching the fabric and making a tunnel.  Pro tip: before you start messing with your tensions and other settings, jot down a little note saying what they were set at for proper stitching. There is nothing worse than forgetting how to get back to your perfect coverstitch.

Now that you know how I made these faux pintucks, it’s time to talk about what I used them to create. I hacked the sleeves on the Greenstyle Creations Hudson Pullover, and made this awesome hoodie for my husband. I am so proud of this one !!

60780643-CBA6-45B6-AC84-0BACC453C7E7

After seeing a similar hoodie on Pinterest I showed it to my husband, thinking he would say no. Obviously, I was wrong. I admit, it doesn’t happen often (wink wink), but in this case, I’m glad it did. Since I have made this hoodie once before, I knew exactly how it fit on him and if I needed to make any adjustments for this slightly different look.

Let’s talk about making the moto patch first. If you are like me, when someone says they “eye-balled” something, you just want to smack them. How are you supposed to duplicate eye-balling?? So I’m ducking over here as I say, I eye-balled most of this. To help with my eye-balling, I took pictures and general measurements that you can use to create your own, “eye-balled” moto patch.

3122BFA5-42E2-4CAB-A69A-6564D8240C6B

The first thing I did was take the sleeve pattern piece and find the halfway mark. I used the wrist hem to find my center since the sleeve is a raglan and not exactly the same from front to back. I needed that center point though, to ensure the patch was centered on his arm when worn.

Once I had my center line I made another mark, approximately 12.5” down from the neckline, along the center line. This line will serve as the bottom of the moto patch. You can bring it lower if you want it to come closer to the elbow, or make it shorter if you wanted a smaller patch. Eye-ball away.

9AA8150A-4F15-4AE3-B244-B2957606D6B6


Now that I had my lower mark on the center fold, I needed to determine what kind of a shape I wanted for this moto patch. Since I was using the seams for the full top and most of the side lengths for the patch, I just eye-balled a curve. It ended up being about 9.5” down from the top for the back side and 7” down for the front side. Both were more than halfway down the total seam length.  Make your marks and smooth out the curves until you are happy with the size and shape. If you have your recipient handy, you can even hold the sleeve piece up on their arm and make sure you like where it will hit. My husband was gone so I just winged it.

Once you have your moto patch pattern piece made, you will want to measure it. I prefer cutting a square piece of my fabric, mirrored, the size of the patch pattern piece, plus some. Then I take that square piece of fabric and do my pintucks. Once it is done, I cut out the moto patch from it. When you tunnel, it will shrink your fabric piece. My 16”x17” piece ended up being around 14”x 16.5”, when done.

00E177A9-9228-4831-BC03-547C74EFC53A

If I did this again, I’d make my piece 17”x 17”, which is about 3” bigger than my moto patch pattern piece. I ended up really close to the edge on my pieces.

0F8D7491-AF97-48D6-A9DB-5A709C408346

Don’t forget to add seam allowance to the bottom curve of the patch pattern piece and the top curve of the plain sleeve pattern piece.

6F162A5F-7FDD-4465-B7A3-8AE4FC542CED

You don’t need to add seam allowance to any other part, as the pattern already includes it.

Making the faux pintucks is seriously my favorite part. Make sure to do a few test rows on your chosen fabric, to get your level of desired tunneling and double checking that there are no skipped stitches. Once you are happy with your pintucks, grab that square piece of fabric. Line up your fabric edge, with the edge of your presser foot, and go. It’s important to take your time and make sure the first row is straight. You will be using the first row to line up each subsequent row, and if it is off, your final stitches will be REALLY off. Make sure you keep your beginning and ending threads at each row too, this prevents your threads from being pulled back in and unraveling all the tunneling you just did. Once you have your first row complete, line up the edge of the presser foot with the edge of the first rows stitching, and make the second row. Continue in that manner until you reach the end and your fabric square is complete. Repeat the same steps for the other patch piece, then sit back and admire all those beautiful pintucks  ❤

CAA81D1F-81E7-41A4-9676-158CEC90FD4A

If you want to see my tunneling in action, you can watch my time lapse video here. I have to say, making the faux pintucks and watching the video is really soothing and mesmerizing, even my kids enjoyed watching it.

This is a good point to finish cutting out all your regular pattern pieces and preparing them for assembly. I don’t cut my moto patches from the pintucked fabric, until the very last minute. Once it is cut, you have to be careful not to pull or mess with them too much. As soothing as I find making the pintucks, I think I’d find it less so, if I had to double my work.

In addition to the moto patch sleeve change, I also made a slight change to the hem of the shirt. The inspiration picture had a curved hem and my husband thought it looked cool too. Brace yourself, here comes some more “eye-balling”. I lowered the center of the hem an inch ish, and free handed an upward curve as it reached the side seam. Then I mirrored the back pattern piece so they would line up when done.

3377B63E-6B3A-4F9F-8C9D-22819F94809E

At this point I started assembling. Since I wanted to be able to secure the pintucks in as soon as possible, I skipped ahead to the hood assembly in the pattern instructions. Once the hood was complete and ready to attach to the bodice, I went back and cut my moto patches. Remember, be very careful with those patches once you cut them.

0FE0F05F-9583-42C8-8626-990B174C0585

I placed the moto patch, right sides together, with the lower sleeve piece, and sewed them. Repeat with the other sleeve.

EBAC02C6-5721-4D63-8BA5-4FABF1F8D713

Now you will have two complete sleeves that can be attached to the front and back bodice.

15B08EB9-D99C-4C21-81E5-AA0AD795C1A0

Do the front sleeves to the front bodice, right sides together, stitching both. Then take the back sleeves and attach them, right sides together, to the back bodice.

2E9B1250-6966-49C1-B5C3-4B0BB0BDF352

You will now have a circle with only the neckline of the moto patch, unsecured.

Since we already did the hood portion and it is ready, we can attach it to the bodice, following the pattern instructions.

76EBF583-46C8-4991-AB6D-2BC9954A7435

Now all the moto patch stitching is secured in another seam and we can go back to finish the sleeves and side seams, then hem the sleeves and bodice. Whew, if you hung with me this whole time, you now have an awesome faux moto hacked hoodie.

782D00A4-43C0-4838-9DB2-A4371A77F30A

Would you believe it took me longer to write this up than it took to actually sew the hoodie?? It did! Now I’m thinking of other places I can sneak in these faux moto patches. Where would you place a moto patch?

F9A65462-514D-4A3A-95FD-BD750A0471BD

The fabric I used to make this hoodie was brushed French Terry from So Sew English Fabrics. I used the hooded version of the Greenstyle Creations  Hudson pullover for this hack. If you want to watch my time-lapse video of coverstitching these faux pintucks, you can on my youtube.


This post may contain affiliate links. This means if you make a purchase through that link, I may get a % back, at no additional cost to you. Let’s be honest, we all know it goes right back to adding to my fabric stash. All opinions on this blog are my own.

Lexington love and my newest hack

The Lexington recently released from Annelaine patterns, and if you saw my last post, you know I absolutely love the pattern. If you didn’t see it, you can read all about it here.

In typical Danielle fashion I immediately pictured a hack of it to create a matching mother daughter maxi dress set I had pinned.

inset 2

I decided to do the red, white, and navy combo with double brushed poly solids that I purchased from Amelia Lane Designs.

I used the empire cut line for the bodice and skirt, which meant that the only modifications/color blocking I needed to do was to the skirt piece and this is how I did it.

To start with I eyeballed my lengths for the color blocking and used the peplum front and above knee front cut lines to gauge a starting point. In the case of my daughter’s, it was the front peplum and front dress cut lines.

IMG_1584

From looking at the pinspiration picture, I felt that the top red portion and the bottom red portion were about the same and the white portion was a little smaller than them. I also knew I wanted my blue strips to be the same size, and around 3”, when finished. I marked the skirt pattern piece a few times for each section, until I got it to where I wanted. Keep in mind the actual measurements, for your skirt color blocking pieces, will vary depending on your specific size chosen. Just to give you an idea, I will share what I used for my daughters and mine. I ended up with around 14.5” for the red pieces, 4” for the blue pieces, and 9.75” for the white piece. On my daughters, I ended up with around 11” for the red pieces, 3” for the blue pieces, and 9” for the white pieces.

IMG_1590

Now comes the fun part. Since the center of the skirt piece color blocking was lower than the side seams, I needed to create that V for each piece. To do so I measured from each point I had marked on the fold line, UP 2”, and marked it on the side seam edge (pictured in red below).

IMG_E1591

I repeated until I had all 4 pieces marked.

Then taking my ruler I drew a line from the upper mark, to the lower mark, for each one. I wanted to curve my centers so I went slightly past my lower mark when connecting the two marks.

IMG_E1599

I chose to make my center points less V like because I figured it would be easier to attach the pieces and with the skirt gathers I didn’t want my lines to look choppy once the dress was done. Then I smoothed out the line and the marks to have a clear cutting line.

IMG_E1602

Seam allowance needs to be added to each piece as well. You can choose to do so now, by making new pattern pieces for each color block, or you can do what I did, and add it when you cut the fabric out. If you choose to add it when cutting the fabric, make sure you do, or your skirt will end up too short. I forgot on two of my pieces and it made me panic before I reminded myself that it was my hack so I didn’t have to follow exact amounts, whew, bullet dodged. To account for this “design adjustment”, I added a little more seam allowance to the connecting pieces.

When adding seam allowance, you will only need to add it to the bottom of the top red piece (R1), the top and bottom of the blue pieces (B1 & B2), the top and bottom of the white piece (W), and the top of the bottom red piece (R2). The original skirt pattern piece has the top seam allowance and the bottom hem allowance already included, so we can skip those.

You can use your new skirt pattern pieces to cut out your chosen colors. Since we are doing the straight floor maxi skirt, the front and back skirt pieces are the same which allows for us to cut two of each color block piece. When cutting, I marked my pieces and made sure to keep them in order so my skirt would fit back together correctly. I labeled them as R1, B1, W, B2, R2, in descending order from the top of the skirt.

IMG_E1603

Once you have all your pieces cut out (10 in total), you can assemble your skirt. To assemble I did both the front and back skirts at the same time, to avoid any confusion of which piece went where. I have this bad habit of walking away to tend the kids or some house thing, and I forget where I was in my sewing. I didn’t want anymore “design adjustments” and I figured this would be easiest to keep it organized.

IMG_E1617

Take your R1 piece and lay it right side up, fully open. Taking your B1 piece, lay it right side down on R1, lining up the bottom of R1 and the top of B1. Clip and sew that seam. Repeat for the back skirt piece.

IMG_1618

Take your R1B1 piece and lay it right side up again. Place your W piece right side down on R1B1, lining up the bottom of R1B1 with the top of W. Clip and sew that seam. Repeat for the back skirt piece.

IMG_1622

Take your R1B1W piece and lay it right side up again. Place your B2 piece right side down on R1B1W, lining up the bottom of R1B1W with the top of B2. Clip and sew that seam. Repeat for the back skirt piece.

IMG_1623

Last one! Take your R1B1WB2 piece and lay it right side up again. Place you R2 piece right side down on R1B1WB2, lining up the bottom of R1B1WB2 with the top of R2. Clip and sew that seam. Repeat for the back skirt piece.

IMG_1625

Now you have your front and back skirt pieces complete and you can attach them together and finish the dress exactly like the pattern instructs.

IMG_1626

We really love our matching pinspiration and are on the lookout for our next color combos.

PAII9462

Pattern used was the Womens and Girls Lexington from Annelaine patterns which is on sale through February 13th. We used the empire, floor length maxi, sleeveless, and the scoop neck options. Fabric was red, white and navy solid double brushed poly from Amelia Lane Designs. If you haven’t heard of Amelia Lane, they are a newer fabric company. They have some pretty neat offerings and I’ve been impressed with the quality, shipping speed, and customer service. They are currently having a site wide 20% off sale with code PERFECTPAIR ending February 17th.

This post may contain affiliate links. This means if you make a purchase through that link, I may get a % back, at no additional cost to you. Let’s be honest, we all know it goes right back to adding to my fabric stash. All opinions on this blog are my own.

Denim Obsession and My First Pinspiration Hack

65C2AD24-D3DA-4D37-85A4-97C6DD5110F1

I have been obsessed with searching for just the right denim fabric to make myself, and my kids, some pants. This fabric couldn’t be just any denim though. I had fabric requirements and so did my kids.

My kids requirements first My requirements first, lets be real, I need pants more than they do. This fabric needed to have stretch and lots of it. It also needed great recovery, I really HATE sagging pants after wearing for a short time. It needed to actually look like denim if it wasn’t true denim. I also needed it to be squat test approved, you know the test where you squat down and force your children or husband to tell you if it is see through? Unless of course you can contort yourself well enough to see your rear in a mirror or you get brave and decide to take a squatting booty selfie, that you promptly delete. PROMPTLY DELETE. It also needed to work for one of my favorite patterns, the Peglegs from Patterns for Pirates (free with the code from their facebook group ), plus a few other patterns I have on my radar this year. I had about given up finding the right fabric when So Sew English Fabrics (SSE) got in this crazy Stretch Denim.

img_0421

I say crazy because it is Cotton Spandex Heavy French Terry, say what??? I’d never heard of it. Amanda, the owner of SSE shared a video of it in their facebook group and wow, this stuff looked amazing! It has the denim look on the inside and outside, no faux here. Plus the stretch (80% x 50%) and recovery to make my Peglegs. All I needed for it to pass my list of requirements was passing the squat test. So, like any logical seamstress, I ordered 2 yards to try it out.

The fabric arrived and I immediately loved it. I knew as soon as people started getting their orders and sewing it up, it was going to disappear quickly. I moved my pair of peglegs up on my “to be sewed” list, just in case I needed to get more. Then, Heidi, from SSE, posted her pair of peglegs, in this fabric. It was exactly what I was looking for. I got so excited! Then I realized that I wasn’t the only one who thought they were amazing. Shoot, that fabric was going to be gone fast. Naturally, I got online and ordered a “few” more yards. I told you, I’m logical. I needed more for shorts, pants for my kids, and if it passed the squat test, I was going to need a few pairs of my own.

I washed up my yardage and sewed up my peglegs. I sewed them up live by the way, in the Sew Inspiring facebook group. You can see that here if you are so inclined ha ha ha. It was my first time sewing live and while it was very nerve wracking, I had a ton of fun chatting with the ladies that joined me. Back to my leggings. I tried them on and yup, I took one for the team, they absolutely pass the squat test. *cheers*

A few details about sizing in case you were lucky enough to snag some of this denim. I made my usual size peglegs that I do with ponte. This means,  I size up the legs one from the chart and make my waistband my true size. I usually do that, because while I like snug fit leggings, I have health issues that cause me to get uncomfortable if it is past a certain snugness. I make my usual waistband size since ponte can relax a little after wearing and I don’t want to risk slippage. This denim has the right stretch and amazing recovery. The recovery is so good that it has a little more of a snug feel. While I really like my first pair, I will probably size up my waistband as well as my leg pieces for my next pair.

When I was looking for something to wear with my new pants, I pulled out one of my first sews, from 2016. It got me thinking. This shirt was my very first pinspiration make and pattern hack. I had seen it floating around pinterest and just knew I wanted to have one of my own. I had no idea what I was doing and it took me FOREVER to figure it out. I laugh now because it seems so simple when in reality I was doing all kinds of math and had lines all over my pattern piece. It worked though and totally gave me the confidence to try more hacks and pinspiration makes.

img_0430

For anyone wanting to make one of these sleeve stripe raglans for themselves here are the few steps I took using the Slimfit Raglan from Patterns for Pirates. I made a few pattern pieces to cut out my fabric but for the sake of this tutorial I will be drawing and marking on the same piece so you can see the effect.

Step 1. I cut out the floral using the short sleeve line. Shown below in red.

img_0385

Step 2. I measured out and marked a 1.5″ strip, overlapping the short sleeve line from step 1, by 1/4″, for the white fabric. Shown below in blue.

img_0386img_0388

Step 3. I measured out and marked a 1.5″ strip, overlapping the bottom line of step 2, by 1/4″, for the floral fabric. Shown below in purple.

img_0389img_0391

Step 4. I used the remaining bottom portion of the sleeve, adding 1/4″ to the top and overlapping the bottom line from step 3, for the white fabric. Shown below in green.

img_0393

I used 1/4″ as the overlap amount for each piece since that was the amount of seam allowance I chose. You can see below how all the pieces will go together.

img_0394

Cut out your four pieces and sew them together. You will do this twice, once for each sleeve.

  • Take the piece from step 1 and place it right sides together (RST) with the top of the piece from step 2. Sew together to create the beginning of your new sleeve.
  • Take the 1/2 piece and place it RST with the top of the piece from step 3. Sew together.
  • Take that 1/2/3 piece and place it RST with the top of the remaining piece from step 4. Sew together.

You should now have your new sleeve 1/2/3/4 all ready to assemble the rest of the pattern per the included instructions.

img_0419

There are a few other ways you can achieve a similar stripe look but I chose to go this route since it gave me the complete sleeve and clean look I was going for. This shirt was pre serger time for me and was completely sewn using my starter sewing machine. It is so neat to look back at where I started and see how much I have learned and improved.

I love the fact that my first pinspiration pattern hack from three years ago, not only looks so great with my new stretch denim leggings, but that it has held up and still looks almost brand new. Longevity sewing makes my heart and wallet happy <3.

abaaab4f-bdba-4b5b-9de3-3618608bdebf

I think it’s also safe to say that my denim search obsession has come to a close. Now I get to work on the list of denim makes I have planned with my “few” yards.

This post may contain affiliate links. This means if you make a purchase through that link, I may get a % back, at no additional cost to you. Let’s be honest, we all know it goes right back to adding to my fabric stash. All opinions on this blog are my own and I have a lot, ha ha ha.

No Tie Aspen – Simple Hack

I have this thing about taking patterns and tweaking them to create different looks. I can’t help it.  I justify it by saying I am getting more wear from one pattern. It works, right?

Recently, I had the opportunity to test the Aspen by Annelaine Patterns , in women and girls sizes. By the way, if you haven’t checked it out, it has just been re released in extended women’s sizing (00-30) and is currently on sale #enableralert

aspen original
Aspen in Brushed waffle from So Sew English Fabrics

For anyone that follows me on Instagram, you probably saw my gushing post about how everything lined up so perfectly. It was seriously such a pretty pattern and a real joy to sew up.

Of course, after making it I had to tweak it for another look. I made a few simple mods and presto, a no tie Aspen.

788cf4df-1f99-4649-9639-44826b5eb5a9
No Tie Aspen in Brushed Waffle from So Sew English Fabrics

Since the original was so well designed it made these mods so much easier to make.

Here is what I did using my regular size 6 Aspen pattern.

First I took my front bodice piece, curved hem option. I used the side seam curve and continued the curve across to the center cut line. You can see the original pattern piece underneath and the new line (in red) that I made. I just free handed it and that will be your new front bodice piece.img_7885

Next you are going to want to match that curve on your front hem facing pattern piece.  To do that, I just laid my facing piece on top of the new front bodice piece we just made. The side seam matches perfectly. Then trace that exact same curve for the bottom of the facing piece. You can see the new line (in red) below.

Now we need to make the new top curve for our front facing piece. The top of the curve is about 1 ¼ “ from the bottom curve. Using my ruler, I measured 1 ¼ “  from the bottom curve, at the center cut line, and made a little dash. I worked all along the curve, making a bunch of dashes, until it connected with the original. (dashed lines pictured below).img_7886

I like to remeasure a few times at different places along the curve, to make sure I have an accurate line. Once I have that line, I blend it in with the original side seam curve to ensure a smooth pattern piece.

You now have your new front facing piece, in red (below). The dashed red lines indicate where your new interfacing piece will be cut to match your new front facing piece.

img_7893

You will cut two mirrored of your new front bodice piece, front facing piece, and interfacing piece, per the pattern directions.

I made no changes to the back bodice, back hem facing, or sleeve (besides adding length for my arms) pattern pieces. Make sure to cut those out too and assemble exactly like the pattern instructs.

When I attached the buttons and made the button holes, I placed one at the top V, one ½” up from the bottom hem, and evenly spaced the rest between.

That’s it. A few simple mods to add another look to your favorite Aspen

2820841c-4336-4272-8367-240c6fdf2838
No Tie Aspen in Brushed Waffle from So Sew English Fabrics

This post may contain affiliate links. This means if you make a purchase through that link, I may get a % back, at no additional cost to you. Let’s be honest, we all know it goes right back to adding to my fabric stash. All opinions on this blog are my own and I have a lot, ha ha ha.