Sports Bra- the sequel (plus bonus tank and shorts)

As soon as I finished my first Greenstyle Creations Power Sports Bra ( read about it here ), I knew I wanted to make more. I immediately went through my fabric and started planning my next combo. I didn’t have quite what I wanted, so I went fabric shopping. I saw a combo Heidi posted in April, in the So Sew English Facebook group, and I knew it would be the perfect fabric for the outfit I envisioned. It took a bit to arrive, but once it did I knew it was the right choice.

For this Power Sports Bra, I did almost the exact same options as my very first, adding the optional bra cup opening, and 1/4″ clear elastic in the full neckline and armscye. I opted to add the elastic since this fabric had a bit more stretch than my first, and I didn’t want to chance it gaping once on. I used the Solid Bubble Gum Pink Peached Performance for the straps and remaining pieces, including the lining, is Grey/Ivory Small Stripe Peached Performance. Just like my first power sports bra, I tried on my underbust band elastic, prior to adding it to the bra, and AGAIN, I was glad I did. I used a different elastic than my first one and it stretched a lot easier, allowing me to remove an extra inch, which was still bigger than my suggested size starting point.

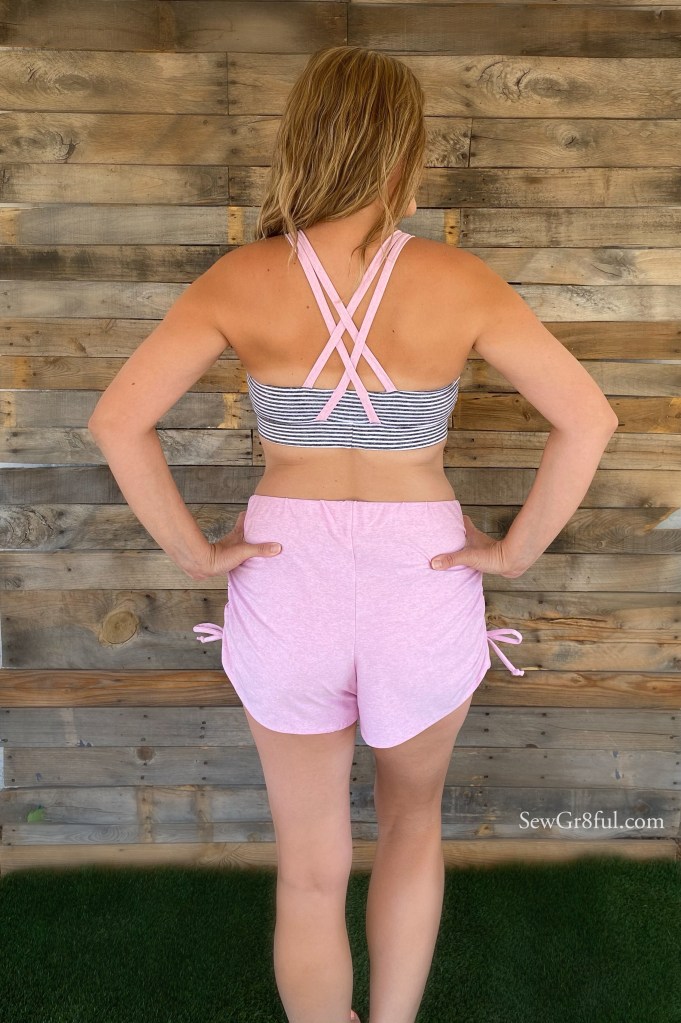
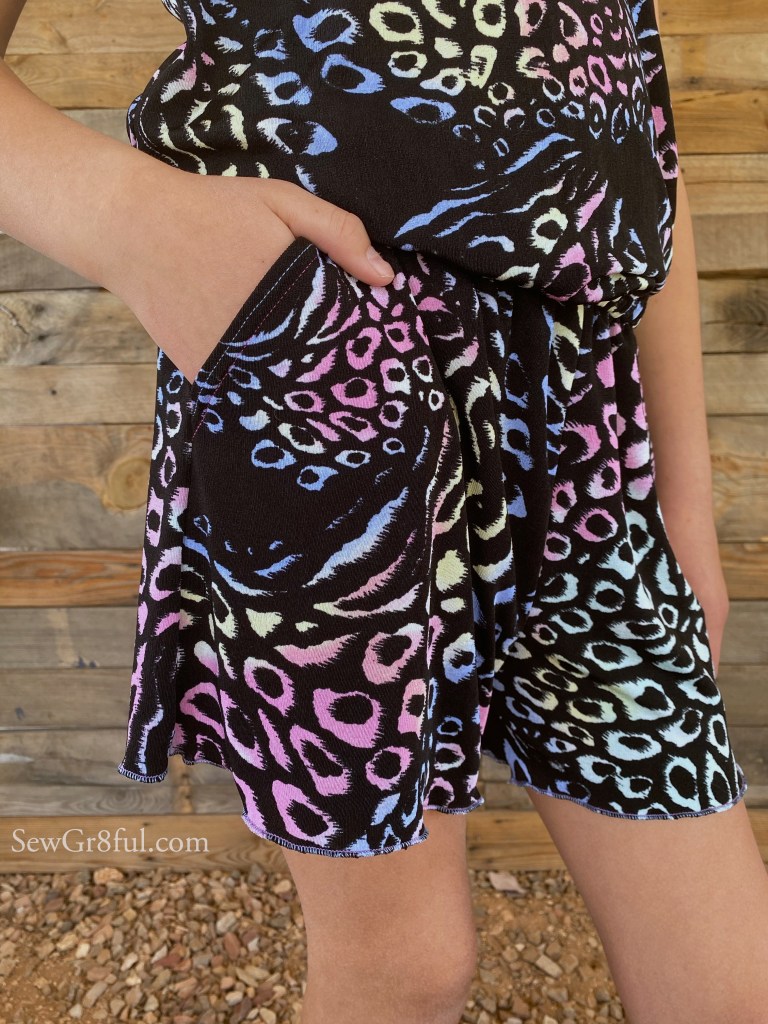
I used the same Bubble Gum Pink Peached Performance for my shorts. It is so soft and the perfect fabric for lounging or to run errands. I made my first Run in The Sun Shorts from Striped Swallow Designs for this. It was also my first SSD pattern, and it was fairly simple to assemble. I made my measured size, XL waist to Large hip and Medium thigh, but for my next, I will probably remove some length off the rise and/or go down a size overall in each spot. I love the option to cinch up the side more or less, depending on my outfit and preference.

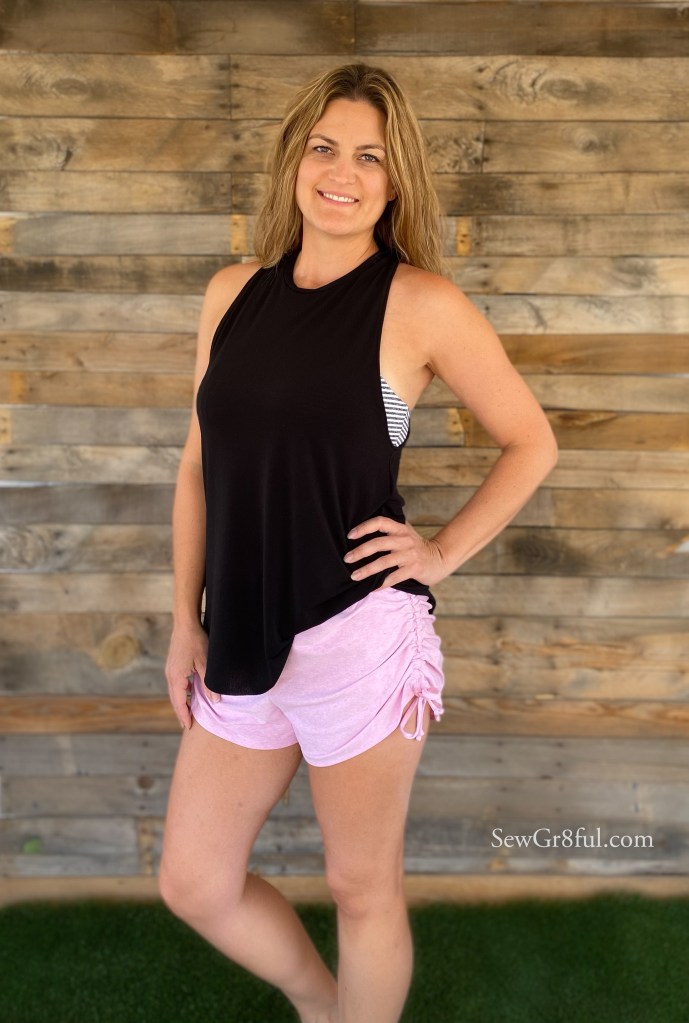
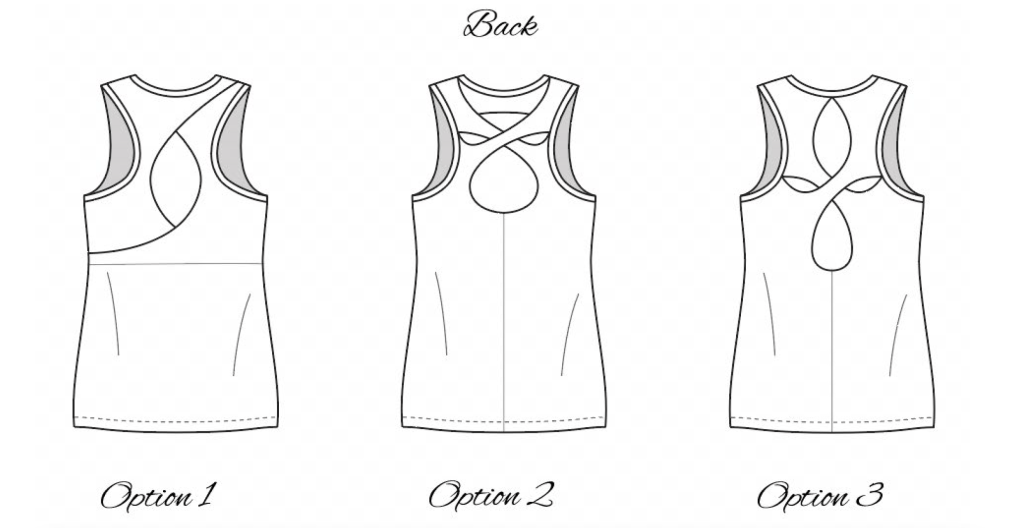
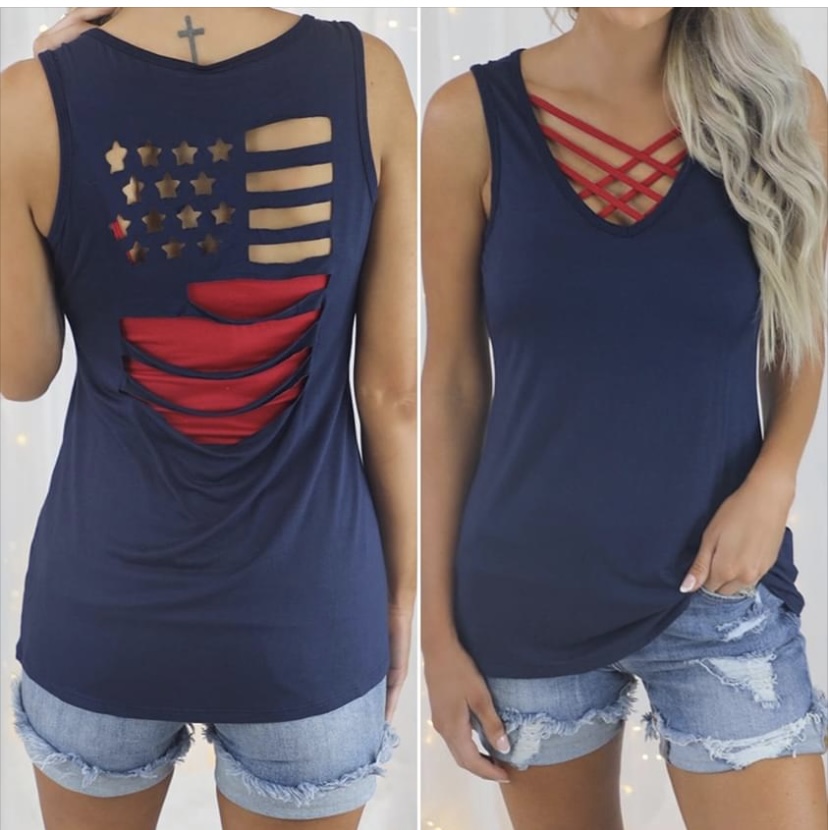
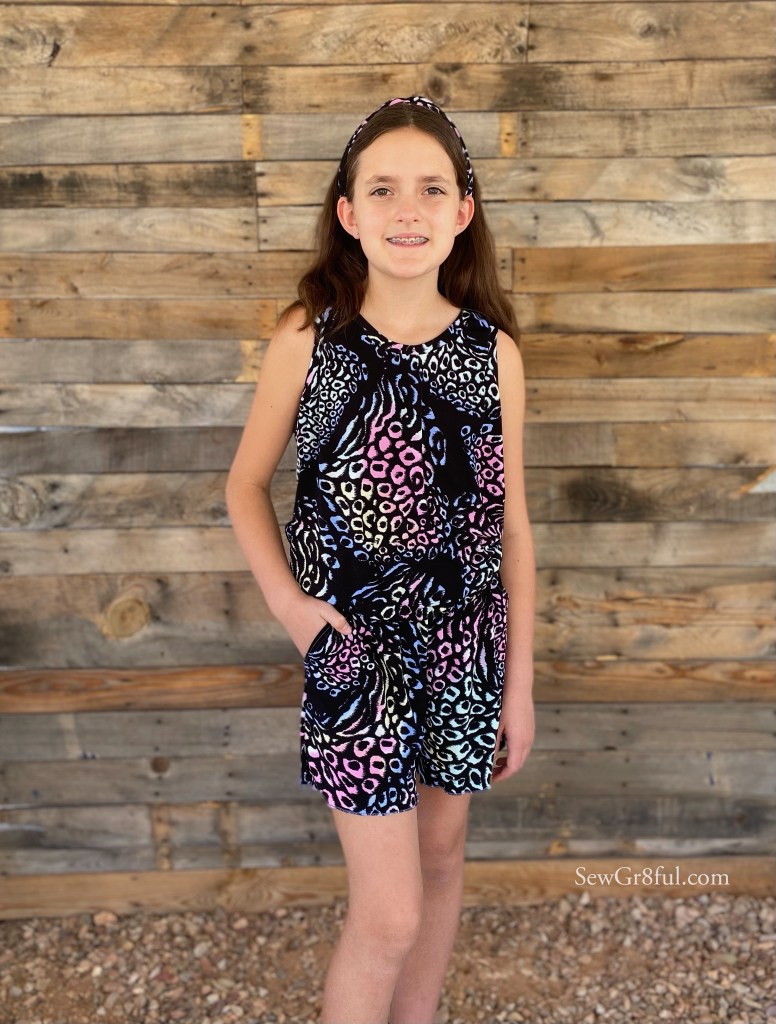
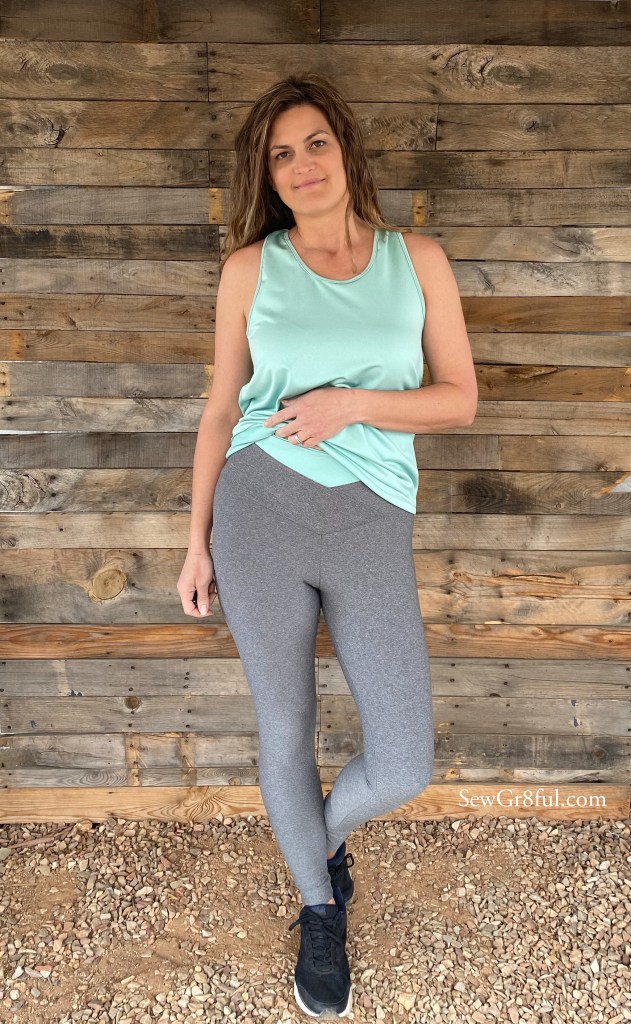
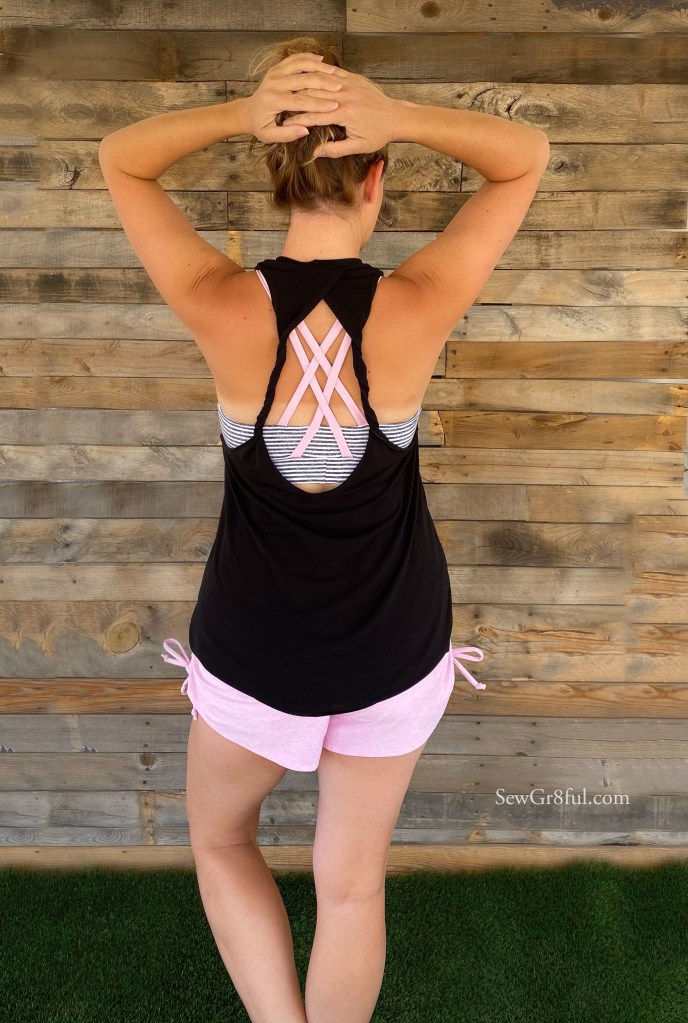
Since I’m not keen on rocking the sports bra and shorts combo out and about, without coverage, I added a Sundown Tank, also from SSD. I absolutely LOVE the low twist back option, it is so fun and totally creates the perfect showcase for my cute bra and straps. I used the Solid Black Crepe Jersey and it twisted beautifully! My machine seriously did not like the thick bindings though, so my next one, I will skip the binding and just turn and topstitch.

The Sundown tank has three back options, a regular back, and a high or low twist back. I did the low twist, added 1″ in length for my height, and made size Medium graded to Large at the bust and waist. I measured for a Medium graded to Large bust and an XL waist, but when I measured the pattern piece, I felt grading all the way to an XL would be much larger than the look I wanted. I also have smaller hips than I do waist, and while the pattern didn’t provide hip measurements, I know from experience with my body and loose fit shirts, that grading out so far would make my hips look like they are drowning. So with the tank having the shape and ease it does, I opted to grade out to just the Large.

A little sewing tip I like to use: When the pattern size chart doesn’t provide a measurement, you can measure your pattern piece at the approximate spot, minus the seam allowance. Then take your tape measure and hold it around your body part, at the pattern piece measurement and you can get an idea on fit. If the pattern has negative ease, you can do the same with a scrap of fabric (preferably in the same fabric you are using for the final garment).

I can’t wait to sew up my next set, I just got another fabric order that will be PERFECT for this! Plus, I am on the hunt for some swim fabric. I think this would be amazing to wear to splash pads with the kids or just hanging out by the pool.

Fabric all from So Sew English:
Solid Bubble Gum Pink Peached Performance
Grey/Ivory Small Stripe Peached Performance
Solid Black Crepe Jersey

Patterns:
Greenstyle Creations Power Sports Bra (available in Women and Kids)
Striped Swallow Designs Run In The Sun Shorts (available in Women and Kids)
Striped Swallow Designs Sundown Tank (available in Women and Kids)

This post may contain affiliate links. This means if you make a purchase through that link, I may get a % back, at no additional cost to you.ย Thank you for supporting my sewing ๐Ÿ’•

Tanks, I made it! ;)

Back in April I went to Vegas with my husband, for a work trip. While there I was able to meet up with one of my sewing friends for a little bit and actually meet her in person.

We had previously been shopping for fabric from Fabmere at the same time and she had faster fingers than I did, and scored some gorgeous floral ITY. She is so sweet, and ended up splitting the fabric in half and bringing it to me when we met up.

So I’ve had this gorgeous 1 yard cut of ITY and I’ve been trying to decide what it wanted to become. I thought of and rejected so many patterns when I finally decided to try the Athena from Pattern Niche. I wasn’t sure if the style would work well with ITY, since it is a lightweight fabric with good drape. So I scoured their Facebook group to see if other people had used ITY and found none. After asking Tara if she thought it would work well, I decided to go for it.

There are several different kinds of ITY, some are slinky and slippery, some have a brushed feel, some have a textured feel, and I love them all and how cool I stay while wearing them. This particular ITY has a slight texture to it, which is an added bonus for traveling, as it doesn’t wrinkle in luggage.

The Athena tank has a regular racer back, plus three different scoop and cutout back options. You can choose from a crew neck or a scoop neck for the front neckline. For mine I chose the scoop neck and the option 2 back.

I made a straight size 12, and added 1″ in length for my height. I didn’t make any other mods to the pattern.

I was pleasantly surprised with how simple it was to do the fun cutouts! I have been having machine issues lately, and I was really concerned it would eat my fabric, but it behaved and I love it! The cutout is perfect to show off those cute bralettes, or in my case, my green bra, that just so happens to match.

I have some more fabric that just arrived that I will definitely be using to make another one. I think I’m going to try the option 3 back next and make a coordinating set with a new sports bra.

The fabric is ITY from Fabmere Fabrics and you can see all their gorgeous options here.

The Athena pattern is available from Pattern Niche (formerly New Horizons Designs).

This post may contain affiliate links. This means if you make a purchase through that link, I may get a % back, at no additional cost to you. Thank you for supporting my sewing ๐Ÿ’•

Stars and Stripes

My family likes to wear patriotic things all year round, but especially on Memorial Day, Independence Day and Veterans Day. Back in April, I came across a shirt from an online boutique and I thought it would be a perfect addition to my patriotic attire.

Image from Nictops

As you all know, we live in sunny Arizona and because of that, I usually avoid layers in the summer. But this top really needed the layers so I wanted to use a lightweight fabric that I knew would allow me to breathe, even with two layers.

I found a 150gsm solid red modal for the cami. I ended up ordering two different fabrics for the blue tank, a modal Ponte and an ITY. I wasn’t sure which I would prefer with the red modal, so I got both. When my package arrived, I didn’t care for the feel of the modal ponte over the red modal and I ended up with a different fabric instead of the ITY. The fabric I got was an almost exact weight to the red modal, and I’d say it’s either a lightweight modal or a rayon spandex. I chose to use the mystery fabric because it had the perfect drape I wanted for the stripes and didn’t cling weird to the red modal. So blessing in disguise ๐Ÿ˜‰

I knew the perfect patterns for the two tops would be the Cross My Heart Cami and Essential Tank, both from Patterns For Pirates. Both tops have several options so for my recreation I went with the high X front and regular back on the cami. For the Essential Tank, I chose the full back, curved hem, with bands. I wanted to have my front neckline lower to show off the front X a bit more, so I just cut a lower “V” and blended it into the original neckline.

I recalculated the neckband by measuring the new opening and multiplying it by 90%. I kept the original neckband width, and when sewing the band on, I let it smooth out the V so it wasn’t as pointy.

I made no other changes to the patterns and sewed up both before creating the design on the Essential tank. I wasn’t sure exactly where I wanted the placement to be so I waited until I had made it and tried it on to determine.

Once made, I tried it on, and marked with two clips where my waist hit. I didn’t want the lowest stripe cutout to be lower than my waist, so the two clips were a simple marking tool.

Then came the fun part, the Stars and Stripes. I did some internet searching and came across a free star printable from First Palette. I used their various sized star template and picked the smallest ones on it. They are about 1″ in size. I needed to print two sheets, to have enough for the design I wanted, and I just cut them out and placed them on the back of the tank.

For the stripes I used the remaining pieces of paper, and cut out 1″ strips, three at 4″ long, one at 7″ long, and the last two at 8.5″ long. I placed the strips about 3/4″ apart and all lined up on the right side.

Once I had the stripes and stars in the placement I wanted, I used my marking chalk and roughly chalked the outline of each.

To cut them out, I used my small 28mm Fiskars rotary and my favorite Kai scissor (7100) thread snips.

I started with the stars and found that it was easiest to cut the star out by creating a tiny snip in the center first. Then I cut out to each inner point, which allowed me to just cut out to the outer point and the remaining V.

For the stripes, It got a little tricker since the shirt was already assembled. I ended up bunching up the front of the shirt towards the neckline, almost as if I was turning it inside out. This allowed me to lay the back portion flatISH on my cutting mat. Starting at the bottom stripe I cut the top and bottom horizontal lines with my rotary and straight ruler, then using my kai snips, I cut up the two sides. I worked from bottom to top to have more room and avoid rubbing off my markings.

Once I had finished cutting it all out I noticed the stripes didn’t have as much drape as I wanted and the stars were a little too nice looking for what I had in mind, so I tossed it in the washer. Not only did the washer give it that little extra I was hoping for, but it also removed all my markings for me. I gave both tops a good press and was done.

As I was cutting the starts and stripes out, I really had feelings of apprehension and like I had lost my mind ๐Ÿคฃ. Making a shirt, only to cut it up, was a whole new experience for me.

Patterns are the Essential Tank from Patterns For Pirates and the Cross My Heart Cami from Patterns For Pirates.

Fabric is both from So Sew English, the Red 150gsm Modal is here, the blue is not on the site.

Star printable is from First Palette.

๐Ÿ’™๐Ÿ‡บ๐Ÿ‡ธThank you to all who have served and paid the ultimate sacrifice. ๐Ÿ‡บ๐Ÿ‡ธโ™ฅ๏ธ

The Romper Repeat – Bayside Leopard

After my daughter saw my SeaChange playsuit (you can read about it here), she asked if I could make her one. She loved how it looked like a dress but was really shorts, and of course, the pockets. Unfortunately the fabric she wanted was a knit, and Pattern Emporium doesn’t have a kids version of the pattern. So I asked her about using the same pattern we did a few years ago for her, the Bayside romper from Pattern Niche.

As soon as I reminded her which it was, she was very excited and asked to see the available options. The pockets sold it for her.

Since the fabric she picked was Bulgaree ITY from So Sew English, it has very nice drape and gives the romper a dress feel, all while feeling relaxed and cool. She has grown quite a bit since the last time, so we had to do several fit check try ons during sewing, and each time she said, “Ohhh, this feels so nice!”

The Bayside has shorts, pants, or dress lengths in mini, knee with a straight or curved hem, mid length or maxi. You can choose short sleeves, flutter sleeve, or tank, and of course, pockets. Something that sets the Bayside apart from other rompers is its fun cross back bodice design. It really makes it easy for my daughter get it on and off and adds such a fun detail.

My daughter picked the tank, shorts cutline, with pockets. She doesn’t like elastic in the cross over back pieces, so I omitted that. It does give the back a slightly more drapy look, but she really likes it. If you have a child prone to things slipping off the shoulders, I wouldn’t recommend that omission, as it can help hold the shape.

When I was making the romper, she asked if we could do some fun stitching so she picked her two topstitch thread colors for the pocket and we did a rolled hem on the shorts, to give it a slight wave look.

Tip: I can not recommend enough. Use your Child’s waist measurement to determine elastic length, and try it on before securing it all. It helps to get a much better fit and allows you to make sure you have enough support to keep the waist where it belongs. It makes such a difference in comfort for my kids and myself.

The Bayside is available in both women and kid sizing.

The fabric is Bulgaree ITY from So Sew English Fabrics.

This post may contain affiliate links. This means if you make a purchase through that link, I may get a % back, at no additional cost to you. Thank you for supporting my sewing ๐Ÿ’•

Trying a new pattern company – SeaChange

Have you sewn any patterns from Pattern Emporium?? I have almost purchased a few in the past, but always forget to go back and miss the sale, and since I try to only purchase when on sale, I have yet to make a PE pattern.

Side note, I love watching Kate’s preview videos. Even if the pattern isn’t my style, I just love to listen to her talk and see all the different ways she styles her own pattern. All the fabrics she uses, and her personal thoughts on why she likes which ones. I just love them and her passion for sewing her own clothing.

The video for the SeaChange was no different, I thoroughly enjoyed it. Except this time, I was determined to catch the release sale and make one for myself.

When I was shopping for fabric at Fabmere, for my Siena ( you can read about it here), I saw a gorgeous red floral, with an almost paisley look to the flowers. It made it into my cart and was earmarked for my SeaChange. I have said it before and I will probably say it a million more times, I LOVE RAYON CHALLIS, especially for our spring and summer.

The SeaChange is a jumpsuit (3/4 or full length) & playsuit ( short or mid length) romper. It has short, regular, or tall cutting lengths, wide or narrow straps that can be fixed, adjustable, or tied. Plus optional side ties, sash, and pockets.

I chose the short length playsuit, with narrow fixed straps, and pockets. For fun I did a narrow rolled hem for the legs.

I know the mantra of making a muslin first, I also knew that I only had a couple yards to make this pattern, and this was my very first time making a PE pattern, all very good reasons for making a muslin first. BUT, I have heard great things about Kate’s drafting, I read her tutorial ( the amount of tips and fit help and steps on how to check fit, were amazing!!) and felt really comfortable with just going for it. With not having much time to sew this past month, it was a good call and I had absolutely no fit issues.

I really appreciated the attention to fit that was provided. I know I usually need to make certain adjustments to patterns for my body, and I can’t even begin to explain how nice it was to know if I actually needed to make those adjustments. For an example, the straps. I almost always have to adjust the straps on cami type tops, and usually longer, which means I need to recut. Kate actually made the straps longer, included a note about it, and I was able to do one fit check and use the original straps, vs multiple fit checks and having to recut new longer straps.

I chose to wear my SeaChange loose with no tie or sash. It really feels very springy, breezy, and super comfy (especially with my current health flare). I love how it almost looks like a dress, but I have no worries of things blowing up and being exposed.

Since our weather is currently fluctuating from the 70’s in the morning and evening, and the 90’s during the day, I decided to try it on with some white tennis shoes and my jean jacket.

I love how this looks!!

I am definitely making more of this pattern, and I’m determined to not miss another PE sale ๐Ÿ˜‚

Fabmere Fabrics has this Rayon Challis still in stock, plus a few other solids and prints.

All the Boho-ish feels – Siena

April has been a really busy month for our family with birthdays, events, schooling, and the home renovation we are doing. Because of it all, my sewing time has been little snatches of 15 minutes to an hour, here and there. As someone who hates incomplete projects and being in the middle of multiple projects at the same time, it’s been a source of annoyance and I have had to get really creative with fitting things in.

I missed out on testing a new pattern from Made for Mermaids, but knew I wanted to purchase it as soon as it released, and then I fell in love with a new pattern from Pattern Emporium and had to add it to my list. Since I knew these were both patterns I wanted to make right away, I ordered fabric for them and slowly worked on them both, at the same time. You can read about my first Pattern Emporium experience here.

The Made for Mermaids Siena is almost the exact skirt I pinned a bunch of times on Pinterest and as a woven pattern, I knew it would still be comfy to wear even with our rising temperatures.

One of my favorite woven fabrics is Rayon Challis and the Honey Gold color from Fabmere Fabrics was spot on for what I had envisioned.

The Siena has 6 different hemlines ( mini, knee, high-low in both above the knee or below the knee, midi, and maxi length), each with different tier amounts, plus the option to sew the tier seams with an enclosed or exposed raw edge. There are two different elastic waistband options, with three different elastic configurations, and an optional faux tie.

For this one I did the full maxi length with enclosed tier seams, and the basic elastic waistband, with one piece of wider elastic. I’m feeling very boho and crazy comfortable in this skirt.

For my height I added 2″ total to the skirt, adding 1/2″ to each of the four tiers, to keep it even. Once I got to the hem, I realized the length was almost exact for where I like to wear maxis at, and I decided to finish it with a rolled hem.

I love rolled hems, so fast, so clean, and such a fun little detail!

I like that I can wear this with my most worn Hey June Handmade, Union St. Tee, tied up, or this tank tied up or tucked in, and get a few different looks. I think the tied up tee is my favorite though. Which is your favorite top?

The Siena is available in Baby, Youth, and Women sizing.

Fabmere Fabrics has several Rayon Challis in stock, including a little of the Honey Gold I used.

This post may contain affiliate links. This means if you make a purchase through that link, I may get a % back, at no additional cost to you. Thank you for supporting my sewing ๐Ÿ’•

Dinosaurs & Brazilian Performance

My son loves dinosaurs and shorts in French Terry. So, when So Sew English came out with a new Dino print on French Terry, it was an immediate purchase.

The last few pairs of shorts I have made for him, have all been without pockets. He loves pockets, but I don’t love the surprises those pockets leave behind in my washing machine. He really, REALLY wanted pockets in this pair, and informed me that he was now 7 and had a better memory. Even though Daddy is way older than 7 and still forgets. ๐Ÿคฃ

He likes the fit of the Pattern Niche 11th Hour Gear Shorts and I love how quick of a sew it is. I always double check measurements before sewing and saw he had moved up a size, so I ended up needing to redo my pattern pieces. I’m glad I checked though, because he loves the shorts and we have a long summer ahead of us.

Since he heard his sister picking her shorts length, he wanted to as well, fortunately his desired length was really close to the pattern length so it was as simple as taking a smaller hem allowance. You can read about how I used this same pattern to make my daughter a pair of shorts a few weeks back, here.

Naturally our puppy, who is almost 6 months now, needed a matching scARF (a.k.a. super soft bandana). I had a two yard cut and was easily able to get both his shorts and the scARF out of it.

If you read my last few posts, you know I’ve been interested in trying new to me fabric bases, so I decided to try out the Brazilian Performance Rib from So Sew English for a matching top. The rib is listed as a horizontal rib, but upon arrival I noticed that it only had around 25% stretch horizontal and around 100% vertical, so I chose to use it as a vertical rib. Unfortunately my camera had a hard time photographing the rib, but the mint color is a perfect complement to the shorts.

On the right side of the fabric, there is a definite rib, and the wrong side is smooth. My son is a little sensitive when it comes to things being soft or having texture, so I wasn’t sure how he would like the rib as the neckband. After wearing, he said he doesn’t mind it, but it isn’t as soft as his Double Brushed Poly or other performance shirts, and that they are his favorites.

The fabric sewed up well, but I did notice that hemming was a bit odd on my machine, with all the ribbing. When compared to other performance fabrics I have used, it feels a little stiffer, again, because of the ribbing.

My husband wants a shirt in it to try too, I knew I should have gotten 2 yards instead of one.

I can’t get over how cute they look together ๐Ÿ˜๐Ÿ˜.

I used our normal go to t-shirt pattern, the Jalie 2918.

This post may contain affiliate links. This means if you make a purchase through that link, I may get a % back, at no additional cost to you.ย Thank you for supporting my sewing ๐Ÿ’•

New Fabrics, New Pattern, and a Fave

I can’t be the only one that loves to try new fabrics. I have my tried and true bases, that I go back to time and time again. But there is also something fun about trying new types and maybe finding another favorite.

I decided to try the Dharma from The Fabric Fairy and since the description sounding highly appealing, I got it in several colors. I mean, doesn’t this sound intriguing ?? Dharma Heathered Jade Green Poly Spandex is stylish, and durable with a soft hand and wicking treatment, fast recovery, and great stretch.  This fashion-forward color has cationic yarns used to create vibrant colors, an ultra-soft hand with excellent moisture wicking management. These high performing qualities make this fabric perfect for yoga apparel, leggings, or any activewear garment.

I got the Jade Green for a top and the Light Grey for a pair of leggings to go with. I was really curious how this same fabric base would act for both a top and leggings.

For the top I picked a pattern I have used a few times, the Tie Back Tank from Greenstyle Creations. Since I’ve made it several times, I was familiar with the fit and felt it would give me a good comparison for this new fabric base.

For the leggings, I chose the Sundial Leggings. I purchased the Sundial leggings when they released, but hadn’t had a chance to sew them up til now. I decided to do the, double crossover waistband.

This fabric was a perfect fit for leggings. It has great stretch and recovery, and it feels really nice on. So nice and smooth, I almost feel like I’m not wearing anything. Since it has such great recovery, the double waistband gave me a lot of tummy support, but I’m not sure how much I will like that when I have a tummy flare. I also noticed that my machine didn’t like the 7 layers in the front.

Using this fabric for the tie back tank, the first thing I noticed was that the fabric had less drape than my usual picks for this top. That translated in a stiffer fit, and a tentish look when worn untied. Once tied up, it looked nice, and the binding was super easy to do with this fabric. I will definitely wear this for workouts and walks, as the moisture wicking feature will be a huge plus.

I really think this fabric would be best suited to a fitted t-shirt, tank top, or sports bra, over a top that needs some drape to keep it from feeling boxy. I’m hoping I have enough scraps left from my leggings and tank, to make myself a sports bra so I can see.

The Dharma is available in 6 colors, and they are all so pretty!

The Tie Back Tank , one of my favorite summer tops, has a low or high neckline, binding or bands, and a racerback or full back. I did the low neckline, binding, and racerback options on mine.

The Sundial Leggings have a V shaped waistband, that can be single or double. It has no side seams and are available in capri or full length. I did the double waistband in the full length, with 1″ added for my height.

This post may contain affiliate links. This means if you make a purchase through that link, I may get a % back, at no additional cost to you. Thank you for supporting my sewing ๐Ÿ’•

Honeycomb continued – My first sports bra

Something I have wanted to do for a long time was make my own bras. It has always seemed intimidating and I’ve never had the time to sit down and really put the research into it, I felt it needed.

I decided that this year would be the year to tackle this and with my gifted fabric and activity levels ( you can read all about that here), now seemed like the perfect time.

I naturally did lots of Facebook searching, asking other sewing friends their favorites, and finally decided on the Power Sports Bra from Greenstyle Creations, for my first.

The Power Sports Bra has several back options, a plain racerback, a keyhole racerback, or a pocket racerback. Plus a strappy cross back or a strappy U back. For my first I chose the strappy cross back, high neckline, and regular coverage cups.

Since I was making a matching set to go with my capri’s, I used the same fabrics. This Teal Honeycomb from Fabmere Fabrics, and some solid black athletic from my stash.

I have no idea why I waited so long. I think y’all have been holding out on me. ๐Ÿคฃ Not only was this a relatively quick sew, but it fit. I totally expected to have to make a few muslins first, nope. I followed the directions and it fit.

Now, I do want to mention. The measurements given for the elastic for my size, were too small, BUT I did as the pattern said, and checked it around me first, at which point I added 2″ to the suggested length.

I also freaked out that the straps were too short when I tried it on, like instructed. BUT after my freakout, I decided to just go with what I had and see. Not only did they fit just right, but once I added the bottom elastic, it held the back down properly. So if you try yours on, don’t freak like I did, it may just need the elastic band before it sits right.

I absolutely loved the strap assembly! Straps can be such a tedious part of sewing, when you have to turn them, but the way you do these with elastic, they were so fast! In fact, I loved it so much, I’m going to use it for other tank patterns I have. Maybe even for the cross cuffs on the strides next time.

I love this bra so much, I’m even going so far out of my comfort zone, I’m practically jumping off the cliff here, and sharing pictures of the completed set on.

I pulled out a pile of athletic fabrics I had been saving, and ordered some more elastic, and I can’t wait to make another set.

The Power Sports Bra is available in both women and girl sizing.

This post may contain affiliate links. This means if you make a purchase through that link, I may get a % back, at no additional cost to you. Thank you for supporting my sewing ๐Ÿ’•

New additions & A Fabric godmother

We recently (the week before Christmas) got a puppy and with his addition, we have been getting out more for walks with short running periods the past few weeks. He is almost five months old now and the walks have been much needed to tire him out in the evenings. With my health issues, I usually can’t do much of either, but I have been utilizing my recumbent bike and working on my leg and heart strength, and as a result I’ve been able to keep up with him. As a little, young puppy, he can only go for short periods while he is growing, which is perfect for my body as well.

When we started taking him out, I realized that I was grabbing the same athletic top, leggings, and bra repeatedly. AND of those three, only one was made by me. Insert shocked face. In my mostly me made wardrobe, I have neglected true athletic tops and bras. To be honest, the whole bra topic makes me nervous, but at the beginning of this year, I decided to cross that off my list and so here we are.

Baby steps y’all. I decided to tackle a matching pair of capris first.

The fabric I decided to use for this set, was a surprise that arrived at my house a few weeks back. It is this gorgeous teal, honeycomb texture fabric from Fabmere Fabrics. I still have no idea who my fabric godmother is, but they sent me one yard of the teal honeycomb and one yard of the olive green honeycomb. With only having a yard I mulled over how to best utilize it. After much debate, I decided to go with the Stride athletic tights from Greenstyle Creations. It has a really great insert piece that allows for just this type of fabric usage. Since I’m too tall to get full length leggings from a yard, and with our warming weather, going for the capri length was perfect.

I decided to try out the optional cross cuff and waistband pocket on this version as well. I have made several pairs of the stride tights in the past, and love the fit. That pair of leggings I was repeatedly grabbing for our puppy walks? Strides.

I really wanted the teal honeycomb to pop so I used some black athletic from my stash for the rest of the leggings.

If you follow me on instagram, you probably saw a few of my recent posts sharing my sewing frustration with sewing these cross cuffs. The cuffs themselves were not difficult, but I messed up and did a step out of order on the cuff straps. On take two, my coverstitch went back to being difficult. So for take three, I went off course and instead of doing the cuff straps as the pattern instructed, I just cut my strips (3/8″ wide) out of the black fabric and omitted the clear elastic or the folding and topstitching.

I was having an off sewing day, so the cuff directions seemed harder for me to follow than I expected. I did use my trusty wash away wonder tape on them, which was a huge help. You can see it all on this time lapse video I made, including the changes I made to the straps.

Now to make the matching bra and cross that off my list. The bra has been made and you can read all about it here, later today.

This post may contain affiliate links. This means if you make a purchase through that link, I may get a % back, at no additional cost to you.